
Retrieve and update the latest order data from Dutch Valley or Walnut Creek:
1. Open Vendor Catalog
-
In the Vendors/Mfg screen, locate Dutch Valley or Walnut Creek.
-
Click View Vendor Catalog.
.png?cb=9cab0857f2f4bd6ae9f8382534b9f2c2)
2. Connect and Retrieve Item Updates
-
When prompted, click Yes to connect and retrieve the latest item updates.
-
3. View Recent Orders
-
Once updates are complete, click View My Most Recent Order to see items from your latest order.
-
If you don't see all your items or want to view a broader range:
-
Set a date next to View All Items I Have Purchased On or After.
-
Click the link to view all matching items.
.png?cb=7086b3f7fb50bc8bff645b1b7016be0a)
4. Add or Merge Items
-
Click Add/Merge Items.
-
If prompted about new or replacement items:
-
Select desired items, assign a Department, Category, and Item Type (e.g., Non-Inventory).
-
Select a Manufacturer to be used If no Manufacturer is provided for the item by the vendor catalog.
-
Check Create Case Items if the item will be sold both individually and by the cases.
-
Click Add Items and Close, or Add Items to select more for another department/category.
Note: Clicking Use Vendor Categories will import all vendor-defined categories into StoreLIVE!.
.png?cb=a91646183e326a096900cbcb799335ce)
5. Review and Update Costs
-
On the Price/Cost Change screen:
-
Click the New Cost column to sort and bring cost-changed items to the top.
-
Confirm or edit each New Cost, then click Save.
Tip: Click Enable Simple View to hide less relevant columns.
.png?cb=1f2dd9a89bba254ba6e6afb4611a757a)
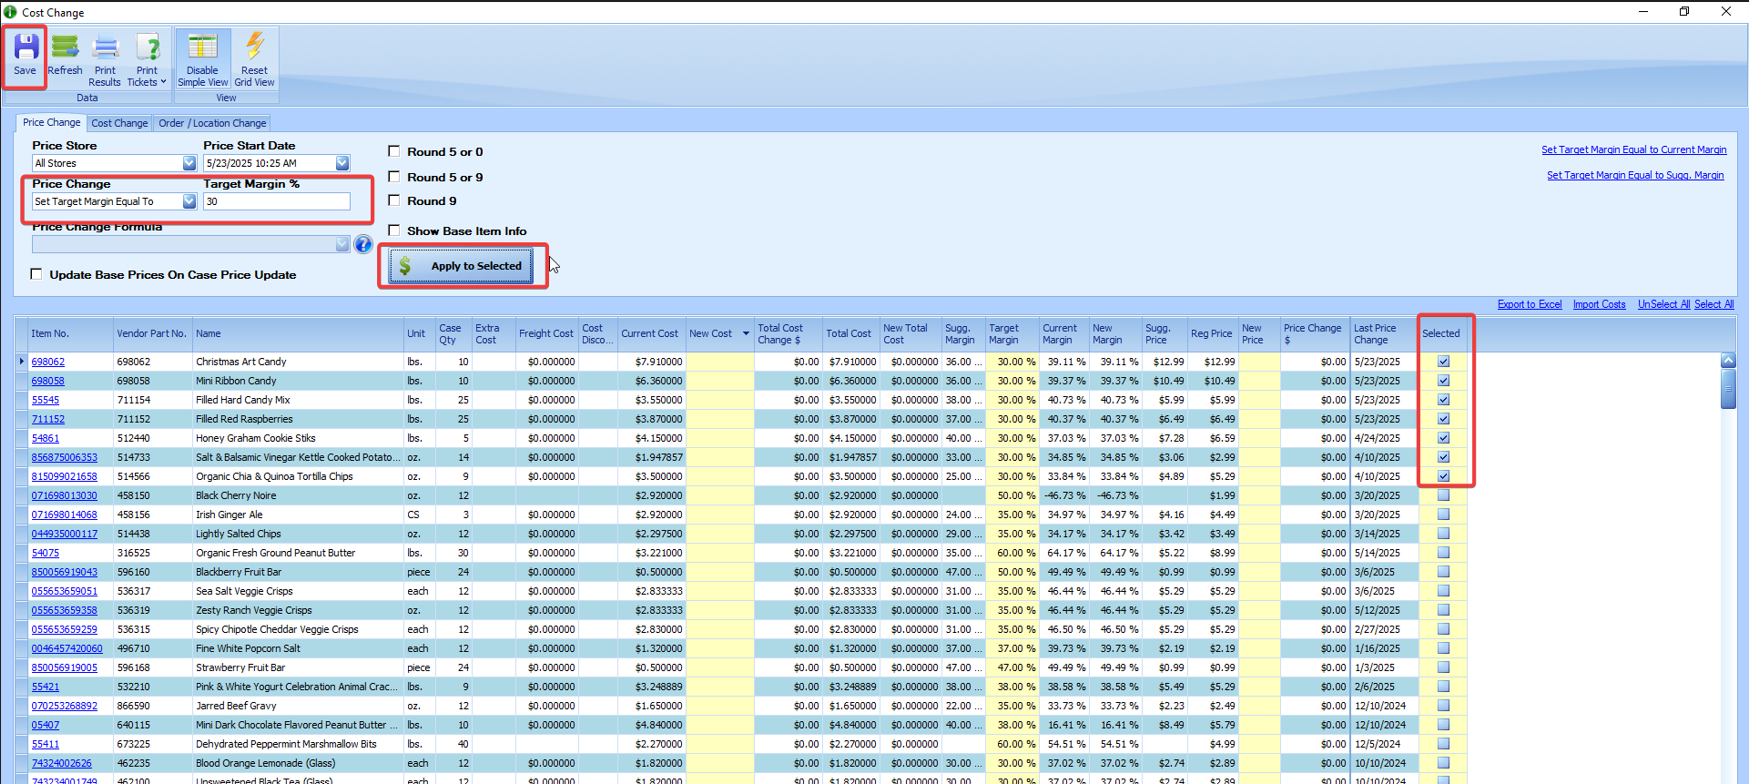
6. Set Target Margins
-
Set the Price Change dropdown to Set Target Margin Equal To.
-
Enter your target margin % in the Target Margin % field.
-
Select items, click Apply to Selected, then click Save.
7. Update Selling Prices
-
Use the Selected column to choose items with cost changes that need price updates.
Tip: Sort by Current Margin or Last Price Change to find priority items.
-
Set Price Change dropdown to Update Price Based on Formula.
-
Select a pricing formula (hover over the blue “?” for formula details).
-
Click Apply Prices to Selected.
8. Finalize Changes
-
Review prices in the New Price column. Edit manually if needed.
-
Click the Save icon to commit the new prices and costs. This will update the item costs, and apply any new selling prices.
-
Close the Cost Change screen and exit the Vendor Catalog.

Additional Tips
-
Run the New Items Report (under StoreLIVE! Reports) to see recently added items.
-
To review and print shelf labels for items with price changes,
-
Sort by Last Price Change and Select the items with recent changes
-
Click Print Labels
-
Common Steps For Downloading Dutch Valley & Walnut Creek Updates and Processing Cost Changes