
StoreLIVE! not only allows for label printing of item ticket labels from within several various tools throughout the program, but also allows the use of numerous fonts, styles and custom layouts.
Printing Labels
Printing Tickets using Item Maintenance
In the Item Maintenance window ticket printing is accessible through the two buttons in the menu bar.
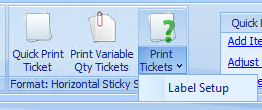
The Quick Print Ticket button allows one ticket to be printed when clicked with the current price and current label settings being used automatically.
Alternately ‘Print Tickets’ can be used to print multiple tickets at once, or to adjust the settings or pricing used.
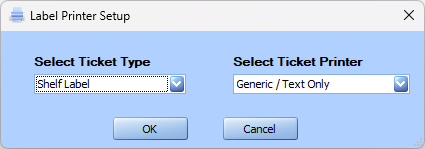
The Label Setup button can be used to change the format selected for the ticket if a different formatting needs to be used. Additionally, in the ‘Select Ticket Printer’ dropdown you can change which device is setup to print the tickets. To add a Ticket Type to the ‘Label Printer Setup’ options please refer to the Label Settings section.
from the Item Locator – Print Labels for Multiple Items
-
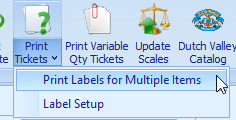
Select the down arrow that appears beside the Print Tickets button and choose Print Labels for Multiple Items.
-
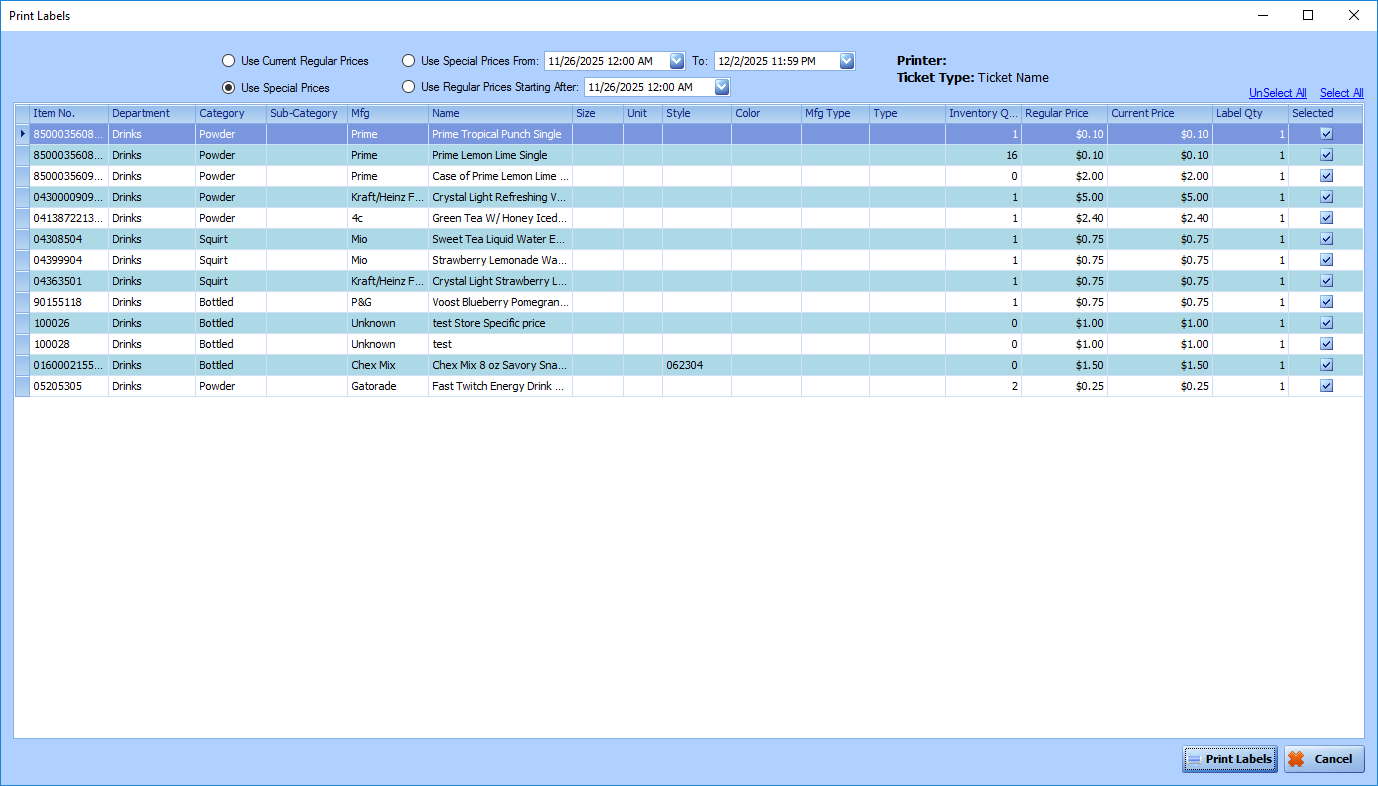
In the window that opens, you can select the items you wish to print. (Click “select all” to select all of them.)
-
You can also change the quantity to print of individual tickets.
-
Select which prices you want printed on the label.
-
Select Print Labels at the lower right-hand corner of the window.
Printing Tickets during Receiving
There are a few different options that can be selected to print out item tickets while receiving. These options are displayed as a section of buttons in the toolbar across the top of the window.
Auto Print Ticket – This is a unique ticket printing option specific to Receiving. This button acts as an on/off toggle. While this button is ‘on’, the tickets for each item will automatically be printed as they are received. The price automatically defaults to the current price in the system. If prices need to be manually adjusted do not select the Auto Print Ticket option.
Quick Print Ticket – This button works similar to the Auto Print Ticket button, but instead of automatically printing each ticket, this button prints out a single ticket for the current item. The price automatically defaults to the current price in the system.
Print Ticket – Unlike the Quick Print Ticket button, this allows you to change the price printed, or the quantity of tickets printed at once.
Print Tickets Dropdown – If you select the down arrow beside the Print Tickets button, you will be presented with these two options.

Print Labels for Multiple Items – A window will open, and you can select more than one item to print. You can choose select all or manually select certain items to print.
You can also change the number of items to print more than one ticket. You can do this for individual tickets.
Label Setup – This button can be used to change the format selected for the ticket if a different formatting needs to be used. Additionally, in the ‘Select Ticket Printer’ dropdown you can change which device is setup to print the tickets. To add a Ticket Type to the ‘Label Printer Setup’ options please refer to the Label Settings section.
Accessing Label Settings
-
Click Settings in the StoreLIVE! Main Menu.
-
Select the Label Setup tab in the Settings window

This is where new label formats can be setup, labels can be activated or deactivated throughout the rest of the program, or an existing label format can be edited.
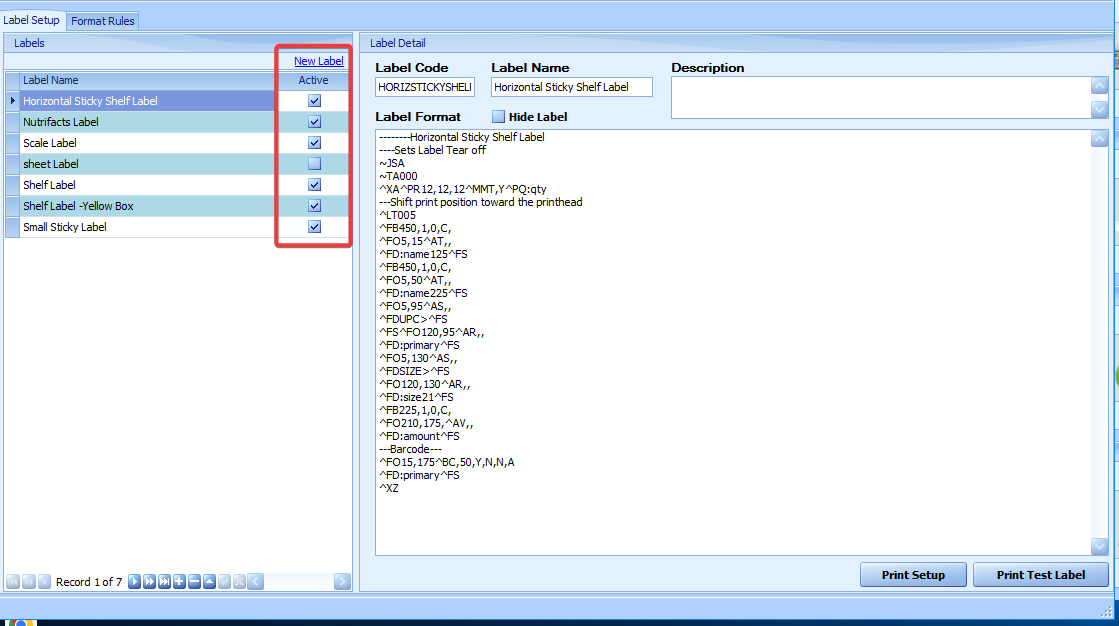
Under the Labels section, there is a table with a list of all the labels currently configured. New Labels can be added by clicking the ‘New Label’ link at the top of the section. Currently existing labels can be activated or deactivated by checking or unchecking the boxes under the ‘Active’ column. A specific label can be selected either by clicking on the name of the label in the list, or by using the Record selection buttons at the bottom of the table to scroll through each label. Once a label is selected the details of that label will be displayed in the Label Detail section.
Label Code - Unique identifier for this specific label. No two label codes can be the same.
Label Name – Name given to the label throughout the system.
Roll Label Setup and Formatting
Roll labels are the labels which come in rolls to be used in the smaller label printers (when compared to most conventional printers). Roll label printers print out individual tickets which is especially useful if a ticket is to be printed every time an item is received. Roll Labels are the more common type of label printing.
Label Format
The Label Format section contains coding that specifies specifically how the label will print out. StoreLIVE! supports many different types and brands of printers, but the label formatting for all the Roll printer labels are setup in the same way in this section using a label coding language known as ZPL (Zebra Programming Language). While this manual will touch on some aspects of formatting using this language, specific questions about the ZPL can be directed to the manual found here.
ZPL Sample Code
This section will explain some of the specifics of editing the label formatting as well as what some of the more common ZPL commands do. The following is a sample label format that could be used in StoreLIVE!.
~JSA^XA^PR12,12,12^MMT,Y^PQ:qty
^FO280,10^ATR,,
^FD:name121^FS
^FO240,10^ATR,,
^FD:name221^FS
^FO185,10^ASR,,
^FDSIZE>^FS
^FO150,10^ASR,,
^FDUPC>^FS
^FO185,120^ARR,
,^FD:size21
^FS^FO150,120^ARR,,
^FD:primary15^FS
^FO180,240^AVR,,
^FD:amount^FS
---Barcode---
^FO100,95^BCR,50,Y,N,N,A
^FD:primary15^FS
^XZ
Common code components
--- Comment that is used for labeling purposes; anything following this is ignored by the program
~JSA – Tells the printer to first print the label and then feed it out to prepare for printing the next label.
^XA – Signals the start of the label code
^XZ – Signals the end of the label code
^PR – Stands for Print Rate, this is the speed at which the labels are printed
^MM – This is the print mode; MMT specifically is used to indicate that the label will be torn off once it is printed.
^PQ – Print Quantity determines how many labels will be printed
^FO – Stands for Field Origin, this is the starting point for this field on the label. Accepts both X & Y coordinates, but defaults are both 0 if missing. ^FO280, 10 means it will start 280 dots (or pixels) in and 10 dots down.
^Afo, h, w – settings used to determine font. F portion determines the font used. T for instance is Times New Roman. O is for the orientation, N is for normal orientation, R is rotated 90 degrees, I is inverted (180), and b is 270 degrees. H and W are the height and width of the font.
^FS – Field Separator, signals the end of the current field, anything following ^FS will start a new field or command.
^FT -An alternate way to dictate Font size as well as styles.^ FTTimes New Roman, 8, B for example will type in Times New Roman Font with a size of 8, and with Bold applied. I and U can also be added to the end for Italics and Underline.
^FW – Sets the default orientation, this can be used in place of the orientation in the ^A command. Once a ^FW orientation of Normal (^FWN), Rotated (^FWR), Inverted (^FWI) or Bottom-up, (^FWB) is set, this default will automatically be used unless specified otherwise or until another ^FW is used.
^FD – Field Data, this is where the data to be printed is inserted. Within StoreLIVE! variables are used to easily transfer in the information from a specific item into these field data locations.
Variables
In addition to these common terms in the StoreLIVE! example you will notice there are words follow by a “:” (colon). These are StoreLIVE! variables to easily transfer in the information for a particular item. Each variable correlates to a piece of information stored within StoreLIVE!
|
Variable Name |
Explanation |
|
:name1 |
The first line of the name of the item |
|
:name2 |
The 2nd line of the name of the item, if there are two lines |
|
:primary |
UPC or SKU # used to identify the item |
|
:amount |
Price for the item |
|
:curdate |
Current Date |
|
:dept |
Department of the item |
|
:size |
Size information for the item |
|
:style |
Style information for the item. |
|
:upc |
the item’s UPC code (if different from the primary). |
|
:autosku |
A type of UPC where each item is automatically assigned the next number in a list of automatically made SKUs. |
|
:qty |
Quantity of tickets remaining |
|
:vendorname |
Name of the item vendor |
|
:vendorno |
The vendor’s item number |
|
:ing |
Item Ingredients |
|
:storemessage |
Item's Store Message |
|
:nutrifacts |
Nutritional Label You can add options after the nutrifacts. Seperate options by a comma. The order of options is necessary. Options: 1,2,3 1: Y or N (border or no border)
Example of options: :nutrifactsY,D,P |
|
: bestusedbydate |
Current date plus number of use by days |
|
: sellbydate |
Current date plus number of sell by days |
|
:warehouseloc |
The item's primary warehouse location |
|
: secondarywarehouseloc |
The item's secondary warehouse location |
|
:color |
Item color |
|
:category |
The item's category |
|
: julcurdate |
Current date in Julian format |
|
: custname1 |
Customer name (for customer mailing labels) |
|
:custname2 |
Second line of customer name |
|
:address1 |
Customer address |
|
:address2 |
Customer address line 2 |
|
:city |
Customer address city |
|
:state |
Customer address state |
|
:zip |
Customer address postal code |
|
:phone |
Customer primary phone number |
|
: mobilephone |
Customer mobile phone number |
|
: customercardprimary |
Customer's primary card number |
|
:calcamount |
Calculated Price amount (Price * Sale Qty) only applies to variable qty labels |
|
:description |
Item Description |
|
:itemoptions |
Invoice label: Prints all Item Options for an item on the invoice. Puts each new Item Option on a new line, therefore, should always be at the end of a ticket. This can make it more difficult to create a label format, but once positioned correctly, should work well.
|
|
:labelXXXX |
A nested label format, with XXXX being the nested label format's code. For example, if you want to nest a label format with a code of SMALLSTICKY, you would put :labelSMALLSTICKY in your parent label format. The nested label format will get the same variable values that the parent label format does. This option is only available in versions above 24.76. |
|
:labelXXXXpromo |
The same as the :labelXXXX tag, but instead of just using the format with the given code, StoreLIVE will try to find the promotion(s) that an item is on and then try to find a label format that has the same name as the promotion that the item is on. For example, if the item is on a promotion called "3 for $1.00", the app will try to find a label format named "3 for $1.00" (case-insensitive). Note that it is checking the label format name, not format code like it does with :labelXXXX. If it finds one, it will use that format for the nested format; otherwise, it will use the format with the code XXXX. This option is only available in versions above 24.76. |
|
:saleqty |
Sale quantity (if coming from a scale, this is the weight) |
|
:scaleunitprice |
Prints the unit price; if the item unit is set to lbs it adds "/lb" to the end of the price |
|
:standardscalebarcode |
Calculates a 13 digit scale barcode |
|
:standardvarweight |
Sets << ItemNum, SaleQty(5), Price(5) |
|
:usernum |
This prints the user number of the user that printed the label. This is mostly used on Item Lookup when a lot of labels are printed and the company wants a way to see who printed and marked the product. |
After each variable there is a number directly following the variable name. This number is used to truncate (shorten) the information contained by the variable if it is longer than the desired length. For example if “:name110” is used, and the item name was “Strawberry gum” The name would be shortened to “Strawberry” because the y is the 10th letter in the item name.
Format Rules
Format rules defines pricing rules and corresponding display text formats for labels using the variable: formatted price in the label format. When formatted price is used you can set this to replace the price such as $0.33 with 3/ $1.00
