
Ordering
The Purchase Order feature of the StoreLIVE! system allows purchase orders (POs) to be manually created in the system. Also, order amounts can be generated based on re-order stipulations, or the purchasing tool can be used to input order quantities.
Manually entering items and quantities on a Purchase Order (PO)
-
Click the Purchase Orders button on the StoreLIVE! Main Menu.
-
After the Purchase Order Locator screen appears, click the “New PO” button.
-
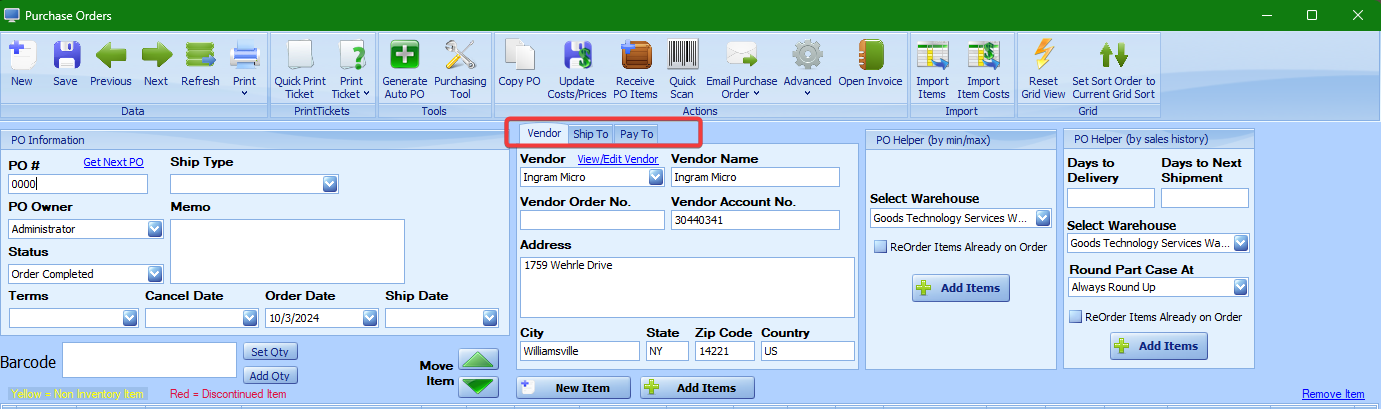
The Purchase Orders window will display.
-
In the PO # field, either manually enter the PO number, or click the Get Next PO link to have the system automatically assign a PO number.
-
Select a vendor from the Vendor dropdown. The Vendor Name and address will auto-fill with the vendor’s information. These fields can be updated here if needed.
-
Click the “Ship To” tab, and verify the “Ship To Warehouse” is set to the correct warehouse. (This will default to the warehouse assigned to the user.)
-
The information under the “Pay To” tab will default to the selected Vendor. This can be changed if the “Pay To” information is different than the Vendor information.
-
Choose an estimated Ship Date for the order, and optionally, a Cancel Date.
-
Select the “New Item” button if you wish to create a new item.
See “Chapter 2: Creating New Items” for more details.
-
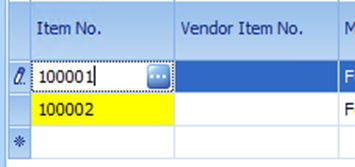
To start entering items onto the PO, go to the Item No. column at the left of the table and start entering an item number.
-
As you start typing the Item No., a dropdown will display showing available item numbers. You can then select an item to enter it or type the whole number in and then press Tab.
-
Optionally, you can click the “…” lookup button to open the Item Locator screen and select an item by double-clicking on an item in your search results. You may need to select the empty Item No. box before the “…” button appears.
-
After the Item Number is entered, the item’s information will display on the PO. The warehouse will default to the Ship To warehouse on the order, and the cost will default to the vendor cost that is set up in Item Maintenance.
-
Enter the order quantity into the “Ea. Qty” field.
Note: It is important to accurately track the status of each order. The system relies on the order status to determine items that are on order. When a POs items are all received, the system will automatically change the order status to “Order Completed.” However, incomplete orders should manually be changed to “Order Completed” after the order is received.
-
When you finish adding items to the PO and are prepared to submit the order to the Vendor, change the Status of the order to “Ordered” by choosing this option from the Status dropdown.
-
Click the Save icon to save changes.
-
To print the Purchase Order, click the print button on the toolbar. This will load the PO in a print preview window, and the order can be printed by clicking the print icon, or it can be exported by clicking the disk icon
Note: When an item is added to a purchase order, the quantity will default to the Min Order Qty set for that item under the Inventory tab.
Using the Add Items feature

Multiple items can be added to the Purchase Order by using the “Add Items” button. Clicking this button will launch the Item Locator, and the Item Locator criteria fields can be used to search for a list of items. Note that the Vendor name and Items will be entered by default when using this feature.
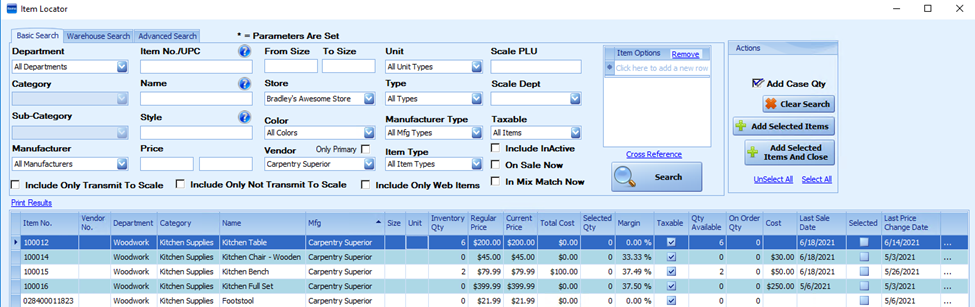
Check the “Selected” box next to each item that should be added to the order. Then, clicking the “Add Selected Items And Close” button will add the items to the order with a quantity equal to the Minimum Order Quantity set for that item and take you back to the Purchase Orders screen. After the items are on the order, the quantity ordered can be updated if you want to order a different amount.
Automatic Purchase Order Generation
The StoreLIVE! system can automatically add items to a purchase order based on inventory levels and reordering parameters using the “Generate Auto PO” feature.
Background:
Several criteria must be met before an item will be added by this feature. The criteria are as follows:
-
In Item Maintenance, under the item’s Vendors tab:
a. The item’s vendor information must match that of the vendor on the PO.
b. The “Auto Order” check box must be checked

a. The Min Order Qty and the Order Multiple Qty under the Inventory tab are also included in the calculation for the order quantity. See Inventory Information on page 2-28 for specifics on these fields.
-
Under the item’s Inventory tab:
a. Minimum and Maximum order quantities must be set up
b. Note that Minimum and Maximum order quantities can be set up by date, allowing quantities to be adjusted for seasonal items.

-
The calculation for ordering inventory works as follows:
a. When the current warehouse quantity of an item falls below the “Wareh. Min,” the system will subtract the current warehouse inventory quantity from the “Wareh. Max.” This becomes the order quantity. In other words, an item will be re-ordered up to the current maximum when the inventory falls below the current minimum.
b. If a minimum order quantity is set at the vendor level—Min Order (ea.) under the Vendors tab—the system will check to verify that the PO order quantity meets or exceeds this amount. If it does not, the item will not be added to the order.
c. If the minimum order quantity is satisfied, and the “Case Qty” under the Vendors tab is not set to 1, the system will round the number to the next lowest order multiple. As an example, if the quantity to order was 15, but the “Case Qty” was set to 6, the system would round the order quantity to 12.
Auto-Adding Items
To generate an automatic purchase order:
-
Follow the normal steps to manually create a purchase order. However, instead of manually entering items and quantities, click the “Generate Auto PO” button on the toolbar.
-
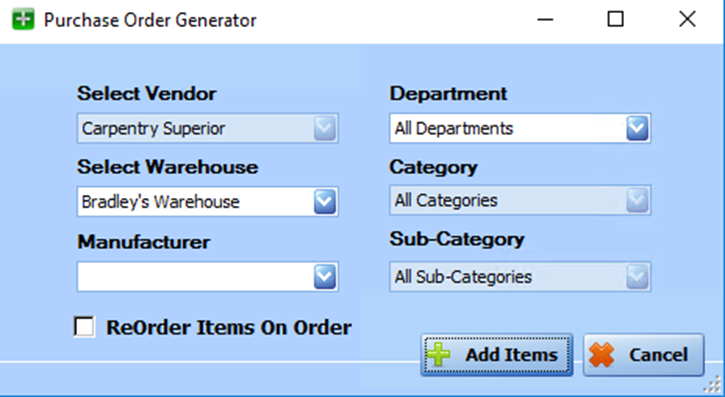
The Purchase Order Generator window will appear.
-
Select the Warehouse for which you are ordering.
-
You can optionally narrow the selection further by selecting a Manufacturer, Department, and/or Category.
-
If you check the “ReOrder Items On Order” box, existing quantities that are already ordered will be ignored. Otherwise, quantities on order will be added to existing inventory before the quantity for the new order is calculated.
-
Click the “Add Items” button. There may be a pause as the system generates the items. Once the generation is complete, the window will close, and the Purchase Order will display the generated items.
Using Case Items with Automatic PO Generation
Automatic purchase order generation is based on minimum and maximum order quantities for items of type “Inventory Item,” and by default, this is the item that will be added to the purchase order.
Sometimes it may be necessary to order in different units of measure than the actual Inventory Item. Case items allow for this functionality.
For example, paper towels may be stocked by the roll, but the vendor may require that orders are placed by the case. In this example, assume that a case is a quantity of 12. The vendor requires that you order 1 case, not 12 individual rolls (each). When using automatic PO generation, by default, the “roll of paper towel” (i.e. the “Inventory Item”) would be added to the PO. However, what really is required is that the “case of paper towel” be added to the PO. Using the Vendor “Order Item” field, you can specify that a “case” item should be added instead of the “inventory” item, and in this example, the result would be the “case of paper towel” being ordered instead of the “roll of paper towel.”
To setup an item so a “case” item is added to the Purchase Order instead of the “inventory” item:
-
Create a Case item that is linked to the “inventory” item being ordered.
-
Add Vendor information to the case item, such as cost, vendor part number, required quantities, etc.
-
Load the inventory item in the Item Maintenance screen.
-
Click the Vendors tab.

-
In the Order Item field of the vendor that the item is being ordered from, click the drop down, and select the “case” item from the list.
Note: When using automatic purchase order generation, order quantities will be rounded to the next lowest case quantity. For example, if the case quantity was 12, and based on the inventory items’ minimum and maximum reorder settings, an order quantity of 26 would be required; the system will round this number to 24 and order 2 cases.
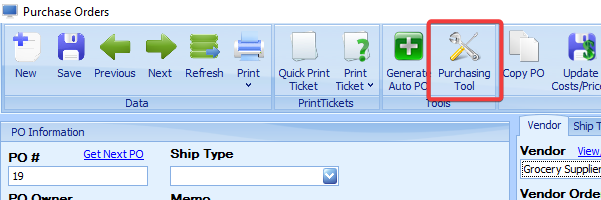
Purchasing Tool
The purchasing tool allows a user to view items with sales details and enter purchase quantities directly onto the purchase order. It is useful when making decisions on the quantity to purchase.
To utilize the Purchasing Tool
-
Create a new purchase order, or open an existing purchase order.
-
Enter a Purchase Order Number and select a vendor.
-
Click the “Purchasing Tool” icon in the toolbar header.
-
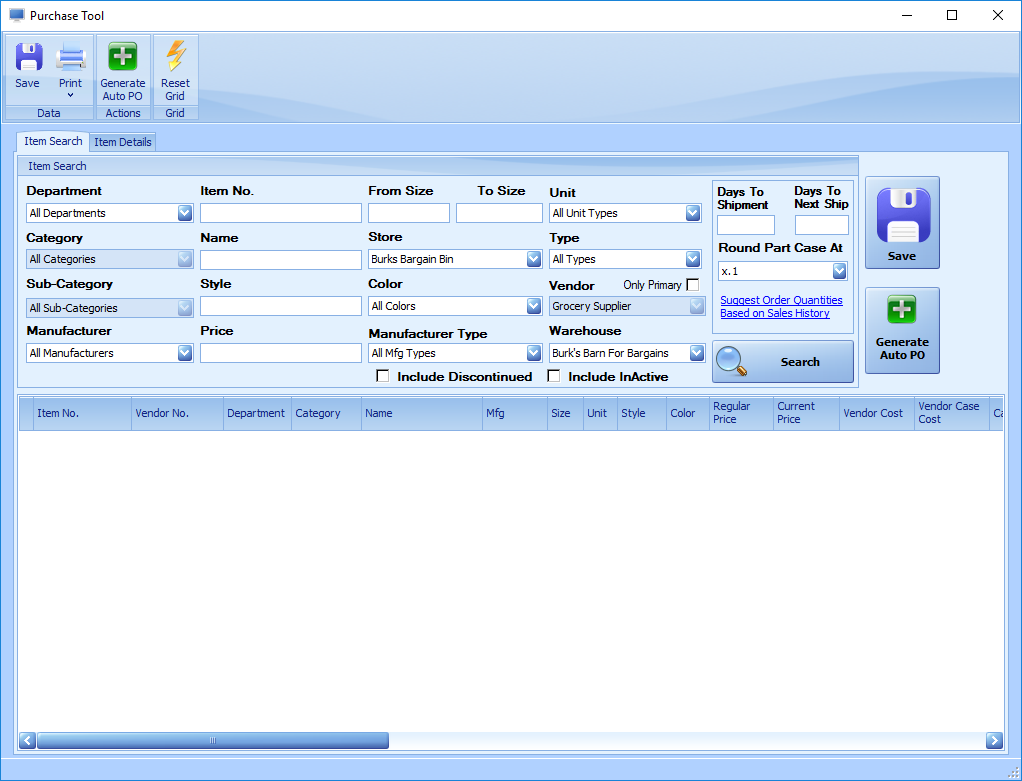
The Purchasing Tool screen will load, and will display an Item Search screen.
-
Enter criteria, such as “Department” or Manufacturer and click “search” to display a list of items that you may want to order
-
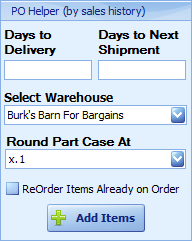
Enter the number of days until this shipment will be received and the number of days until the next order will be received.
-
Select the point it should round up to the next whole case.
-
Click 'Suggest Order Quantities Base on Sale History' This will fill the PO Case Qty and PO Qty (Yellow Columns) with the suggested order quantities.
-
The values in these fields can be manually changed.
-
There are columns to show past weeks, months and year sales to aid in making ordering decisions.
-
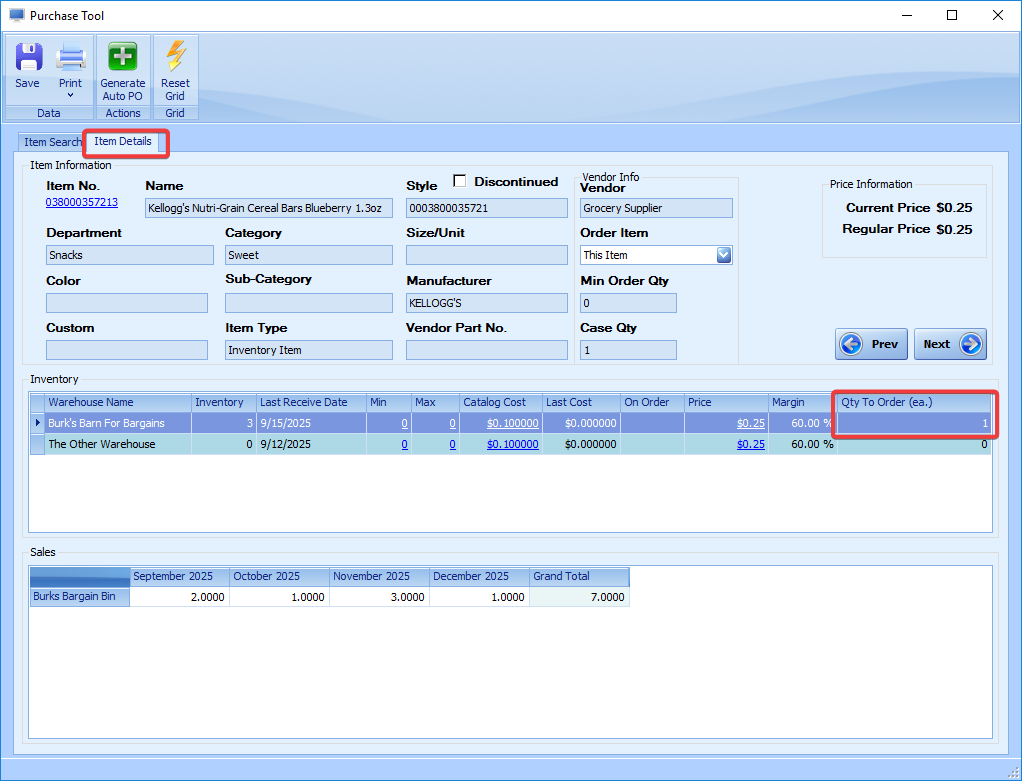
Double-click the first item in the list. You will be then be taken to the “Item Details” tab where you can view more details about the item.
-
The Qty to order can be modified here as well.
-
Use the Next and Previous can be used to go to the next or previous item in the search list.
-
Once complete switch back to the Item search tab and Click Save to return to the Purchase order screen. The quantities can by modified here as well.
Be sure to verify that the system is ordering the proper each and case quantities
There is a simplified version of the Purchasing tool on the Purchase Order screen. This tool suggests order quantities the same way. It suggests Qtys for all items from the PO vendor.
Notes:
The Purchasing Tool uses these steps to suggest a PO quantity: 1. It figures out how long the order would take to arrive (Days to shipment + Days to next ship) .2. Based on that number, it takes the average sales of this year's date range and last year's date range.
-
This year's date range: current date then counts back the amount of days that it will take the order to arrive
-
last year's date range: current date then counts forward the amount of days that it will take the order to arrive
-
If zero sales a year ago last year's date range is ignored.
-
No min/Max calculation
-
It subtracts Current Inventory from the sales determined in step 1-4. This number is divided by the number in a case to recommend an amount to order(note: purchase tool will order the next integer up, meaning that if .1 or 1.3 cases are needed, it will suggest 1 or 2 cases, respectively). keywords: purchase order