
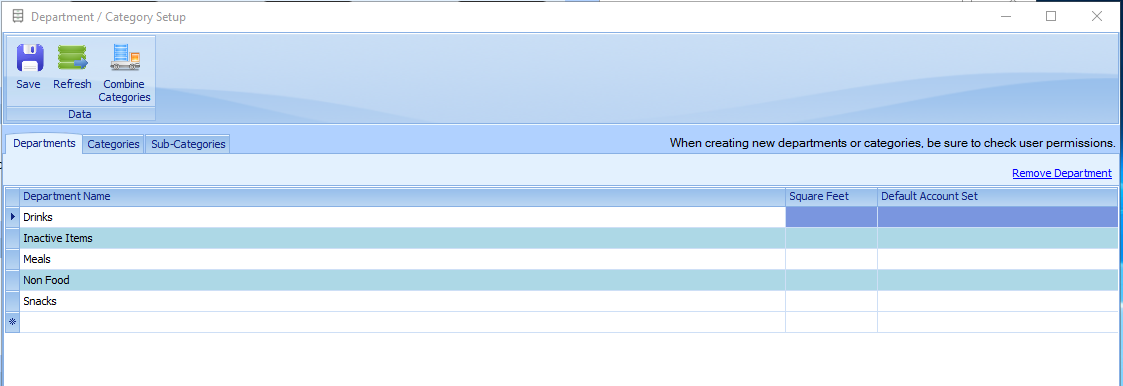
StoreLIVE! allows a Department/Category/Sub Category structure to be setup to manage items. Careful consideration should be given to the setup of this structure, as the departments and category structure is a key component to meaningful sales reports. A recommendation is to keep the number of departments at or below 10.
Accessing Department/Category/Sub Category Maintenance
-
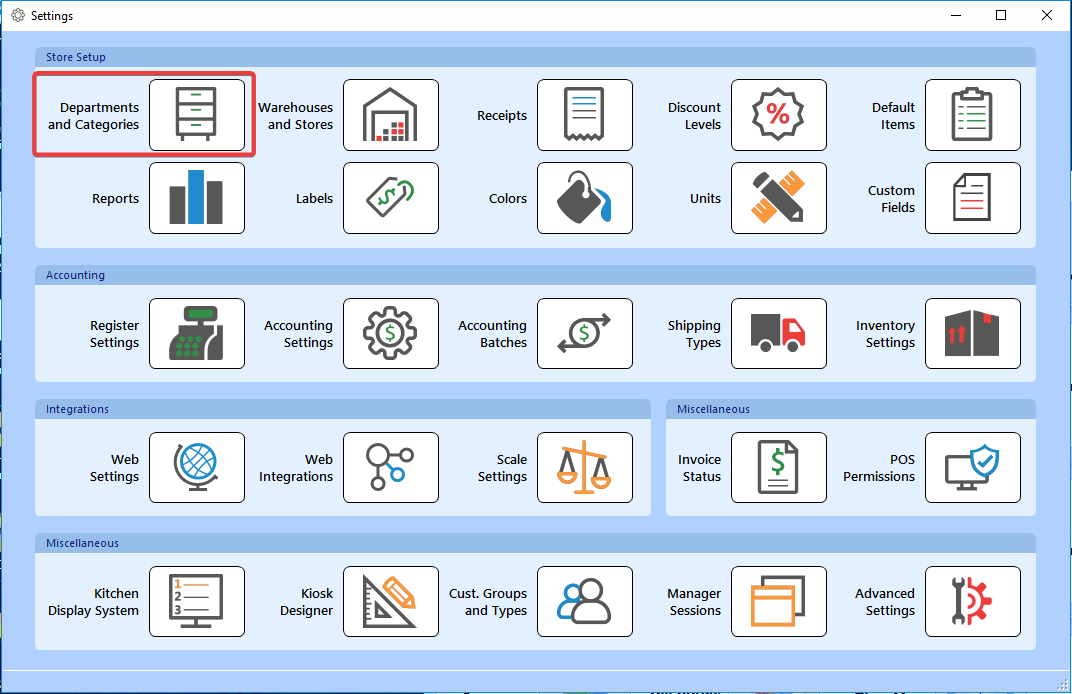
From the StoreLIVE! Manager Main Menu, click the Settings button.
-
Enter your Advanced Password.
-
On the Settings screen, click the Dept and Cat Setup toolbar icon.
Creating/Editing Departments
-
Departments are created by adding new entries and existing departments can be edited on
the Department list on the Departments tab. Note: When a new department is created, it will only be accessible to users who have been granted access to it in User Maintenance/Security!
-
Description of Department Fields:
-
Department Name: Friendly name of the department that is visible to users.
-
Square Feet: The square feet dedicated to the department this is used for reporting purposes
-
Default Account Set: This field is used for syncing with Quickbooks and is documented in a document called “QuickBooks Sync Setup Guide.” Please contact technical support for more information.
-
-
Departments can be removed by clicking a Department entry, and then clicking the Remove Department link. Note that all items in a department must be moved to other departments before the department can be removed.
Creating/Editing Categories
-
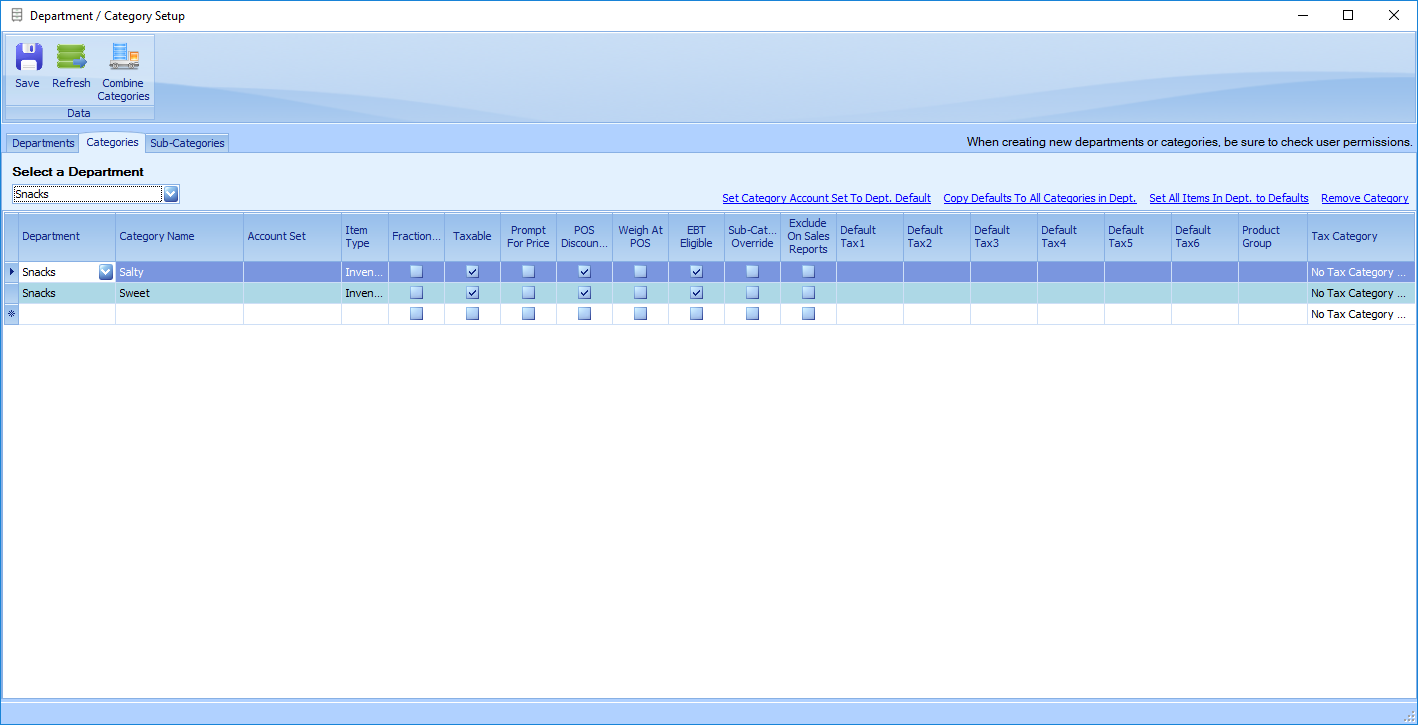
Categories are created and edited on the Categories tab of the Department/Categories/SubCategories maintenance screen.
-
To Add or Edit a Category, first select the Department associated with the Category in the “Select a Department” dropdown list.
-
Category Fields are defined as follows:
-
Department – The Department that Category is assigned to.
-
Category Name – The name of the category.
-
Account Set – If the StoreLIVE! system is integrated with an accounting system, choose an Account Set to control the accounting entries that will be created for transactions that include items assigned to this category. This is documented in a document called “QuickBooks Sync Setup Guide.” Please contact technical support for more information.
Note!: if any of your categories have account sets, ALL categories will be required to have account sets. -
Item Type, Fractional, Taxable, Prompt for Price, POS Discountable, Variable Weight, Food Stamps Eligible, Default Tax 1, Default Tax 2, Default Tax 3 – The default value to assign to new items that are added to this department/category.(See the Item Maintenance chapter for information on these fields)
-
Sub Category Override – When this field is checked, it allows selecting new item defaults at the Sub Category level.
-
Product Group – When StoreLIVE! is integrated with the Plum Store Scale Management software, the value assigned to this field will be transmitted to Plum as the Product Group/Class for all items assigned to this category.
-
Exclude on Sales Reports - When this field is checked, sales for items in the category will by default be excluded from sales reports. This can be useful when certain transactions/items are processed via the Point of Sale that are not technically sales, and should not affect the overall sales amounts when running sales reports.
-
-
When multiple categories exist for a single department, the values for a single category can be setup, and then copied to the other categories by clicking the Copy Defaults To All Categories in Department link. Note that this does not affect the value of the items assigned to the categories. It only assigns the default values to the category.
-
The Set All Items in Department to Defaults link can be used to apply the category defaults to all items assigned to categories in the selected department. This can be useful to apply new values to items, but should be used with caution, as it will override any item specific values that were previously set!
-