The StoreLIVE! Sale Invoices screen allows sales orders to be entered into the system. Sales orders can be converted into sales/invoices by using the Complete Invoice feature. Sales Orders/Invoices are can be used to for sales that require a down-payment, special orders, etc. For the purpose of the is document Sales Orders/Invoices will be referred to as sales invoices or invoices.
Sales Invoice Search
-
On the StoreLIVE! Main Menu, click the Sale Invoices button.
-
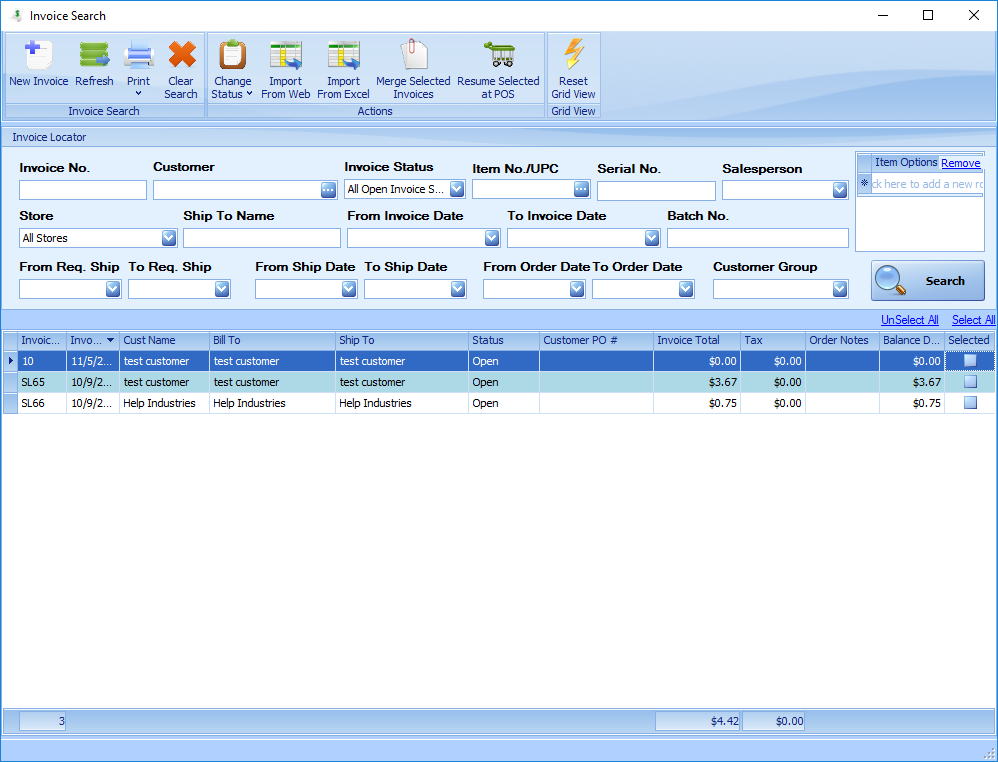
When the Invoice Search screen appears, enter search criteria and click Search to locate an existing invoice. Double click the invoice entry in the search results to view or edit the invoice.
Creating or Editing a Sales Invoice
-
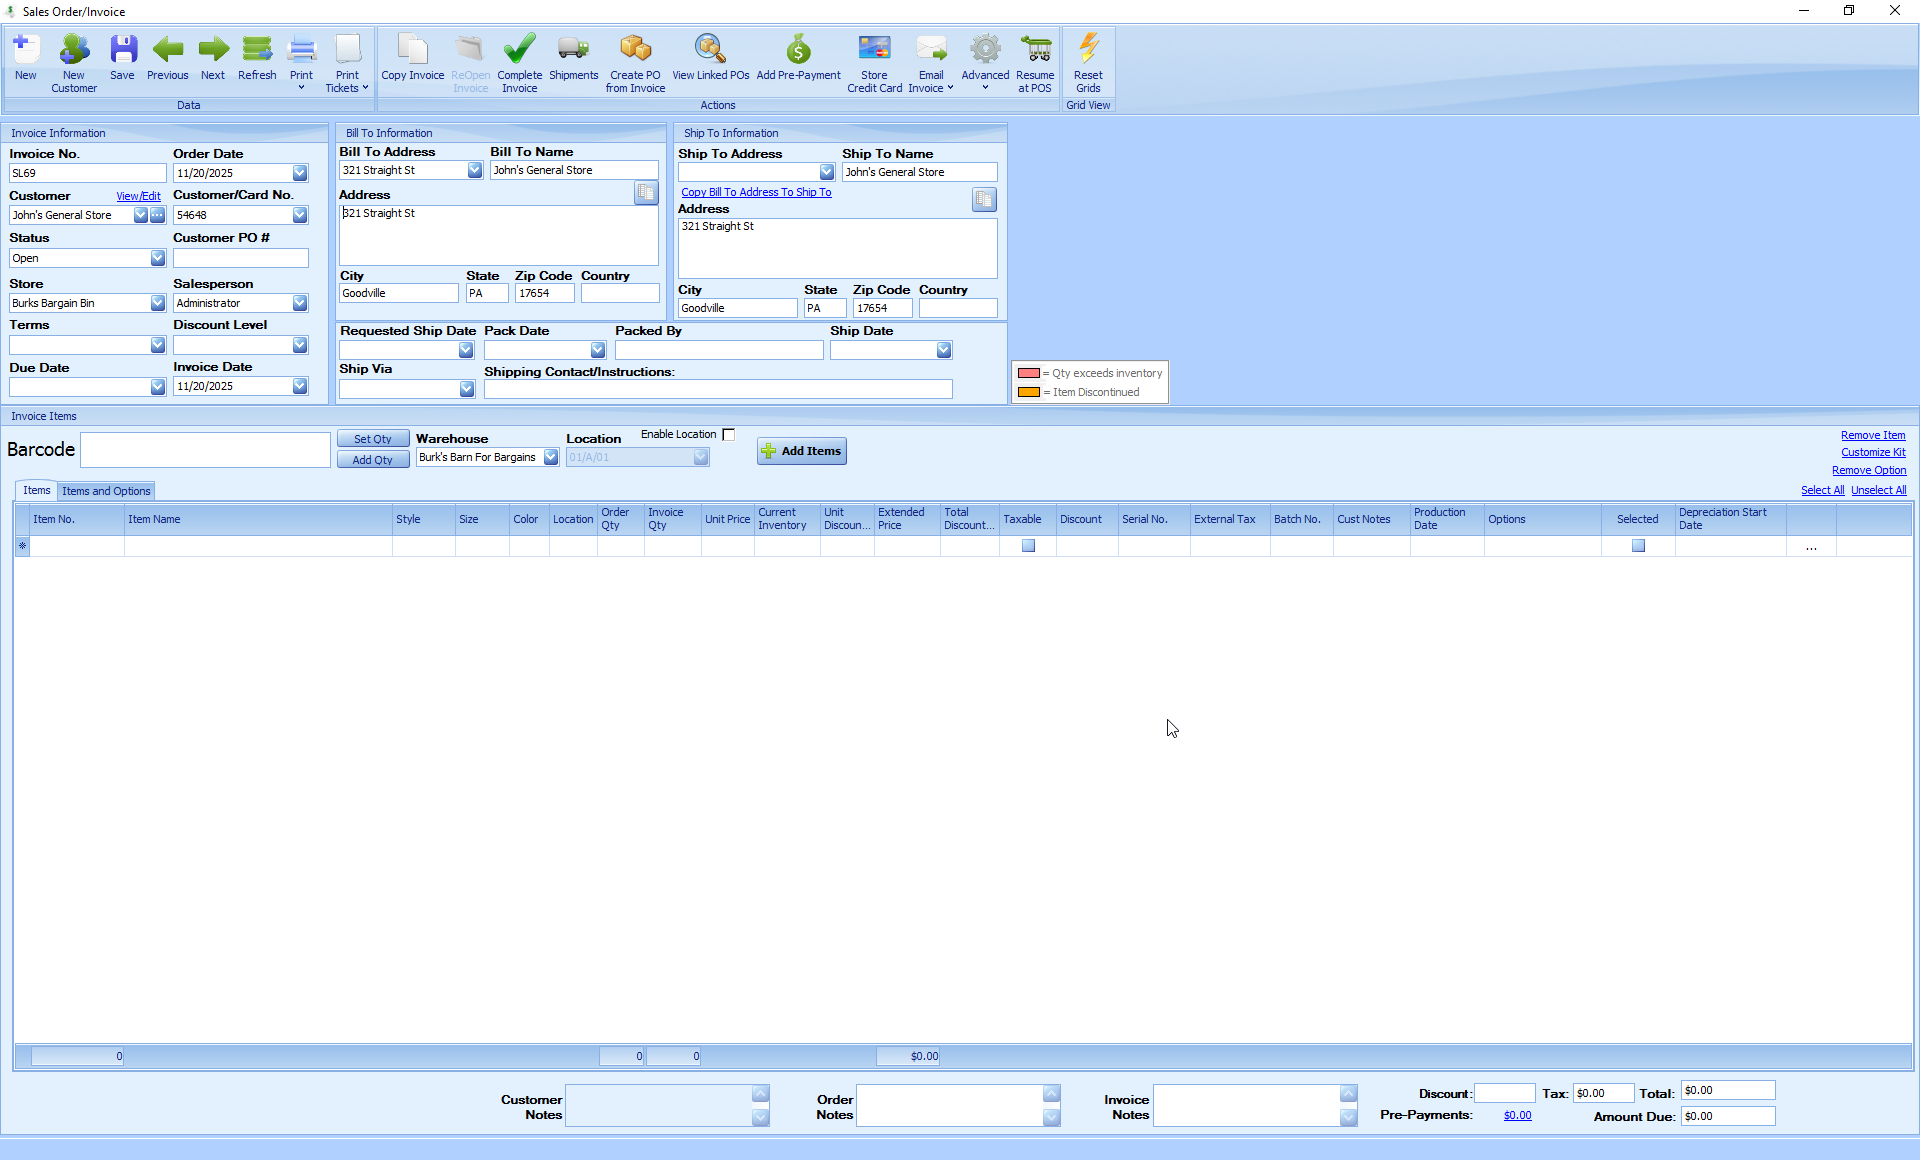
To create a new invoice, click the F1- New Invoice button from the Invoice Locator Screen
-
Invoice No. - The Invoice No. will be auto assigned based on the Starting Invoice No and Invoice Number Prefix applications settings. It can be changed if desired. Invoice numbers must be unique. (The Starting Invoice No and Invoice Prefix are configured in Settings/Advanced Settings/Applications Settings)
-
Order Date - The date the order was placed or started.
-
Customer - Select a customer by clicking in the Customer field and beginning to type the customer name. Alternatively, click the … lookup button next to the Customer field; this will display the customer locator and allow you to search for a customer.
-
Customer Card No. - A customer card number may be selected from the Customer Card No. dropdown. This can be useful to track the specific person who placed the order, if multiple charge account numbers have been issued to a customer.
-
Status - The Status field shows the status of the invoice. These statuses can be customized in the StoreLIVE Settings to match the business processes. Back-Ordered, Canceled, Open, and Closed are system required statuses that cannot be removed or changed. All custom statuses are considered Open. When an invoice is closed it will become a sale and can no longer be edited; the status will then be set to Closed. Canceled invoices are invoices that were started but are not intended to be completed. When an invoice is completed but not all the ordered items are invoiced the system will prompt the user to create an invoice with the status of back ordered.
-
Customer PO# – Field to track a Customer’s PO number.
-
Store - The Store will default based on the user that is logged into StoreLIVE but can be changed if needed. This is store that will receive the sale once the invoice is completed.
-
Salesperson – The Salesperson will default based on the user that is logged into StoreLIVE but can be changed if needed.
-
Terms - The Terms fields will auto-fill from the Terms selection on the Customer record. (When using accounting integration, the terms list will sync from the accounting program. When not using accounting integration, terms may be setup in Settings/Accounting Settings)
-
Discount Level -The Discount Level will default based on the chosen customer but can be changed if needed.
-
Due Date – If set, the Due Date will override the terms to control when the invoice is due. This can be set automatically from Invoice Date by Terms if the terms are configured with a number of days.
-
Invoice date -The Invoice date is the date the sale will be recorded on when the invoice is completed. When using terms, this is also the date the Terms will be based on.
-
Bill To - The Bill To address for the customer will default to the Bill To Address setup in the Customer program. If a specific billing address is not specified, the customer’s default or main address will be used. The address fields can be changed. Changes made on this screen affect this invoice only.
-
Ship To -The Ship To address for the customer will default to the Ship To Address setup in the Customer program. If a specific ship to address is not specified, the customer’s default or main address will be used. The address fields can be changed. Changes made on this screen affect this invoice only.
-
Requested Ship Date - Informational field to allow tracking of the date the items were requested to be shipped.
-
Pack Date – The packing date of the order.
-
Packed By – Enter the person who packed the order.
-
Ship Date – Informational field to allow tracking of the date the items were shipped.
-
Ship Via – If items are being shipped to the customer, the ship method can be tracked by choosing a value from this drop down. (The Ship Method options can be configured in Settings/Inventory Setup Settings)
-
Shipping Contact/Instructions - Informational field to allow tracking of the special shipping instructions.
Adding Items to a Sales Invoice
There are several ways to add items to an invoice.
-
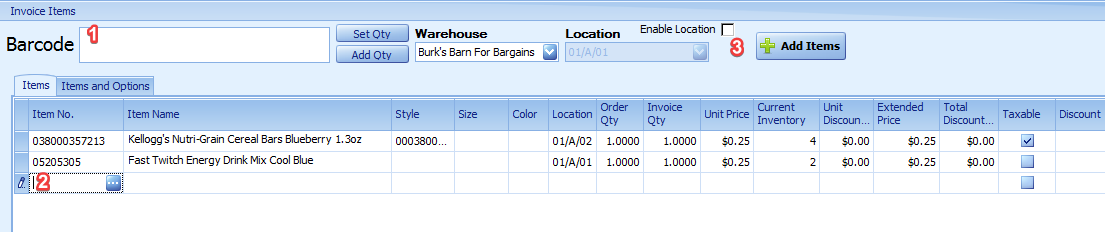
Items can be scanned in the barcode field. Scanning the same item multiple times will change the Ordered Qty.
After scanning/entering an item, the quantity of the item can be changed by modifying the Order Qty. Alternatively. 'Add Qty' can be pressed to add the qty entered in the barcode field to quantity of the line selected. 'Set Qty' can be pressed then the quantity typed into the barcode field will be used for the next item scanned.
-
An item number can be typed in a blank line or click the blue … button to open Item Locator and select one item
-
Clicking the Add Items button will open Item Locator and allow you to locate and add multiple items at once.
The Warehouse and Location fields are the warehouse where the items being sold are located. This will default to the user’s default warehouse. If Enable Location is checked, the inventory location of the items being entered on the invoice from the Barcode field will be set to this location selected in the dropdown field. If the Enable Location field is not checked, the system will use the default location for the item/warehouse. Note that Location can be over-ridden per item if needed.
Invoice Items Information
The following is a description of each column of the invoices items.
-
Item No. – The Item number to be invoiced. This number can be typed into this field, or selected from the Item Locator by clicking the … button that appears when this field has focus.
-
Item Name – The Item Name will default from the name of the item entered in the Item No. field. This field can be modified or more detail added if needed.
-
Style/Custom-Named Field – The Style will default from the Style of the item entered in the Item No. field. This field can be re-named in Settings/Advanced Settings/Default Item Setup/Item Style Label.
-
Size – The Size field will default from the size field of the item entered in the Item No. field.
-
Color – The Color field will default from the color field of the item entered in the Item No. field.
-
Location – The inventory warehouse location the item will be removed from when the invoice is processed and the sale is recorded. (Locations are based on the warehouse selected in the warehouse field. All items on an invoice must be located in the same warehouse)
-
Order Qty – Quantity of the item that was ordered.
-
Invoice Qty – Quantity of the item to be invoiced. This will default to the Order Quantity, but it can be changed if the quantity to be invoiced is different than the quantity being ordered. Note: The user will be prompted to create a Back Ordered invoice the Invoice Qty is lower than the Order Qty.
-
Unit Price – The selling price of the item. This will default to the regular or special selling price of the item that is current at the time the item is added to the invoice. This price will reflect customer group pricing but not a discount percentage applied to the customer or invoice
-
Current Inventory- The current inventory qty of the item if the item is an inventory item.
-
Unit Discount/Markup – The Discount/Markup is the calculate dollar amount to be discounted or marked up based on the discount applied to the item in the Discount column.
-
Extended Price – Calculated total of Invoice Qty times Unit Price minus discounts.
-
Taxable – Checked if the Item is Taxable, unchecked if the item is not taxable.
-
Discount – The discount column will default to the Discount Level set on the Invoice header. However it can be over-ridden on an item level if needed. Discounts can be setup Settings/Stup Discount Levels
-
Serial Number - A serial number can be manually typed into Serial No. column. If the item has Serial Tracking enabled the user will be prompted to select a specific serial number from the inventory listing. You can search for any invoices containing that Serial No. For more information see the section on Serial Tracking.
-
External Tax- The tax calculated by the external sales tax service provider.
-
Batch No./Custom Field – This field’s label can be changed in Settings/Advanced Settings/Application Settings. As shown here, it is named “Batch #.” The Invoice Locator screen will have this field available as a search option when the name/label of the field is chosen. As shown in the picture, any invoice marked with the Batch # “1234” can be found by searching with that number.
-
Cust Notes -The Cust Notes column is for customer and item specific notes. The notes are added on the customer on the Item Notes tab. The notes can be over-ridden or removed if needed.
-
Production Date - The Production Date is used to populate the Production schedule on the Invoice Search screen. This date can be set individually for each line or it can be set for all the lines on the invoice by setting a date from Advanced>Prod. Date.
-
Options - Clicking in the Options field will open a screen to add additional option to the invoice line item. Options can be set to affect the price of the invoice item and are configured on a per item bases. The item options will also be appended to the Item Name. Clicking the Items and Options tab will display an additional item options grid to the right of the screen; this is helpful for users who use a large amount of item options. For more information see the Item Options section.
-
Select- Select multiple items for a function such as Remove Item.
-
Lookup button - Clicking this button will load the item maintenance screen for the item on the invoice line item.
Additional Sales Invoice Features
This section will document additional sales invoice features starting with the ribbon on the top of the screen from left to right then down.
-
New – The New button will create a new invoice for the same customer as the open invoice
-
New Customer – This will open a “Quick Customer Save” window to quickly add a new customer to StoreLIVE and the open invoice.
-
Save – Will save any changes to the invoice
-
Previous – If multiple invoices were returned in the Invoice Locator the Next/Previous buttons all a user to page from one invoice to the next.
-
Next – If multiple invoices were returned in the Invoice Locator the Next/Previous buttons all a user to page from one invoice to the next.
-
Refresh – This will refresh the invoice to the last saved version.
-
Print – Will display the print preview for the default invoice report. Clicking the lower half of the button will display alternative reports that can be printed such as a Packing List. If the status of the invoice is set to Estimate or Quote the default report will show Quote instead of Invoice.
-
Print Tickets – Print tickets for the items selected.
-
Copy Invoice – This button will create a new invoice with the same information as the current one.
10. Reopen Invoice - After an Invoice has been completed, this button will set the invoice status to open and allow it to be edited. Please note that this will cause all payments to be unlinked from the invoice, as well as any inventory changes to be reversed. Reopening an invoice will not be available after register balancing is completed or the accounting entries have been synced to the accounting system.
11. Complete Invoice – This will be documented in the section Completing/Invoicing a Sales Invoice.
12. Shipments – This is a screen to record shipping information such as tracking numbers. This information is automatically populated if StoreLIVE is configured to integrate with UPS WorldShip.
13. Create PO from Invoice – There is two ways to add items from the PO to an invoice:
a. Clicking the Create PO from Invoice button without selecting an items will prompt for a vendor name then add any items to the PO that have that vendor assigned.
b. If items are selected first then the Create PO from Invoice button is clicked the user will be prompted for a vendor. The selected items will then be added to the vendor whether they are associated with the vendor or not.
14. View Linked POs – This will show all POs that have been created by the “Create PO from Invoice” button. Note: If there are any uncompleted, linked POs, StoreLIVE will prompt the user whether or not to continue when the user attempts to close an invoice.
15. MFG Items – This button allows a user to initiate the “manufacture process for any item on the invoice. The items needs to be the destination item of a Manufacturing Order Master Template; the Manufacturing Order needs to be set as the Default Mfg Template on the Item Maintenance/Item/Item Options tab. See the section on Manufacturing Work Order for more information.
18. Add Pre-Payment – This allows for a down-payment or a pre-payment to be added to the invoice. A payment type and amount must be specified. The Customer Card No., Store, and the invoice selected will be defaulted based on the invoice information. Clicking “Process and Print” will process the payment and display a payment receipt to be printed. Clicking “Process” will process the payment. A blue link in the bottom-right of the screen will show the sum of all the pre-payments added to the invoice. Clicking the link will show additional payment information.
19. Store Credit Card – This option is only available if Authorize.net has been configured on the computer. It allows a customers credit card to be securely stored on Authorize.net servers. This also allows the card to be charged in the future without needing to request the card number again. Note that all sensitive credit card data is not stored in StoreLIVE but on a secure Authorize.net server.
20. Email Invoice – Allows an invoice to be emailed directly to a customer. The email address will default to the invoice customer’s email address. The subject will default to what is defined in Settings/Advanced Settings/Application Settings/Default Email Subject on Invoice. The message will default to what is defined in Settings/Advanced Settings/Application Settings/InvoiceCustomerMessage.
-
Advanced
a. Auto Set Locations – Will set the location for the items to the location with the largest amount of inventory
b. Calculate Tax – This will keep the invoice from calculating tax for any changes that would affect the tax during the time it is unchecked. Changes while it is checked will calculate sales tax.
c. Reverse Invoice – this will create a reversal invoice for the open invoice. This can be used to cancel out an invoice that has been completed and sent to an accounting software.
d. Import Items – Used to import invoice item from a spreadsheet. See the Importing Data section for more information.
e. Prod. Date – This will set or over-ride the Production Date for all the items on the invoice.
f. Shortcuts – A list of all invoice screen specific keyboard shortcuts
These options are located on the right-hand side of the screen just above the items grid
22. Remove Items - The Remove Items link is located on the right hand side just above the item grid. It will remove the selected item from the invoice.
23. Customize Kit - The Customize Kit link is located on the right hand side just above the item grid. It will allow items in a kit item to be removed or substituted.
These fields are located at the bottom of the screen.
24. Order Notes – Notes about the order can be entered in this field. Order notes do not print on the invoice.
25. Invoice Notes – Notes that should appear on the invoice can be entered in this field.
Completing/Invoicing a Sales Invoice
When all data has been entered for a Sales Invoice, the invoice can be completed. Completing an invoice creates a Sale in the StoreLIVE! system. The Register associated with the Sale Transaction will be the register setup as the “Sales Invoice Register” in Settings/Register Setup. The sale date is set to the Invoice Date. Note: If register balancing has been completed for this date, you will not be able to complete the invoice until the date is changed.
Once an invoice has been completed, it becomes read only, and may no longer be edited.
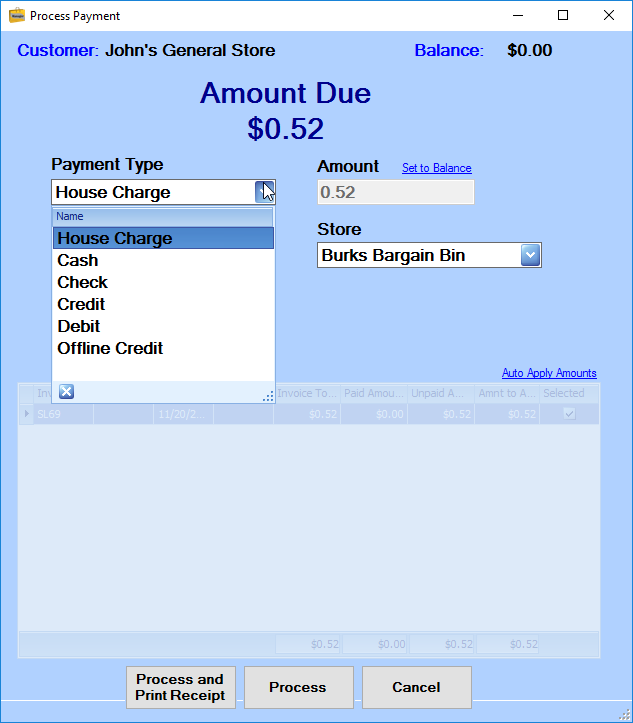
An invoice is completed by clicking the Complete Invoice button on the toolbar then selecting a payment method.
If the payment type Cash, Check, Credit, or Debit is selected a dollar amount other than the default can be entered. The user can also select multiple invoices and define the amount that should be applied to each selected invoice.
The House Charge payment type will only apply to the current invoice and will not allow the payment amount to be over-written.
The Process and Print Receipt button will complete the invoice and print the invoice to the default printer. The Process button will close the invoice.