
Inventory Receiving
Inventory receiving is the process of recording the quantities and costs of goods delivered by a vendor. This can be done with or without a purchase order for the shipment. The process involves entering the quantities and costs information into a "receiving document" or inventory receipt, then finalizing the document, which updates the actual values in the StoreLIVE! inventory system.
Receiving without a Purchase Order
-
Click the Receive Items button on the StoreLIVE! Manager Main Menu.
-
At the Receiving Document Locator screen, click the “New Receiving” button.
-
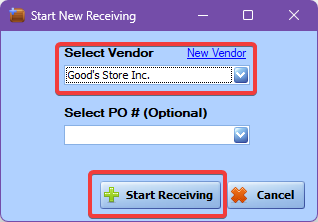
At the “Start New Receiving” window, select the vendor from the dropdown, and click the
“Start Receiving” button.
-
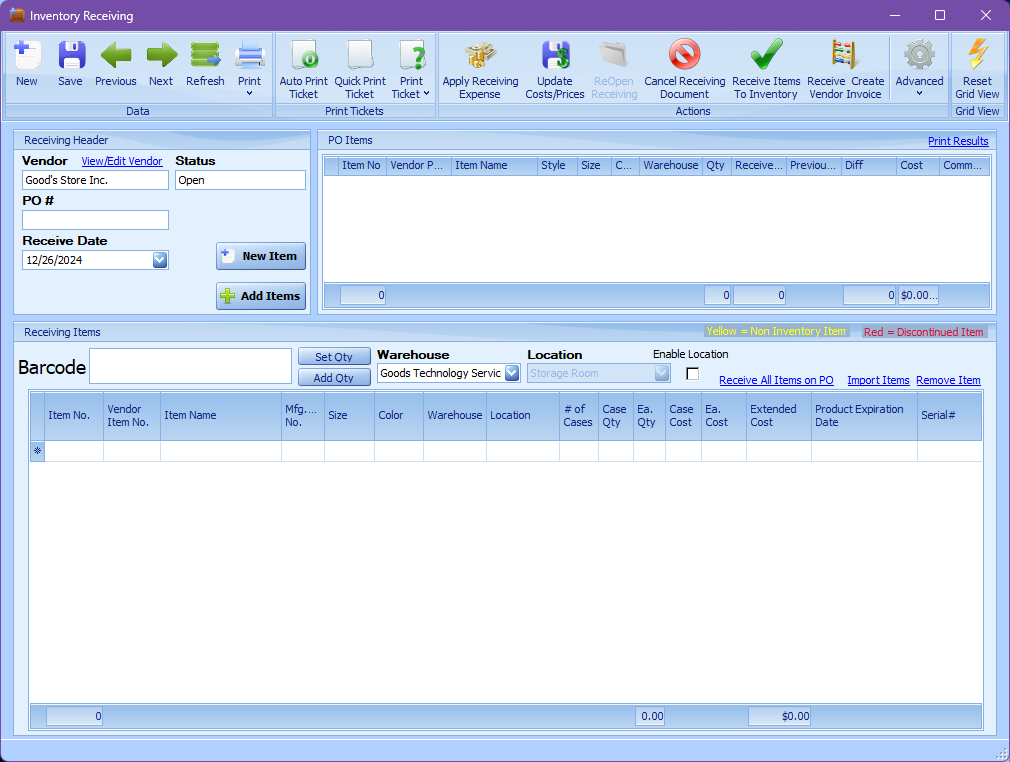
When the Inventory Receiving screen appears, verify the Default Warehouse is set to the warehouse where the goods will be received. Optionally, you can select the “Enable Location” check box, and specify a location. If this box is unchecked, the system will receive the items at the item’s default location or the warehouse default location.
-
Using the Barcode input box, item numbers can be scanned or entered. When this is done, the item is added to the receiving document. If the item is already present on the receiving document, the quantity of the item is increased.
-
Pressing enter again will increment the quantity by 1. Alternately, you can click on the “Qty” column and manually enter a quantity.
-
2 other shortcuts are also available to enter quantities. If you have a quantity before you enter the first item number, you can enter the quantity in the Barcode field, and press *. For example, to input a quantity of 6, enter 6*. This will set the pending quantity to 6, and when the item number is scanned or entered, it will be added with a quantity of 6.
-
Alternately, you can increment the quantity after an item number has been entered. To do this, enter the quantity followed by the + sign. This will increment the quantity of the last item entered or scanned. For example, to add 5 to the existing quantity, enter 5+.
-
When receiving without a purchase order, the costs entered on the receiving document are the vendor costs from the vendor setup in item maintenance. These costs can be changed after the item has been added to the document by manually updating the value in the Cost field.
8-23
-
If additional shipment costs are known at the time of receiving that are not included in the item cost, these costs can be distributed to the items using the “Apply Receiving Expense” feature. To use this feature:
a. Click the “Apply Receiving Expense” button on the toolbar
b. When prompted, enter the expense amount and click “Apply Expense”.
c. The expense amount will be added to the item costs. It is weighted based on the
extended cost of the item.
Note: In order for the system to have accurate costs and to facilitate the vendor invoice matching process, it is important that the costs on the receiving document are as close to the actual item costs as possible.
-
When all items from the shipment have been received, click the “Receive Items to Inventory” button on the toolbar to “post” the quantities and costs to the StoreLIVE! system.
Note: Before clicking the “Receive Items to Inventory” button, verify that costs and locations on the receiving document are correct!
Additional Receiving Notes
-
If vendor costs changes are entered on the receiving document, it is possible to update the
vendor cost in item maintenance by clicking the “Update Costs/Prices” icon on the toolbar.
-
If a receiving document is started, but will not be completed for any reason, it should be
canceled by clicking the “Cancel Receiving Document” button on the toolbar.
-
If multiple computers are being used to receive the same order, each computer should
create a separate receiving document. It is not recommended to have more than 1 person
simultaneously receiving on the same receiving document.
Receiving with a Purchase Order
Receiving with a Purchase Order follows the same basic steps as receiving without a purchase order. The following steps note some differences:
-
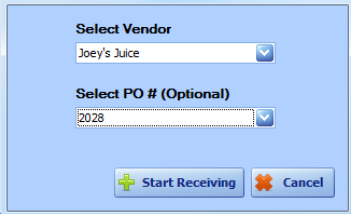
At the “Start New Receiving” window, select the vendor from the Vendor dropdown, select
the PO # from the PO # dropdown, and click the “Start Receiving” button.
-
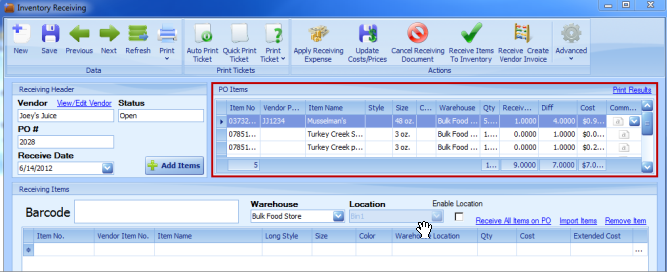
The Receiving screen will appear with the items on the PO listed in the top right corner
-
Similar to Receiving without a PO, items can be received by scanning/entering the item number.
-
Items can also be received by double clicking the PO line item
-
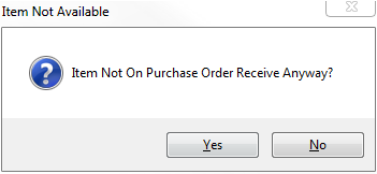
If an item is received by scanning or entering the item number, and the item is not on the PO, or the quantity on the PO has already been received, the system warns the user and allows the user to cancel if necessary.
-
The difference between the order quantity and the received quantity can be viewed on the PO Items section of the screen

-
Clicking the “Receive All Items on PO” link will auto-receive all the items on the purchase order

-
Follow the steps listed in the “Receiving without a Purchase Order” section to apply additional expenses and to complete the receiving process.
Printing Tickets during Receiving
There are a few different options that can be selected to print out item tickets while receiving. These options are displayed as a section of buttons in the toolbar across the top of the window.

StoreLIVE! allows for either manually printing tickets in specified quantities, or automatically printing each ticket for the item as it is being received. For more information refer to the Label printing section.