The StoreLIVE! Manufacturing Work Orders screen allows new items to be “manufactured” from existing items, and performs all of the necessary inventory updates.
For example, if a store creates gift baskets from on hand inventory, the store might use 1 basket, 2 bags of candy, 1 coffee mug, and 2 coffee tins. The basket, candy, coffee mug and coffee tins must all be removed from inventory and a gift basket must be added to inventory. In addition to the inventory changes, the combined cost of the inventory items should become the inventory value of the gift basket. The Work Order program allows listing all of the “source” and “destination” items, and with the click of a button, reduces the inventory quantities of the “source” items, and adds to the inventory of the “destination” items.
Creating, Editing and Processing a Work Order
-
Click the “Inventory Menu” button on the StoreLIVE! Main Menu.
-
When the Inventory Menu appears, click the “Work Orders” button.
-
When the “Manufacturing Order Locator” screen appears, click the “New Order” button to create a new Work Order, or enter search criteria and click Search to locate existing work orders. Existing work orders can be loaded by double clicking the work order entry in the search results.
-
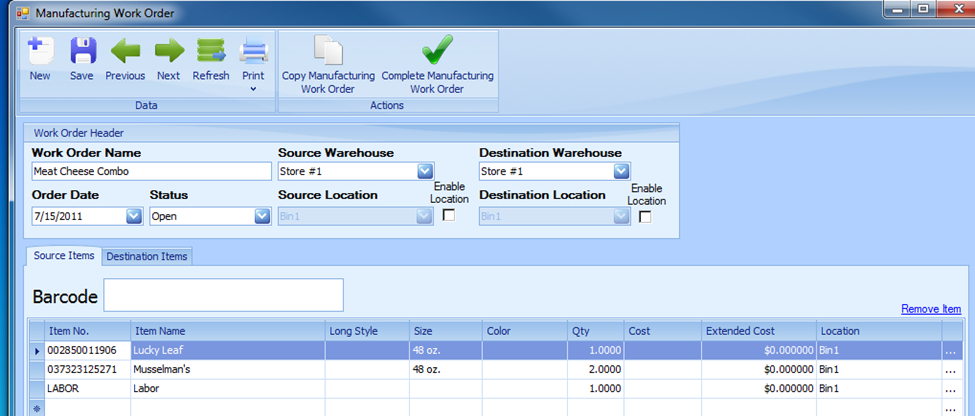
The Work Order Header includes the following fields
-
Work Order Name – This is a description field, used to identify the work order.
-
Source Warehouse – The warehouse where the “source” items will be removed from when the Work Order is complete.
-
Destination Warehouse – The warehouse where the Destination items will be added when the Work Order is complete.
-
Order Date – The date of the work order. When the Work Order is completed, the inventory activity will be recorded on this date.
-
Status – The Status of the Work Order.
-
Source Location/Enable Location – When using the Barcode field to scan items, if Enable Location is selected, items will be added to the Source Items list at the selected source location.
-
Destination Location/Enable Location – When using the Barcode field to scan items, if Enable Location is selected, items will be added to the Destination Items list at the selected destination location.
-
-
Source Items - Source items are listed on the Source Items tab and are the items that will be removed from inventory when a work order is completed.
-
Item No. – The Item No. of the inventory item.
-
Item Name, Style (custom field), Size, and Color – Read Only fields that display item information.
-
Qty – They quantity of the item to be removed from inventory.
-
Cost/Extended Cost – The costs fields are read only. The cost for the items is populated by the system when the Work Order is completed and the FIFO cost of the items is known.
-
Location – The warehouse inventory location where the items will be removed from when the Work Order is processed.
-
Lookup button – Clicking this button will load the item maintenance screen for the item on the line item.

-
|
Note: Non-Inventory Items may be used as source items on a work order. When the work order is processed, the cost of the non-inventory items is included in the value of the destination item(s). If only one vendor is listed for a non-inventory item, the vendor cost is used by the work order as the cost of the item. If multiple vendors are listed, the selling price of the items is used as the cost. When using accounting integration, the cost of non-inventory items is posted to the cost of goods sold account associated with the items’ category. |
-
Destination Items – Destination Items are listed on the Destination Items tab. These are the items that will be added to inventory when the work order is completed. Note: Destination Items must have the type of “Inventory Item”
-
Item No. – The Item No. of the inventory item.
-
Item Name, Style (custom field), Size, and Color – Read Only fields that display item information.
-
Qty – They quantity of the item to be added to inventory.
-
Size/Units – A size or unit factor can be entered in this column. If no entry is made, the system assumes a value of 1. When costs are being distributed to destination items, costs are weighted for each line item by Qty * Size/Units.
-
Cost Factor – This is a calculation of Qty * Size/Units.
-
Cost/Extended Cost – The costs fields are read only. The cost for the items is populated by the system when the Work Order is completed. The total value of the source items is distributed to all the destination items.
-
Location – The warehouse inventory location where the items will be added to when the Work Order is processed.
-
Lookup button – Clicking this button will load the item maintenance screen for the item on the line item.

-
-
Completing a Work Order – To complete a Work Order, click the “Complete Manufacturing Work Order” button on the toolbar. Completing a Work Order removes the source items from inventory and adds the destination items. After a work order is completed it becomes read only and no additional changes may be made to it.
Work Order Cost Distribution
When a work order is processed, the total value of all source items is calculated, and this cost is distributed to the destination items based on the Cost Factor of each item. (Cost Factor = Qty * Size/Units) The total source item cost is then divided by the total cost factor, in order to arrive at a base unit cost. This base unit cost is then used to calculate the cost of each item by multiplying it by the item’s size/unit.
Example:
Source Items:
1 – 100lb Bag with a cost of $75.00
Destination Items:
5 – 10lb bags of flour with Size/Units set to 10 (cost factor of 50)
20 – 2.5lb bags of flour with Size/Units set to 2.5 (cost factor of 50)
Cost Factor
Total Cost Factor = 100 (50 + 50)
Base Unit Cost
Base Unit Cost = $.75 ($75.00 / 100) (Source Item Total / Total Cost Factor)
Final Cost Distribution
Per Item Cost = (Unit Cost * Size/Units)
Extended Item Cost = (Unit Cost * Size/Units * Quantity)
5 – 10lb bags of flour @ $7.50 ea. = $37.50 ($.75 * 10 * 5)
20 – 2.5lb bags of flour @ $1.875 = $37.50 ($.75 * 20 * 2.5)
Total Distributed Value = (5 * $7.50) + (20* $1.875) = $75.00
Master Work Orders
Master Work orders function as templates, allowing a list of source and/or destination items to be maintained. This feature is useful for work orders that use similar items, eliminating the need to input every item each time this type of manufacturing process is performed.
Master Work Orders are created the same as a standard work order, with the exception that the Status is changed to “Master Template”, before work order is then saved. Once the Work Order has a status of Master Template, the option to complete it is disabled, preventing users from inadvertently processing a master work order.
Master Work orders can be opened at a later time by using the Work Order Locator and searching by Work Order Status.
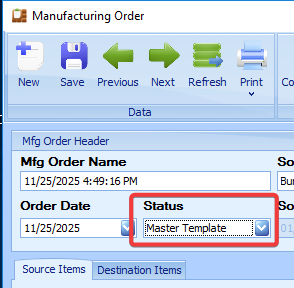
Once a Master Work Order is opened, a new work order can be created by copying the master.
Work Orders are copied by clicking the “Copy Manufacturing Work Order” tool bar icon.
A master template can be be set as default on an item in Item Maintenance.
Manufacturing an Item From Item Maintenance
In Item Maintenance go to the Item Options tab and select a default template. Only master templates with this item as a destination item will appear.
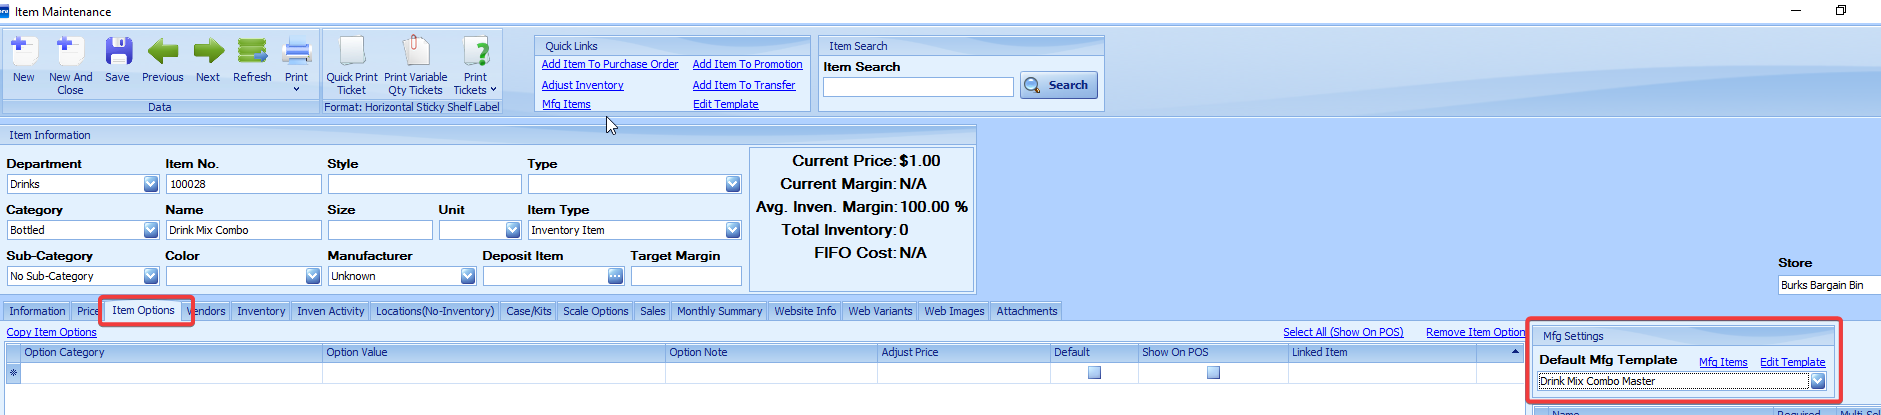
When the Mfg Items button is clicked a screen showing the source items from the Manufacturing master template appears. Enter the Qty of the destination that you would like to manufacture. This will multiply the source items by the Qty of destination items when you click MFG Items.
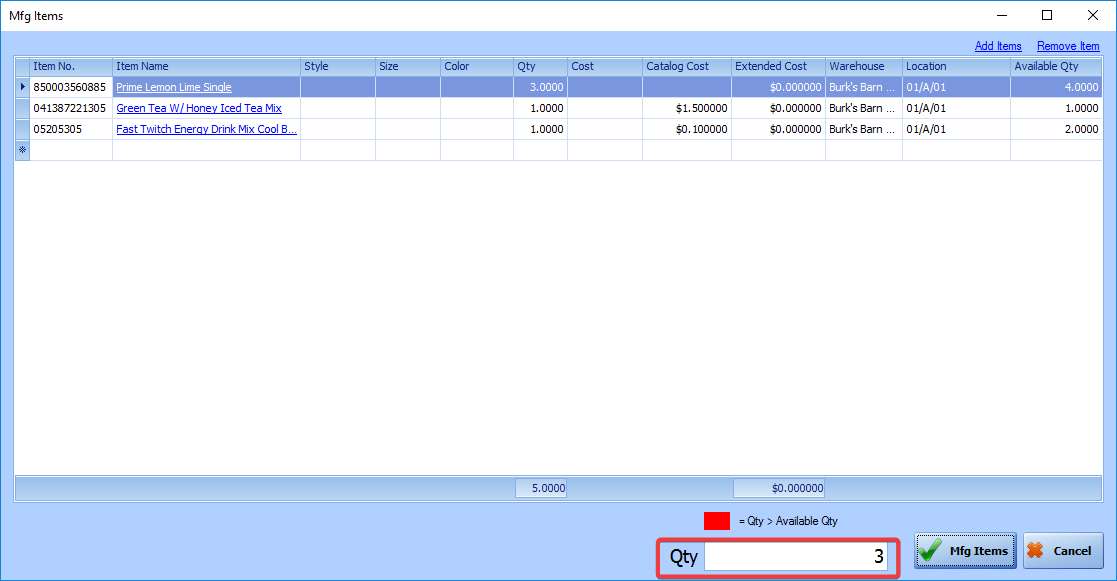
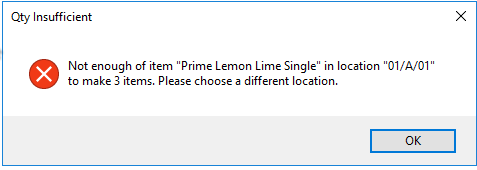
If you attempt to manufacture more items than you have source items available you will see an error.