
Creating New Items

New Items can be created in StoreLIVE! by using the Item Maintenance feature. To create a new item:
-
Click the “Item Maintenance” button on the Main Menu. (see below)

-
When the “Item Locator” screen appears, click the “New Item” icon on the toolbar at the top left of the screen.
-
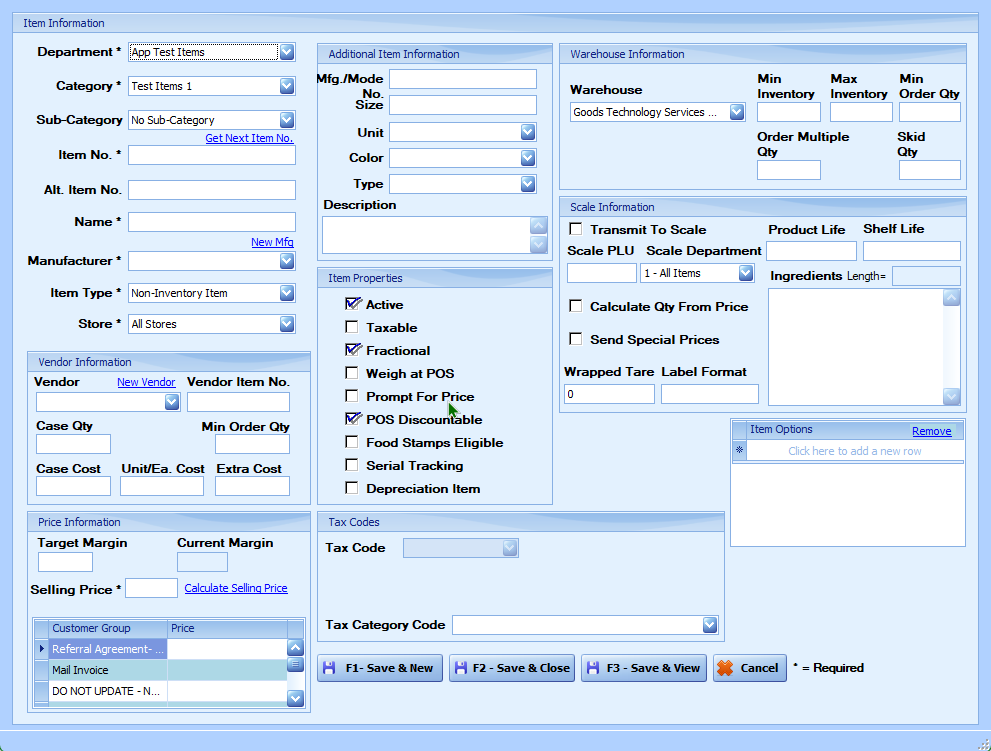
The “Create New Item” screen will appear.
POS stands for “Point of Sale”
Required and Optional Fields
Fields with an asterisk (*) next to them are required. All other fields are optional. The fields are used as follows:
-
*Department – The department to which the item should be assigned
-
*Category – The category within that department the item should be assigned to
-
Sub-Category – The sub-category the item should be assigned to
-
*Item No. – This is a unique numeric or alphanumeric identifier for the item. It can be a PLU, a UPC, or a number that follows a naming system unique to your store.
The Get Next Item No. link, if clicked, will generate the next unused item number if there is not a barcode or specific item number that is to be used.
-
Alt. Item No. – Use this field to store an alternative item number.
-
*Name – This is the name or a short description of the item. This is the description that will print on Point of Sale (may be referred to hereafter as “POS”) receipts.
-
*Manufacturer – The manufacturer or brand of the item—The New Mfg link can be used to enter a new manufacturer the same way as explained in Chapter 1.
-
*Store – Defaults to “All Stores”; only change to a specific store if the entered selling price is not the correct price for all of your stores.
-
*Item Type – This is the type of item you are adding to the system. The options are:
1. Case Item – This item will link to an Inventory Item, allowing the Inventory Item to be bought or sold in multiple quantities or units of measure. (See “Case Items” later in this document for more information on case items.)
2. Inventory Item – An item for which inventory quantities will be tracked
3. Non-Inventory Item – This is an item for which quantities will not be tracked.
4. Transaction Item – A transaction item is a specified item that will show at the top of the receipt. Only one transaction item is allowed per sale.
Vendor Information
-
Vendor – The primary vendor the item will be purchased from
-
Vendor Item No. – The vendor’s part number or item number
-
Case Qty – If this item is purchased from the vendor as a case, enter the number of items in one case. Min Order Qty – The minimum amount of the item allowed to be ordered from this vendor (the default quantity when adding this item to a PO)
-
Case Cost – The cost per case
-
Unit/Ea. Cost – The cost per item. If a Case Qty and a Case Cost are entered, the system will calculate the Unit/Ea. Cost automatically.
-
Extra Cost – Extra costs associated with the item, such as a bag cost for repackaging
Price Information
-
Target Margin- Desired profit margin. For example, if an item costs $300 and sells for $400, the target margin is 25%.
-
Current Margin: This shows the current profit margin based on the item’s current entered case cost and selling price.
-
*Selling Price- The price of the item.
Note: The Selling Price will be the price per pound if the Unit field is set to “lbs.”
Selling Price Calculation
-
You can automatically calculate the selling price by clicking the **Calculate Selling Price** link. This uses the item’s cost and desired profit margin.
-
the equation used for this calculation is as following. (listed below)
“Selling Price = Cost / (100% - Target Margin)”
-
Example: Cost is $20.
-
We want a Target Margin of 40%.
-
100% - 40% = 60%
-
$20 / .60 = $33.33
Item Details
-
Style: A custom field for additional information.
-
Size: The size of the item (no units).
-
Unit: Measurement unit (e.g., lbs, oz, each). For scale items, “lbs” or “count” is required.
-
Color: The item’s color. Options are set in the Color Setup.
-
Type: A custom field that can be renamed for specific store use.
-
Description: Use this field for notes about the item.
Item Properties
These are set by default based on the selected department and category and may not need to be changed but can be changed for each item:
-
Active: Indicates if the item is available for sale.
-
Taxable: Shows if the item is subject to tax.
-
Fractional: Allows selling in decimal quantities (e.g., 1.5 lbs).
-
Weigh at POS: Check this to prompt for weight at checkout.
-
Prompt For Price: Indicates if the cashier should enter the price manually.
-
POS Discountable: Check this if the item can be discounted.
-
Food Stamps Eligible: Indicates if the item can be included in a food stamps subtotal.
-
Serial Tracking: Check this if tracking serial numbers.
-
Depreciation Item: Check for items that lose value over time.
Tax Codes
There are six fields that can be used to set any applicable tax codes. These tax codes will automatically be calculated at the register. this is only used if the location has multiple tax codes. if there is only one tax code defined in the system then you don’t need to set a tax code here.
Note: that tax code should be set under “Main Menu/Settings/Accounting Settings/ Tax Setup
Warehouse Information
-
Warehouse – Select the warehouse this item is to be stored at if it is to be
stored at one.
-
Min Inventory – Sets the minimum inventory to be kept at the warehouse
-
Max Inventory – Sets the maximum inventory to be kept at the warehouse
-
Min Order Qty – This is the minimum amount of the item you would like to
order for the warehouse.
-
Order Multiple Qty – A multiple you want to be ordered for the warehouse
Skid Qty – The number of the item allocated to each skid if skids are used
Note: The Min and Max Inventory fields are used to determine which items get included in an automatic purchase order. If an autogenerated PO item is below the minimum quantity, it will get added to the PO with an amount that would bring it equal to or just under the max.
Scale Information -(can largely be ignored for non-scale items)
-
Transmit To Scale’ – This should be checked if this item is to be sent to a
scale. This box can be checked later under Item Maintenance if is not to be
sent to the scale immediately.
-
Scale PLU – The 5-or-less-digit PLU the item will correlate to on the scale-
-
Scale Department – Set the department the item should be assigned to in the scales. “1 - All Items” is set by default.
-
Product Life – The number of days until the product expires
-
Shelf Life – Shelf life of the item (days until its “best if sold by” date)
-
Calculate Qty From Price’ – Check this to determine the amount of the item
being sold by calculating the full item price divided by its Selling Price.
-
Send Special Prices’ – Check this if Special Prices under the “Price” tab of an
item should be sent to the scale for this item.
-
Wrapped Tare – Tare weight in pounds for this particular item
-
Label Format – Label format that the scale should use for this item
Ingredients – List of ingredients that make up the item
Copy Item Options - (Enter or search a Parent Item number in this field to make this new item’s “Item Options” the same as the parent item’s “Item Options.
Note: To complete the item, click “F1- Save & New” or “F2 - Save & Close.” Note that clicking “F1-Save and New” will reset the form to allow entry of another item, but it will recall most of
the fields from the previous item. This can significantly speed up item entry when entering
similar items. “F3 - Save & View” saves the item and then opens it in Item Maintenance
Editing Existing Items
Existing items can be viewed and edited in the StoreLIVE! system using the Item Maintenance feature.
Many of these fields will be the same as those used when creating a new item.
To edit or view an existing item: (see below)
-
Click the “Item Maintenance” button on the Main Menu.
-
The “Item Locator” screen will appear. Enter search criteria into the filter fields and click the
“Search” button to list items that meet your search criteria. Only the items that meet ALL of
the entered search field criteria will load.
3.The “Clear Search” button can be used to clear previously filled fields and loaded items.
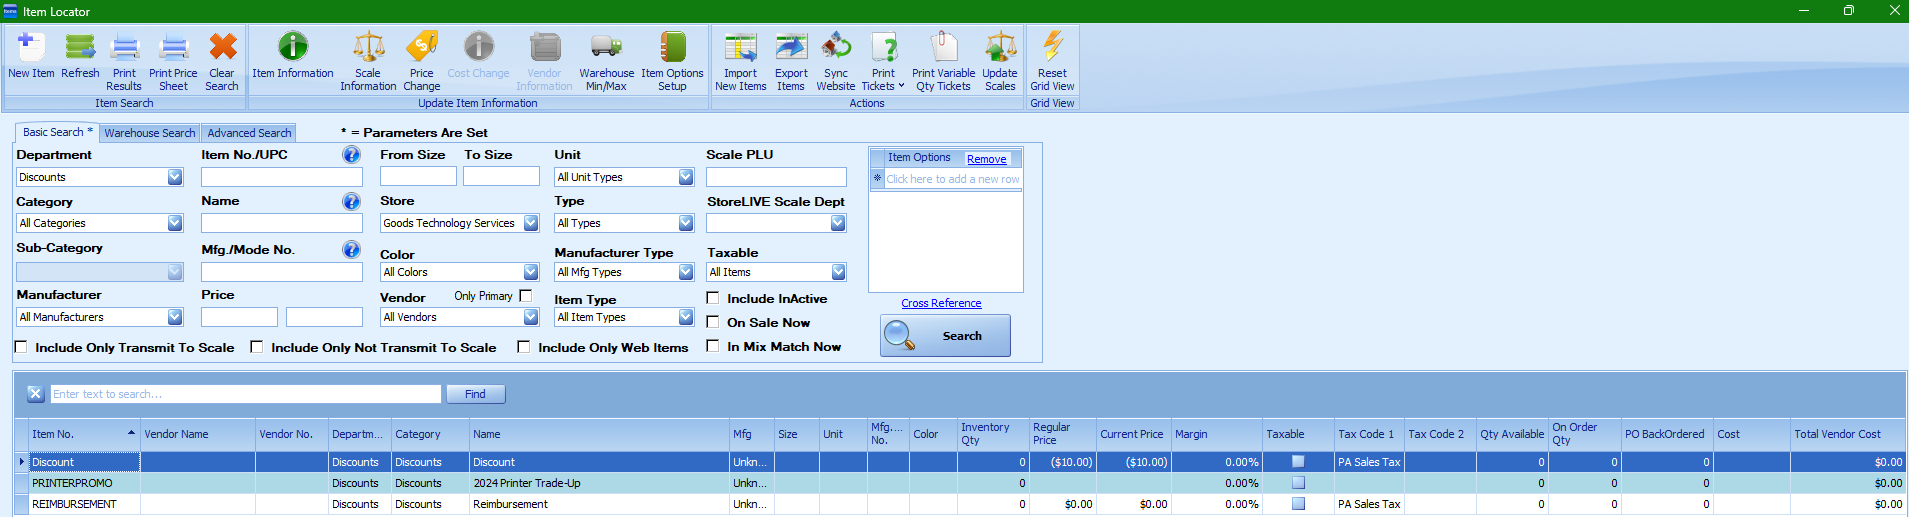
4.Double-click an item in the search results to load the item. After words you will see it displayed. (see below)
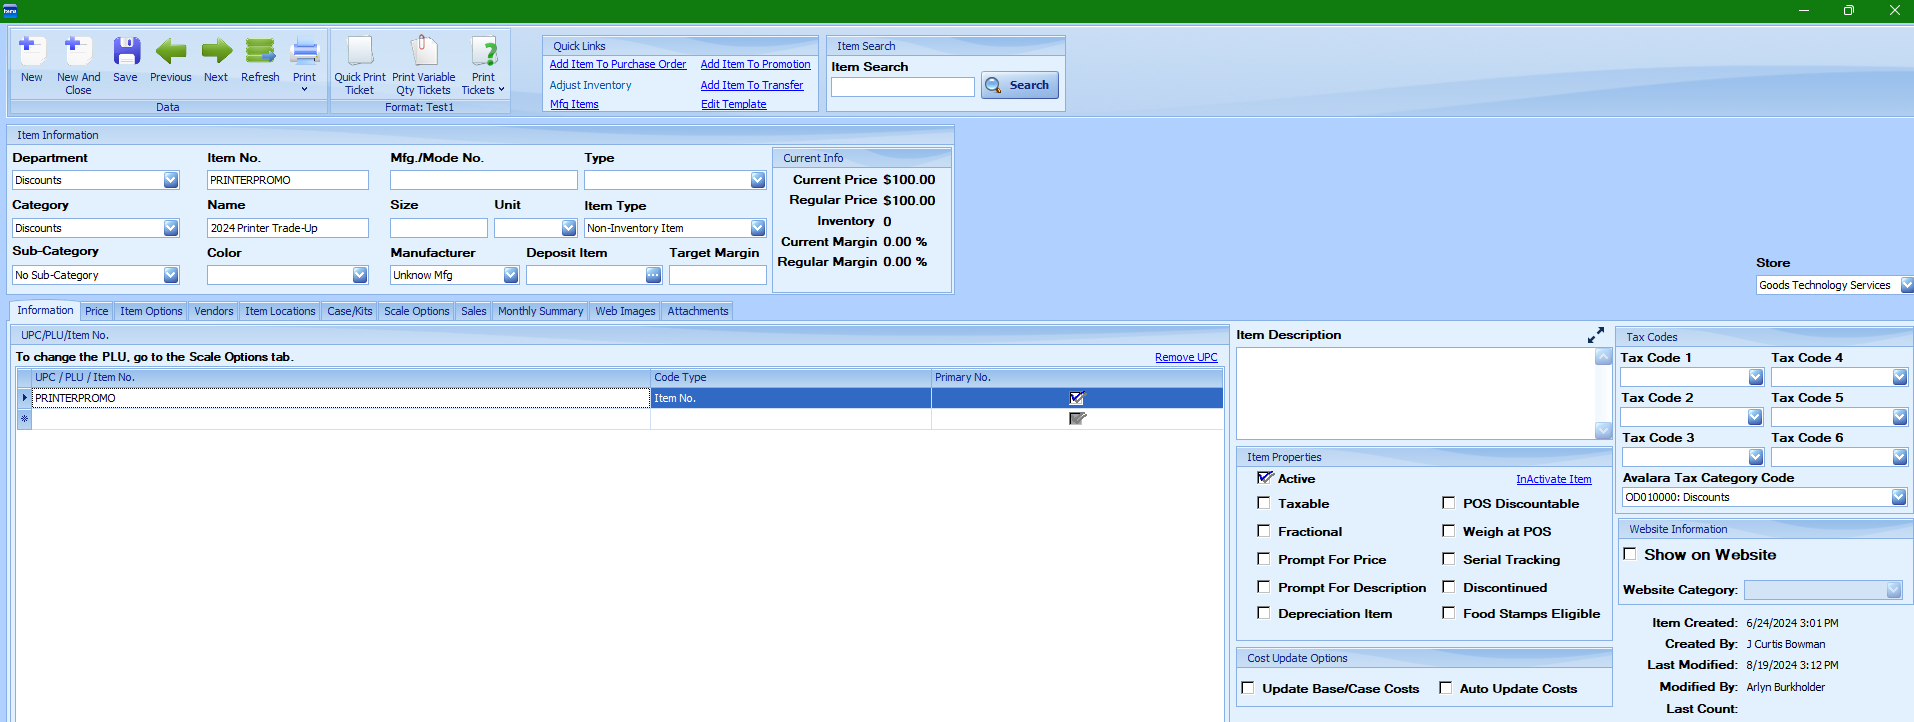
Item Information
-
Item information is displayed toward the top of the screen and can be edited.
Note: These are not search filter fields! If you change and save fields here, they will change for the item itself!
-
The fields here (see below) are used as follows:

-
Department – The department the item should be assigned to
-
Category – The category within that department the item should be assigned to
-
Sub-Category – The sub-category the item can be assigned to2-22
-
Item No. – This is a unique numeric or alphanumeric identifier for the item. It can be
a PLU, a UPC or a number that follows a naming protocol unique to your store.
-
Name – This is the name or short description of the item. This is the description that
will print on Point of Sale receipts.
-
Color – The item color (The options available in this dropdown are controlled in the
Advanced Settings.)
-
Style – This is a custom field to use for store-specific purposes.
-
Size – The size of the item, without the units
-
Unit – The unit of the item, such as lbs., oz., or each (The options available in this
dropdown are controlled in the Advanced Settings.)
-
Manufacturer – The manufacturer or brand of the item
-
Type – This is a custom field and can be renamed for store-specific use. (The options in the dropdown are controlled in the Advanced System Settings.)
-
Deposit Item – This allows another [deposit] item to be linked to this item. When
this [currently loaded] item is sold at the Point of Sale, POS automatically adds this
deposit item to the sale as well. This is useful when deposits such as milk bottles or
soda cans are charged on items. The item in this field is the deposit item.
-
Target Margin – This is the desired profit margin on each sale as a percentage. Enter
this number as a decimal (Enter “.45” to make this “45%”)
-
Item Type – This field controls the type of item you are adding to the system. The
options are:
-
“Non-Inventory Item” – This is an item for which inventory quantities will
not be tracked.
2.“Inventory Item” – This is an item for which inventory quantities will be
tracked.
3.“Case Item” – This item will link to an inventory item, allowing the inventory
item to be bought or sold in multiple quantities or units of measure.
4.“Kit Item” – A kit item is similar to a case item, but it allows multiple items
to be linked into one sellable unit. For example, a kit item could be a “Gift
Basket” containing the following items: 2 bags of candy, 1 cheese block and
1 meat item. When the “Gift Basket” item is sold, 2 bags of candy, 1 cheese
block, and 1 meat item would all be removed from inventory.
5.Transaction Item – A transaction item is a specified item that will go at the
top of the receipt. Only one transaction item is allowed per sale.
Note: This field (Item Type) cannot be edited if an item is of the type “Inventory Item”and the inventory quantity on hand is something other than “0.”
Additional Item Information
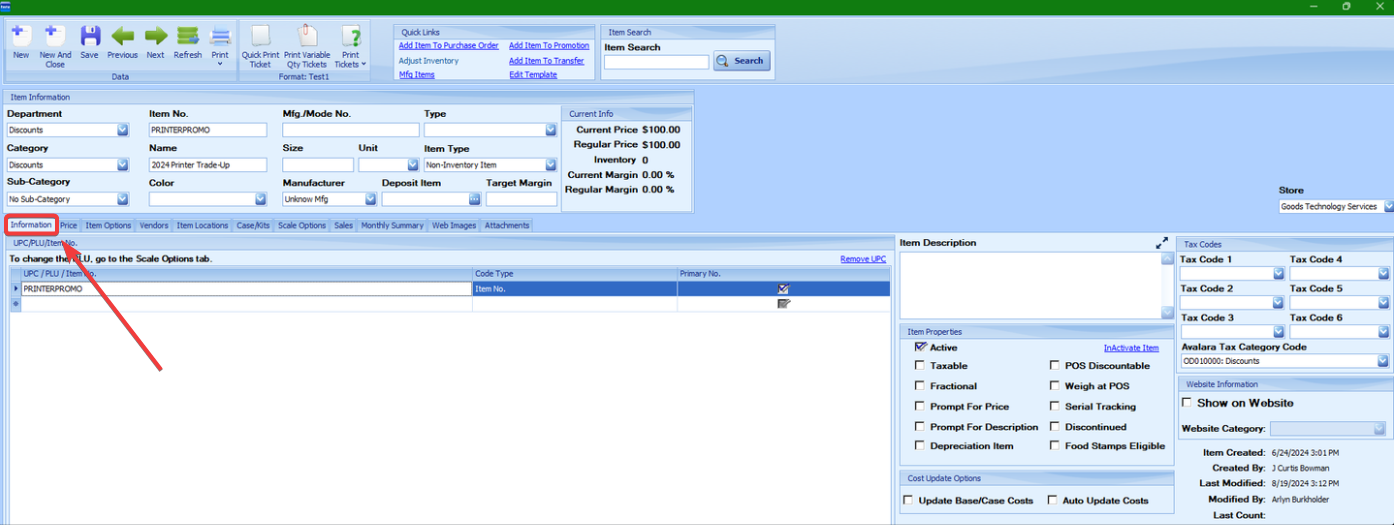
Additional item information is displayed under the “Information” tab. (see below)
-
The “UPC/PLU/Item No.” - this section allows one or more item numbers to be attached to an item. The item number with the ‘Primary No.’ box checked is the primary item number and is used as the master identifier for that item. However, when scanning or entering items at POS or on other screens, any of the item numbers can be used to locate the item.
-
Item Description– Allows for an extended item description to be entered and tracked in the system.
-
Item Properties- Controls how the item is processed at the point of sale. they are as follows:
1. Active’ – Indicates if the item is active in the system and can be bought and sold
2. Taxable’ – Indicates if the item is taxable
3. Fractional’ – Indicates if the item can be bought or sold in decimal amounts
4. Prompt For Price’ – Indicates if the Point of Sale system should prompt the cashier to manually enter a price for this item instead of looking up the price automatically from the price information
5. Prompt For Description’ – Indicates the Point of Sale system should prompt for a description when the item is added to the sale. For example, an item simply called “Service” could be set to prompt for a description of the actual service provided.
6. POS Discountable’ – Needs to be checked if this item may be discounted at the Point of Sale
7. Weigh at POS’ – Indicates if POS should prompt the cashier to retrieve the weight from a scale attached to the Point of Sale (or enter a weight from a scale)
8.Food Stamps Eligible’ – Indicates if this item needs to be included in a Food Stamps Subtotal at the Point of Sale
9. Discontinued’ – Indicates whether this item has been discontinued by the vendor
10. Depreciation Item’ – Check this for items that depreciate after a certain time.
11. Serial Tracking’ – Check if tracking serial numbers for this item.
-
Cost Update Options-
-
1. Update Base/Case Costs’ (for case or kit items) – This checkbox allows associated costs to be updated when this item case or kit has a price change. For instance, if a 24-pack of soda’s price is being changed, this would effect a price change for the individual soda.
2. Auto Update Costs’ (for inventory items) – This checkbox is used in conjunction with the ‘Update Base/Case Costs’ above. The ‘Auto Update Costs’ checkbox must be checked for this item to receive automatic price adjustments when there is a price change to the kit or case that this item is a part of. If only one item in a kit has this box checked, then that item will update with new costs while the rest of the items remain static.
Note: Only items with the ‘Auto Update Costs’ checkbox checked will receive these updates!
-
Tax Codes – These six fields can be used to set any applicable tax codes. These tax codes are automatically applied to the items at the registers.
Pricing Information
Pricing information is maintained under the “Price” tab.

-
Regular Prices – This list is used to maintain the regular retail selling price of an item. Special price types can also be set up under the Advanced link to create discount items. The Point of Sale will use the price within the current date range as the regular selling price of the item. When price changes occur, multiple price entries may be created with corresponding starting and ending dates in order to maintain a price history. The system also allows for entering price changes into the system before the date and time they are to take effect.
-
Price – Contains the unit price of the item
-
All Stores – If checked, the price applies to all stores. If not checked, the price applies to the store selected in the Store dropdown at the right of the screen.
-
Start Date – The date and time the price should start to be in effect
-
End Date – This is the date and time this particular price should end. This field can be left blank if the price is current and/or the end date is not known.
-
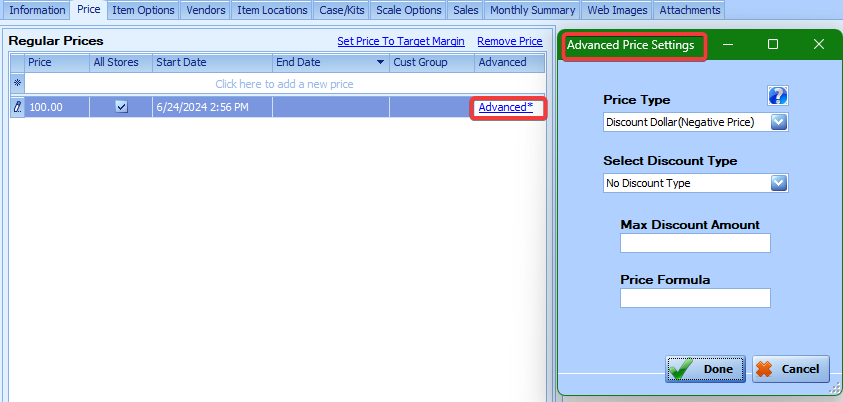
Advanced Pricing Options- These advanced options apply only to discount items. Click on the Advanced link, and a dialogue box will pop up with the following fields: (see below)
-
Price Type – This is the kind of price. The blue question mark

-
Selling Price” – This is the default price type. This price type indicates a fixed dollar price for an item.
-
Discount Dollar(Negative Price)” – Discount Dollar prices ring up as negative prices at the Point of Sale. For example, a non-inventory item could be set up with a discount price type that corresponds to an actual coupon or promotion being offered by the store. To apply the coupon or promotion at the Point of Sale, the cashier would add this item to the transaction. This way, when reporting sales, the items on the transaction will appear as having sold at full price; and the item with the discount price type will appear as having sold for a negative price. For example, if Item X is rung up with a regular price of $5.00, and the next item added to the transaction has a “Discount Dollar” price of $1.00, Item X will appear on the sales report with a sales amount of $5.00; and the item with the “Discount Dollar” type will appear on the sales report with a value of negative one dollar ($1.00).
-
Discount Percent(Negative Price)” – Rings up as a negative price at the Point of Sale. The price is calculated as a percent of the current transaction total. Notice: The last item on the sale will discount once you hit the “Pay” button. The discount percent should be entered as a decimal value in the “Price” field (so you would enter “.10” to make the discount 10 percent). This will also be a negative value in sales.
-
Item Discount Dollar(Margin)” – Applies a negative price at the Point of Sale. This discount is associated with the most recently entered or highlighted item on the Point of Sale screen. For sales reporting purposes, the item that was discounted will appear with the reduced price. The actual discount line item will not appear on the sale report. (That is what the Item Discount Absolute Dollar price type is for.) For example, if Item X is rung up with a regular price of $5.00, and the next item added to the transaction has an “Item Discount Dollar” price type with a value of $1.00, Item X will appear on the sales report with a sales amount of $4.00.
-
Item Discount Percent(Margin)” – Applies a negative price at the Point of Sale. This discount is associated with the most recently entered or highlighted item on the POS screen, and the discount amount is calculated as a percent of the selling price of the item being discounted. The discount percent should be entered as a decimal value in the “Price” field (so enter “.10” for 10 percent). For sales reporting purposes, the item that was discounted will appear with the reduced price. The actual discount line item will not appear on the sales report. For example, if Item X is sold with a regular price of $5.00, and the next item added to the transaction has an “Item Discount Percent” price type with a value of .10, Item X will appear on the sales report with a sales amount of $4.50 ($5.00 – (0.10 * $5.00)).
-
Sale Discount Dollar(Margin)” – Rings up as a negative price equal to its entered value at the Point of Sale. The sales reporting method used is the same as the “Item Discount Percent” price type, except the discount will reduce the selling price of all previously entered discountable items on the transaction. The system allocates the discount amount to the items based on the item’s percent of the total. Then, in sales reports, if Item X’s price is 25% percent of the total sale, 25% of the “Sale Discount Dollar” amount will be deducted from Item X.
-
Sale Discount Percent” – Applies a negative price at the Point of Sale, the same as the “Sale Discount Dollar,” but this price is calculated as a percentage of the transaction total. The discount percentage should be entered as a decimal value in the “Price” field. (Again, enter “.10” for 10%) For sales, the selling prices of all the items previously added to the transaction will be reduced by the discount percent, same as the “Sale Discount Dollar” price type.
-
Surcharge Percent” – Rings up as a positive price at the Point of Sale. The price is calculated as a percent of the transaction total, including tax. The surcharge percent should be entered as a decimal value in the “Price” field (0.10 for 10%). The sales reports for a surcharge do not affect the selling price of the items on the transaction, same as the “Discount Percent” types.
-
Special Prices – This table is used to maintain “special” or “sale” prices for items. These prices typically have a known start and end date. When a special price is active and in a current date range, the Point of Sale will use this price instead of the regular selling price. It takes priority over the regular selling price. The columns are mostly self-explanatory:
-
Price” – This is the unit sale price of the item.
-
Price Type” – Set to “One time special selling price” for a normal special price.
-
All Stores’ – If checked, the price applies to all stores. If not checked, the price applies to the store selected in the Store dropdown on the right side of the screen.
-
Start Date” – Enter the date and time the price is to start to be in effect.
-
End Date” – Enter the ending date of the special price.
-
Promotion” – If the special price has been created via Main Menu’s “Promotions” button, the Promotion Name will display here. Clicking it will load that promotion.
-
Select Discount Type – Selecting “Regular Priced Only” ensures that this item will not discount further an item that is already on sale. Selecting “All Items” means of course that this item will apply a discount to everything. “No Discount Type” is an option for those price types that are not discounts.
-
Max Discount Amount – Set this to a dollar amount, and the discount will not be more than this amount.
-
Price Formula – This field can be ignored.
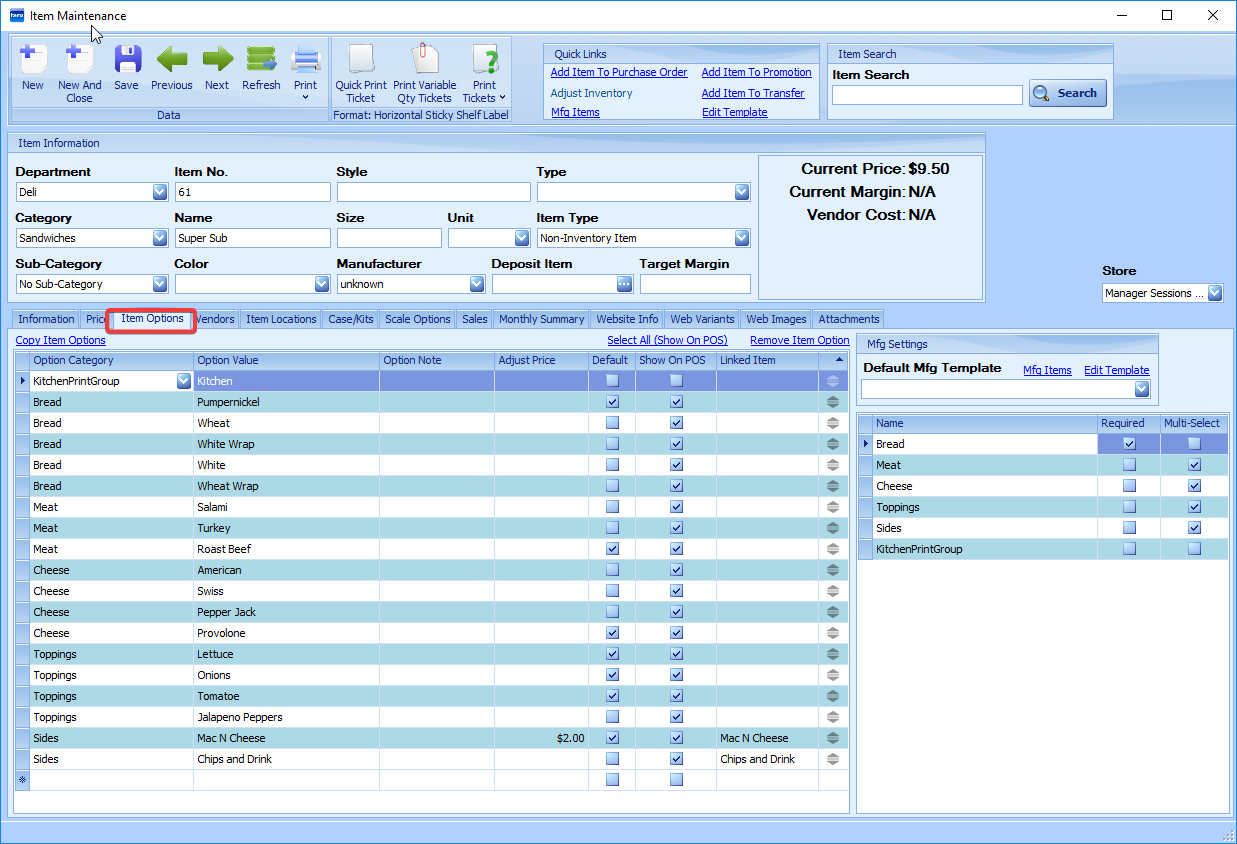
Item Options
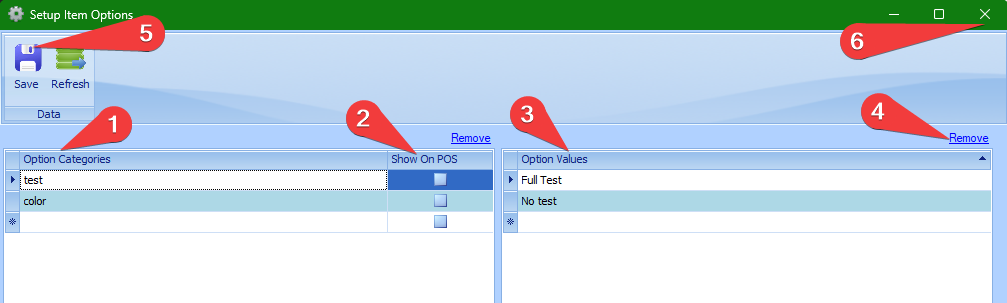
Item options is a feature to StoreLIVE! that allows for a number of different options. Two of the main uses of this feature are: setting up kitchen receipt printer groups, and having a selected café item bring up a list of options/toppings on POS to add to customize the item. Click on the Item Options Setup button under “Item Maintenance,” and the “Setup Item Options” box will appear. (see below)

This is where you will create the item options you wish to use. (see below)
-
“Option Categories” – Enter your option category names (e.g. Size, Bread, Toppings, etc.)
-
“Show on POS” – Check this box if these options are supposed to show up on the registers.
-
“Option Values” – Enter the values you wish to be available for that specific category.
You must save after adding option categories, before adding option values!!
-
Click the Remove link to remove the selected category or Value.
-
Save your changes
6.Close this tab, open the item you want to apply these to, and select the “Item Options” tab.
-
“Option Category” – Choose the option category (such as “Toppings”) that you want values for.
-
“Option Value” – Enter one line for each value you want to be available for this item on POS.
-
“Option Note” – This will show on POS as a small note under the option value.
-
“Adjust Price” – The price entered here will be added to the item price when this option is selected.
-
“Position Handle Arrows” - Drag the arrows to organize the option in the order the should show on POS Note: Option categories will all be grouped together even if their positions are different. For example, though one Bread option may be below the Meats it will display on POS at the bottom of the Bread Column with the rest of the bread options.
-
‘Default’ – Check this box if this option is to be selected by default when the item is ordered at POS.
-
‘Show On POS’ – This should be checked if the item options should show up on the register.
-
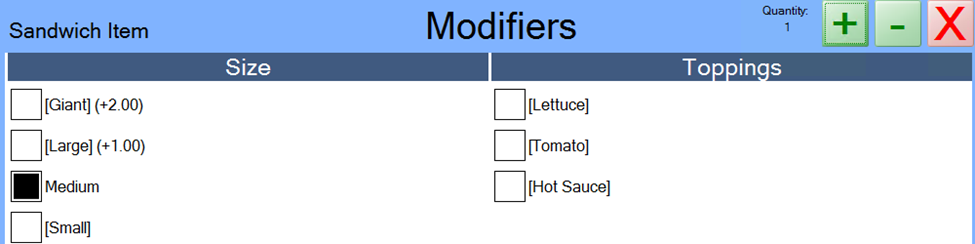
‘Required’ – This box on the right requires the user to choose at least one option from this category. Note: At least one “Option Category” must be marked ‘Required’ to use Modifiers on POS.
-
‘Multi-Select’ – This must be checked to allow multiple values in that category to be selected.
10. The Copy Item Options link lets you choose an Item to Copy From, adding those options to this item. This currently ADDS the copied item’s “Item Options”; it does not REPLACE them.
11. Remove Item Option can be used to remove one item option at a time from the item. (see below)
Vendor Information
Vendor information is maintained under the “Vendors” tab.

One or more vendors may be assigned to an item. To do so, enter the following information:
-
“Vendor Name” – Select the vendor from the dropdown list.
-
“Vendor Item No.” – The specific item number the vendor uses to identify the item
-
“Cost” – The cost you pay the vendor for the item
-
“Cost Discount” – The amount the vendor has given as a discount (as a percentage off)
-
“Extra Cost” – Any added costs associated with the item that should be included in the cost
-
“Freight Cost” – The shipping costs associated with receiving this item
-
“Total Cost” – The total cost of the item. This field is automatically calculated by multiplying the cost discount by the item cost and then adding in any extra or freight costs.
-
“Sugg. Price” – The suggested price for selling the item, typically provided by the vendor
-
“Sugg. Margin” – The suggested margin for selling the item, typically provided by the vendor
10. “Vendor Min Order (ea.)” – The minimum amount to be ordered from the vendor. This will be the default quantity utilized when this item is added to a PO by typing in or searching for the item in the “Item No.” field. This number will most likely be a multiple of the “Case Qty” if using that feature.
11. “Case Qty” – The number of the item per case. When using auto-generated POs, the item will be ordered from the vendor as a multiple of this number. For example, when inventory drops under the “Wareh. Min” and your “Case Qty” is “7,” an auto-generated PO for this item would order the item as a multiple of 7. When using the “Add Items” button on a regular PO, the “Selected Qty” is the number of these cases that are being ordered.
12. “Order Item” – If using case items, this permits the case item to be added to the purchase order when auto-generating purchase orders, instead of the current inventory item.
Note: This can be used for case items, not for kit items.
13. ‘Auto Order’ – If selected, this item will be included when auto-generating purchase orders.
14. ‘Primary Vendor’ – Checking this will mark this vendor as the primary vendor, and fields that refer to a vendor for this particular item will default to this vendor first.
15. “Details” – Clicking the View Details link displays a cost history for the item and allows for the entering and/or editing of cost changes. Note: Verify the correct cost is marked ‘Active.’
Inventory Information
Inventory information is viewed and maintained under the “Inventory” tab.
If an item is of the item type “Inventory Item,” current on-hand inventory can be viewed under the “Inventory” tab. In addition, minimum and maximum order quantities can be maintained here as well.

The fields on this screen have the following functionality:
-
“Warehouse Qty” – The current inventory quantity on hand at the warehouse
Note: Clicking the “Warehouse Qty” field link will display the locations within the warehouse where the inventory is located.
|
-
“Warehouse” – The warehouse where the inventory is located
-
“Committed Qty” – The number of the item committed to customers but still in inventory
-
“On PO” – Displays the quantity of this item that is on purchase orders with status “Ordered”
-
“Avg Cost” – Displays the average cost of this item
-
Note: Clicking the link under average cost will display the cost of each inventory.
-
-
“Last Cost” – Displays the most recent cost of the item
-
“Ship Date” – Displays the ship date of the oldest issued but unfulfilled purchase order
-
“Warehouse Min Order Qty” – This is the minimum number of this item to be ordered in a transfer from this warehouse when creating a picklist.
-
“Order Multiple Qty” – This is the multiple of the item to be ordered from the warehouse at one time when creating a picklist. The quantity picked will start with the “Warehouse Min Order Qty” and then go up by the “Order Multiple Qty” amount.
10. “Wareh. Min” – The minimum number of the item you wish to have in inventory
11. “Wareh. Max” – The maximum number of the item you wish to have in inventory
When generating an automatic PO, when inventory drops below the “Min” amount, the PO will generate an order amount that will bring inventory up to the set “Max” amount.
12. “Min/Max Details” – Click this link to edit the minimum and maximum order information.
a. Warehouse minimums and maximums can be specified by date ranges in this link.
b. When using the “Generate Orders” or “Generate Auto PO” feature for a new PO, the active “Min Qty” and “Max Qty” values will be used.
Default Item Locations
Default item location information is viewed and maintained under the “Item Locations” tab.
Default locations for sales and receiving can be set up on a per-warehouse basis for items. When these locations are set and the default locations are not overridden, the system will use these locations when selling and receiving the items. If no item-specific locations are set, the warehouse defaults will be used.

These fields can be created or configured under the “Main Menu/Settings/Warehouse Setup” button. Every store needs a “Warehouse” set up, but not every warehouse needs a specific “Store.”
The location fields under the “Item Locations” tab are used as follows:
-
“Warehouse” – Select the warehouse containing the location.
-
“Location” – Select a location within that warehouse.
-
“Store” – Select the store where the item is located. Stores need to have a “Warehouse.”
-
“Order” – If using multiple sales locations, specify the order by entering a number. The system will sell from the location with the lowest number until inventory is depleted from that location, and then it will take from the next location in ascending numerical order.
-
“Default Receive Location” – Check this if this location should be the default for receiving.
-
“Default Sale Location” – Check this box if this should be used as the default sale location.
-
“Active” – This simply indicates that the location record is current and active.
Case Items
StoreLIVE! supports the buying and selling of different units by what are called “case items.” For example, a store may choose to sell paper towels both by the “roll” and by the “case.” For this example, we’ll assume a case of 12 rolls. When selling by the roll, it will be sold based on the Item No. or UPC (these are used interchangeably here) of the roll, and at a “per roll” price. However, when selling by the case, it will be sold using the UPC of the case (which is different than the UPC of the roll), and the case price will most likely be different than the “per roll” price. When tracking inventory, the store may not want to maintain two separate inventory counts—they simply want to track inventory “per roll.” When a roll is sold, a quantity of one (1) should be removed from inventory; when a case is sold, a quantity of twelve (12) rolls should be removed.
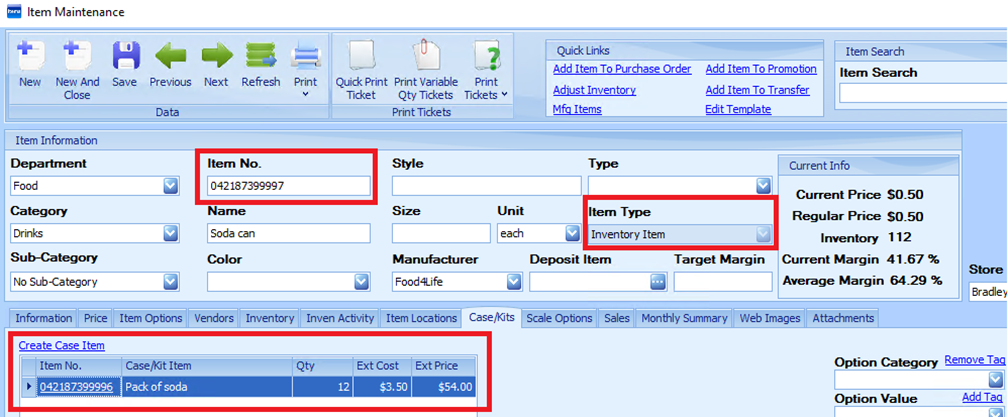
To accommodate this scenario, the store should set up an item with Item Type “Inventory Item” for a paper towel roll, and assign the “per roll” price and UPC/Item No. to this item.
A second item should be set up as Item Type “Case Item.” The case price and the case UPC should be assigned to this item. Then, this item should be then be linked to the “per roll” item under the “Case/Kit Setup” tab with the case quantity of 12. This information should be filled in on the CASE item, not on the individual item.
The setup of this case item is shown below. In this example, Item No. 042187399997 is the item number for a can of soda (the “per roll” item), and the Item No. 042187399996 is the item number for an entire pack of soda (the “case” item). The case item is loaded into the screenshot below.
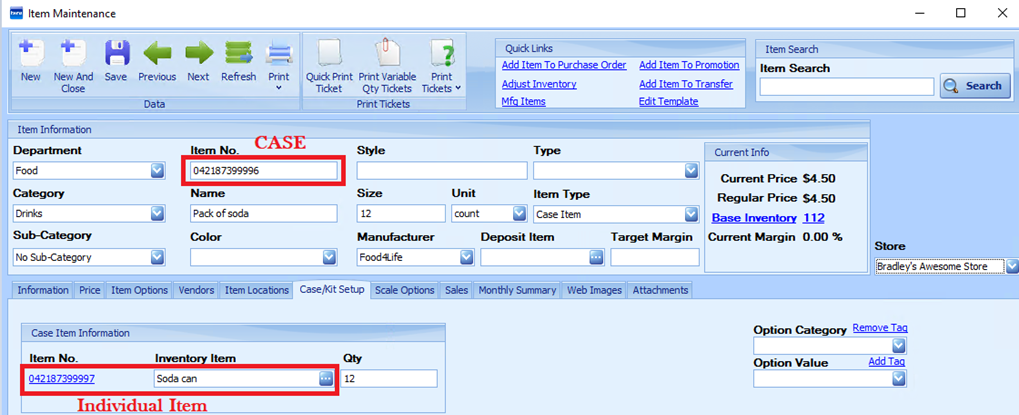
The screenshot below is the individual item (the “roll” item) that the case is made up of.
Kit Items
A kit item in StoreLIVE! is an item that may be bought or sold as a single unit, but it consists of one or more inventory items. For example, a store may choose to stock patio chairs, tables, and umbrellas. Each of these items may be sold individually. However, if 4 chairs, a table, and an umbrella are purchased, the store considers this a “patio set.” The “patio set” price is lower than the combined individual prices for each of the items. Since each item of the set may be purchased individually, the store wants to track inventory at the individual item level. The store does not specifically designate which items will be sold in sets, and which items will be sold individually.
Using this example, the patio set would be set up as a “Kit Item” in StoreLIVE!
This item is then linked to the chair item with a quantity of 4, the table item, and the umbrella item. When this kit is sold, 4 chairs, 1 table, and 1 umbrella would be taken out of inventory.
To set up a kit item:
-
Create an Inventory Item for each individual piece of the kit. (See previous instructions for creating items.)
-
Create a Non-Inventory Item that will be used as the “kit item.” Assign the kit price and kit Item Number to this item.
-
Load the Non-Inventory Item in Item Maintenance.
-
Change the Item Type to “Kit Item.” Save.
-
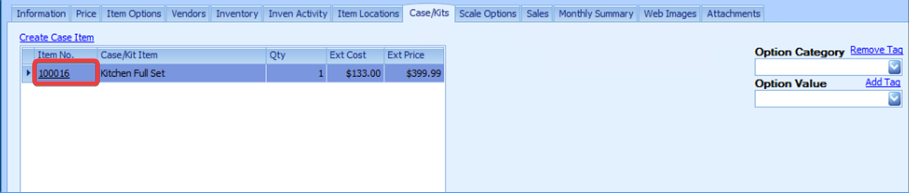
Under the “Case/Kit Setup” tab, list each component and corresponding quantity.
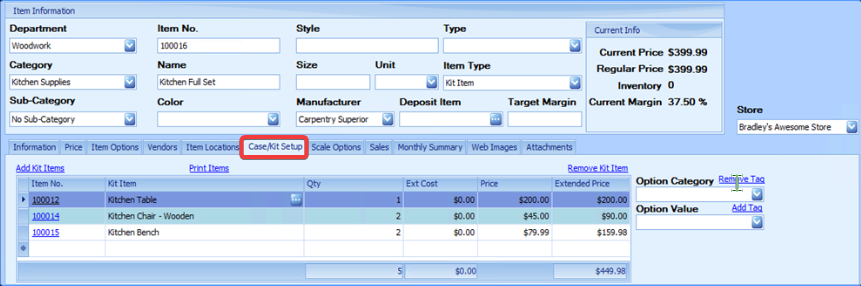
The following screenshot is an example of a “Kit Item” kitchen set that includes the following:
1 Kitchen Table, 2 Kitchen Chairs, and 2 Kitchen Benches:
Linked Cases/Kits
Case/kit information is viewed and maintained under the “Case/Kits” tab.
Scale Options
Scale information for items being sent to scales is viewed and maintained at the “Scale Options” tab.
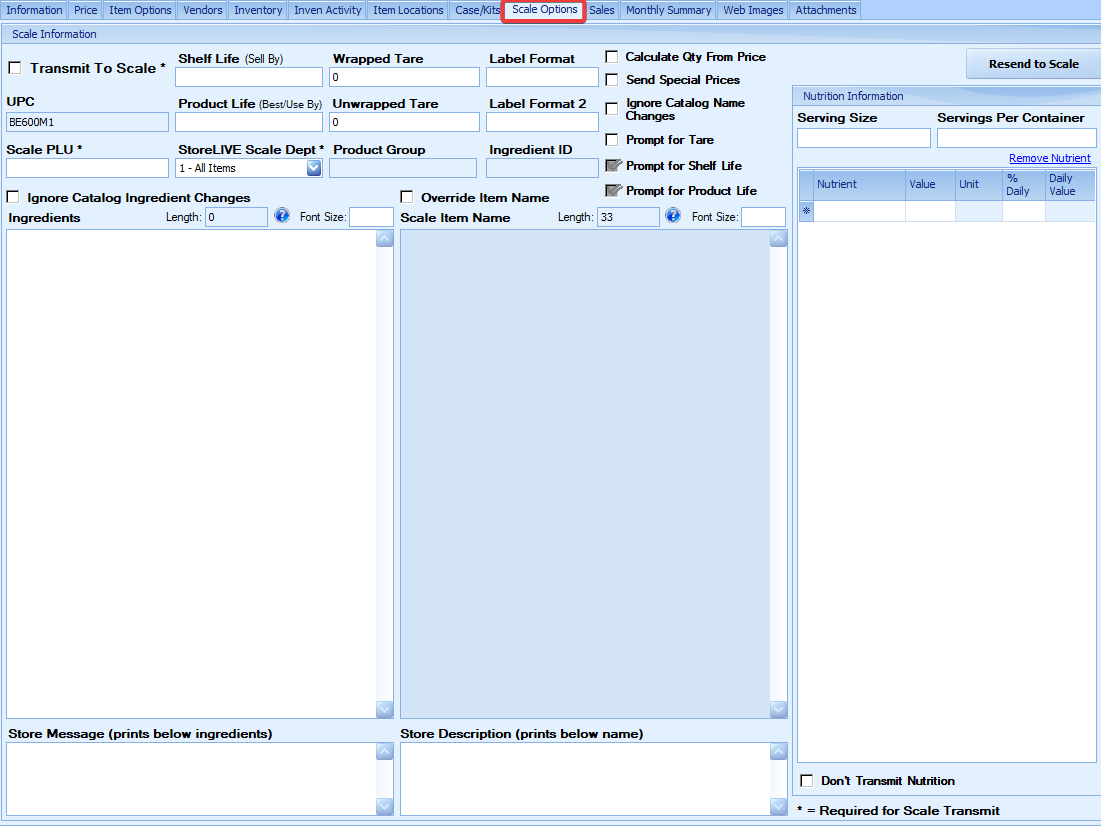
The “Scale Options” section of an item allows for integrating item information used in deli/bulk/meat/produce scales. When StoreLIVE! is used in conjunction with a scale communication package (such as ePlum), this information can be transferred to scales, eliminating duplicate entry of item data. This allows StoreLIVE! to be used as the singular item database. Selected options under this tab also control how POS will process variable weight barcodes when they are scanned or entered. The fields with asterisks are required for transmit-to-scale items.
Note: Some of the checkboxes may not be selectable if there is no corresponding field or catalog for the option or field to pull from.
-
‘Transmit To Scale’ – When checked, this item information will be transmitted to the “Update Scales” button when using the scale integration feature.
-
‘Calculate Qty From Price’
When this box is checked, when this item is scanned at the Point of Sale, the system will divide the extended price in the barcode by the unit price maintained in the StoreLIVE! database to calculate the quantity that was sold. This option should be checked when tracking inventory on items sold by weight.
When unchecked, the Point of Sale system will use “1" as the quantity, and the unit price will be set to the extended price contained in the barcode rather than calculating how many of the item was sold based on the total price divided by the individual price.
The following page contains examples of what these options look like.
Examples:
When ‘Calculate Qty From Price’ is checked:
Example item: 2.35 lb of flour at $0.99/lb = $2.33
Point of Sale will divide $2.33 by $0.99 to determine that the amount sold is 2.35 lb
Item will show on receipt and sales as:
Flour…….. 2.35 @ $0.99 = $2.33
When ‘Calculate Qty From Price’ is NOT checked:
Same example item: 2.35 lb of flour at $0.99/lb = $2.33
Item will show on receipt and sales as:
Flour…….. 1 @ $2.33 = $2.33
-
‘Send Special Prices’ – When checked, any special selling prices (such as Special Prices set up under an item’s “Price” tab) for the item are transmitted to the scale. When not checked, the price transmitted to the scale is always the regular selling price.
Note: This setting also affects the price used by the Point of Sale when the ‘Calculate Qty From Price’ box is checked.
If Special Prices ARE transmitted to the scale and the date range of the Special Prices is current, the system will assume the price on the item label/barcode is the special price. So when it calculates the quantity, the system assumes the price on the barcode is the price to be used.
If Special Prices ARE NOT transmitted to the scale and the date range of the Special Prices is current, the system will use the regular price when it calculates the quantity, as the system assumes the price on the item label/barcode is the regular price. However, once the quantity has been calculated, the Point of Sale system will use the special price as the unit price and override the price on the label/barcode with the special price. This setting allows pre-packaged items and items that are sold by weight to be put on sale without having to change labels on the items.
-
‘Don’t Update Name From Catalog’ – When checked, this will prevent the item name from automatically being updated to the description provided by the vendor’s catalog.
-
‘Prompt for Tare’ – When checked, the scale will prompt for a tare for this item. Note: This feature is not supported by all scales.
-
Scale PLU – The PLU number to be assigned to the item for the scale. This could possibly be the Item No. or UPC. Note: PLU numbers must be 5 or less digits when printing barcodes!
-
Wrapped Tare – Weight (in pounds) of the package in which the item is wrapped
-
UnWrapped Tare – Weight (in pounds) of the package in which the item will be wrapped
-
Shelf Life – Number of days until the product should be sold (Sell By)
10. Product Life – Number of days until the product expires (Best/Use By)
11. Label Format – Entering a label formatting code here will change how the label information looks. For example, entering “103” will set the label to the Hobart scale default label format.
12. Product Group – This field is automatically filled in based on a Product Group that can be set under the “Category” tab when creating departments and categories.
13. Scale Department – Scale Department to which the item will be assigned. Departments can be used in a scale to separate lists of PLU numbers. Typically, StoreLIVE! uses only the default “1 - All Items” option.
14. ‘Don’t Update Ingredients From Catalog’ – When checked, this will prevent the ingredient list from automatically being updated to the ingredient list provided in the vendor catalog.
15. Ingredients – Ingredients’ text for the item
16. Scale Item Name / ‘Override Item Name’ – If the ‘Override Item Name’ box is NOT checked, the system transmits the item’s Name to the scale as the item name on the scale.
If the ‘Override Item Name’ IS checked, the description typed into this field is sent to the scale as the item name instead.
17. Store Description – This is a field that can be used to describe the store, typically with a short description or phrase such as a slogan. It will print underneath the store name.
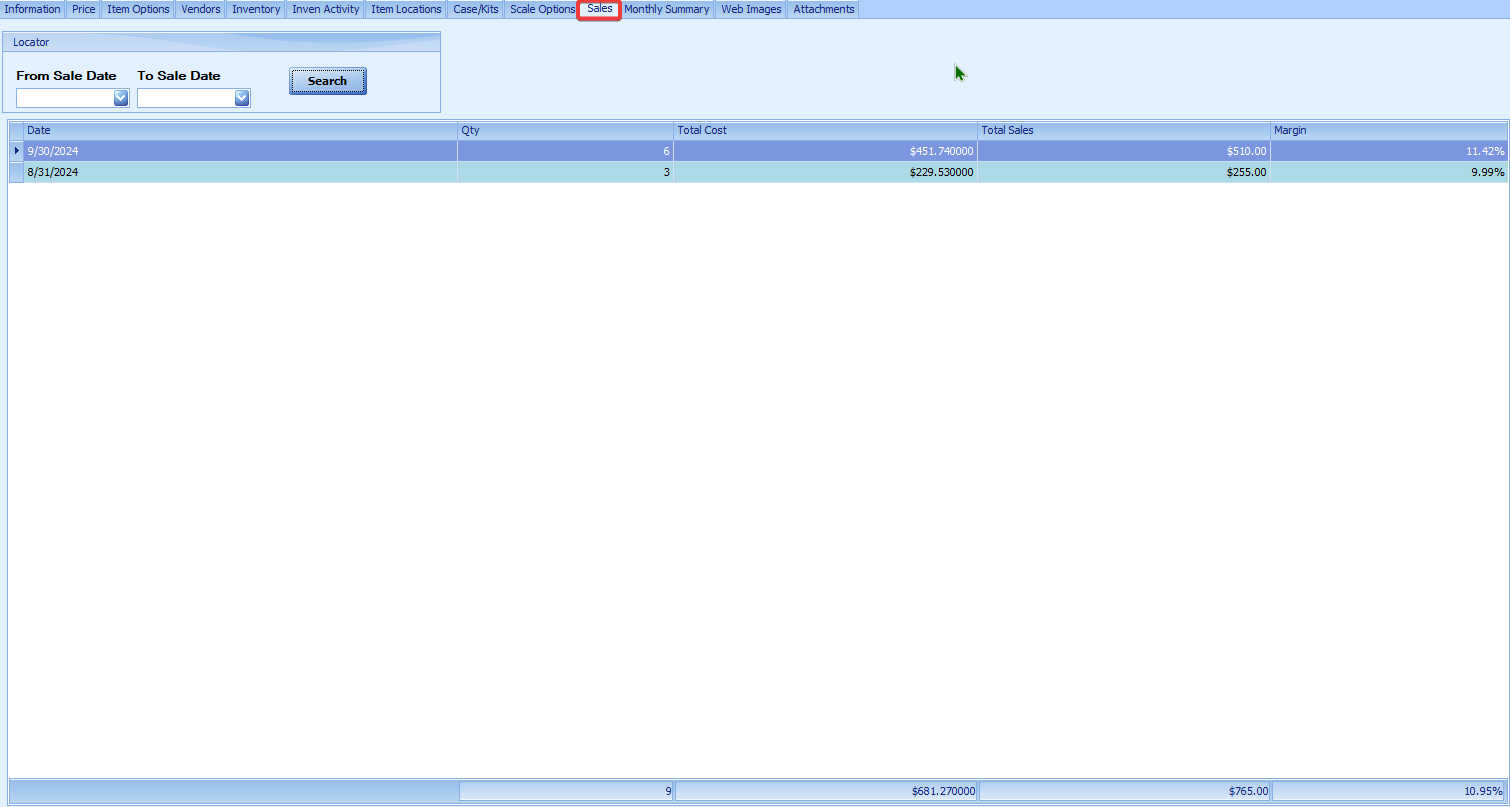
Sales
The “Sales” tab can be used to view a quick snapshot of the item’s sales on a daily basis. A date range can be entered, or the “Search” button can be clicked without a date range to view the most recent sale. (see below)
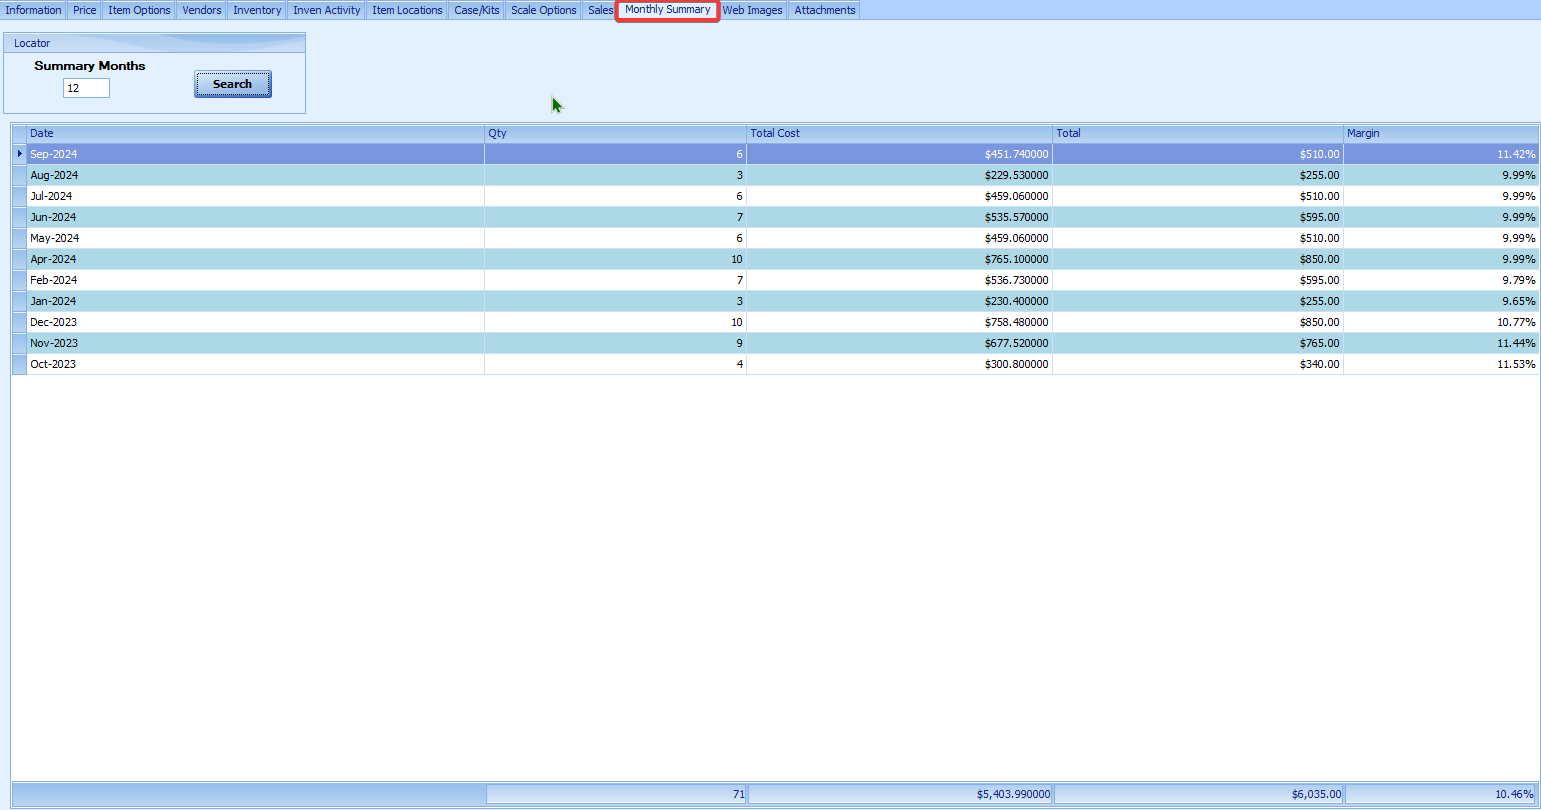
Monthly Summary
The “Monthly Summary” tab can be used to view item sales on a per-month basis. The number entered is the number of months. (see below)
Mass Updating Item Information
StoreLIVE! supports mass updating item information all at once. Options such as changing the taxable status or the assigned category of a group of items can be done with just a few clicks using this feature, instead of needing to manually locate and change each item individually.
To Mass Update Items:
-
From the StoreLIVE! Main Menu, click the “Item Maintenance” button.
-
On the “Item Locator” screen, query the group of items you wish to update by using the filters and pushing the “Search” button.
-
After the query results are displayed, click the Item Information icon on the toolbar.
-
The “Update Item Information” screen will display with the items that were previously listed on the screen.
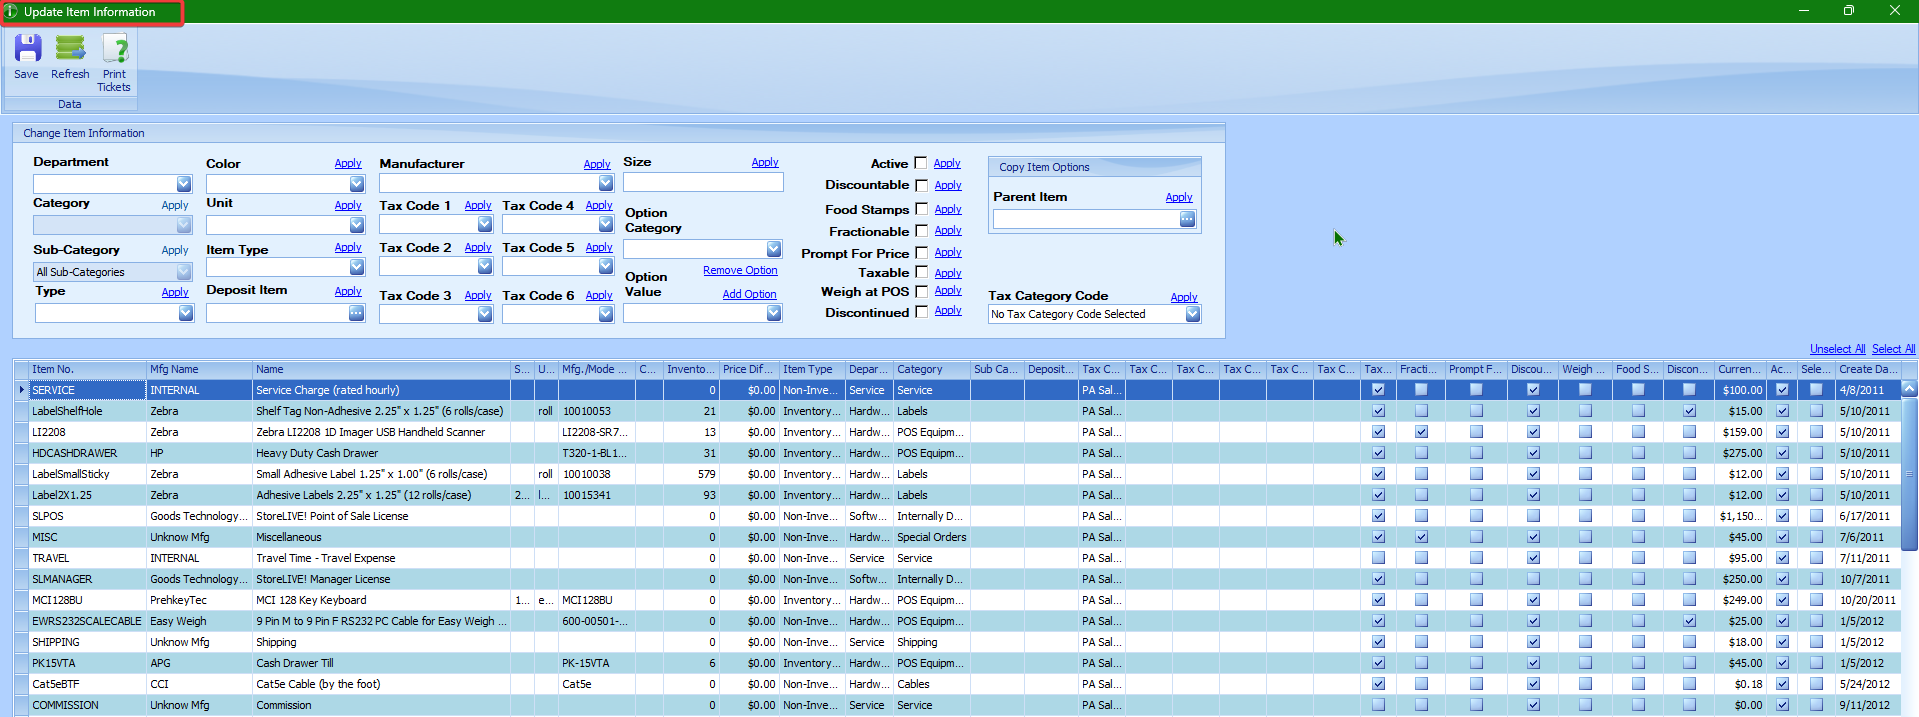
5.Select the items that should be updated, either by clicking the Select All link or by individually checking the boxes in the ‘Selected’ column at the far right of the table.
-
In the “Change Item Information” section, set the value of the field you wish to update. For example, to set all items as taxable, select the check box next to the Taxable option. (To change the “dropdown” fields, such as the Unit, select the new value from the dropdown.)

-
Click the Apply link to the right of the field you want to change to apply the changes.
NOTICE: THIS WILL ONLY CHANGE THE STATUS OF THAT ONE FIELD, AND ONLY TO THE PREVIOUSLY SELECTED ITEMS.
WARNING: BE CAREFUL! YOU ARE CHANGING A LOT OF INFORMATION WITH JUST A FEW CLICKS HERE AND MAY NOT BE ABLE TO UNDO THEM EASILY.
-
To make the change permanent, click the “Save” toolbar icon.
-
This process can be repeated for other fields as needed.
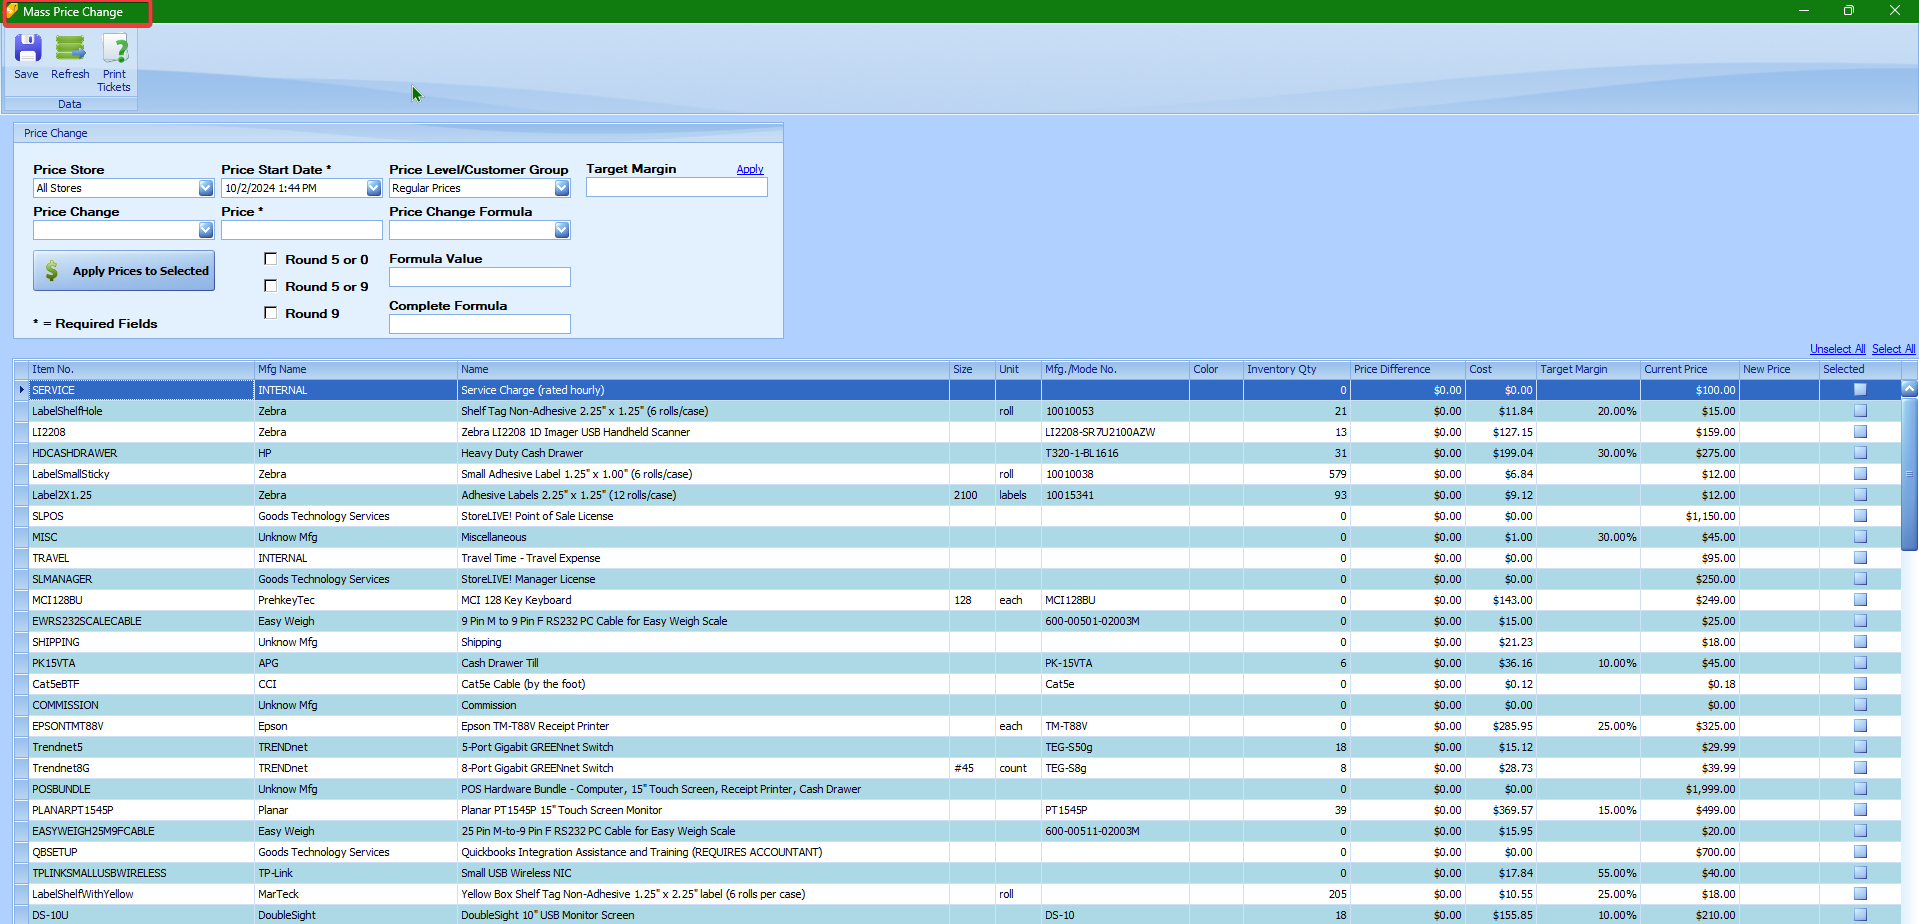
Mass Price Changes
The StoreLIVE! system also allows for mass updating of the regular selling price of items. This is useful when you want to apply a price increase or decrease to a group of items.
To perform a Mass Price Change
-
From the StoreLIVE! Main Menu, click the “Item Maintenance” button.
-
On the “Item Locator” screen, query the items you wish to update by doing a search.
-
After the query results are displayed, click the Price Change icon on the toolbar.
4. The “Mass Price Change” screen will load and display the items you had queried.
-
Select the items that should be updated, either by clicking the Select All link, or by individually checking the box in the ‘Selected’ column at the far right of the table.
-
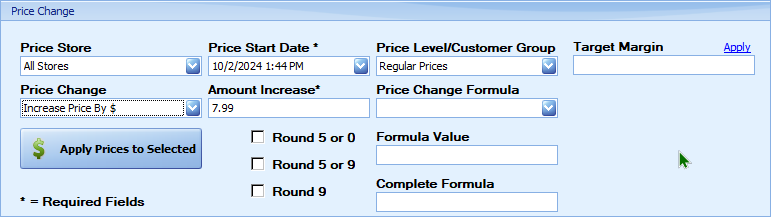
In the “Price Change” section, select the Price Start Date. (This controls when the price change will go into effect at the Point of Sale.)
-
In the Price Store dropdown, choose a specific store if the price change only applies to a single store. Otherwise, choose the “All Stores” option.
-
In the Price Change dropdown, choose from the following options:
a. “Set Price Equal To $” - Select this to make all the prices be a specific dollar amount, such as $2.99.
b. “Increase Price By $” - Select this to increase the prices by a specific dollar amount. For example, use this selection to increase all the selected item prices by 25¢.
You can enter a negative amount in the Price field to decrease the price.
c. “Increase Price By %” - Select this to increase the prices by a percentage. So you could use this selection to increase the selected item prices by 5 percent.
d. “Update Price From Target Margin” – Select this to set the price of the selected items to the amount necessary to meet your target margin based off of your given cost and target margin. For example, let’s say your cost is $1. If your target margin is set to 50%, it would automatically set the price to be $2 to reflect that amount. If an item doesn’t have a target margin, you can enter one in the column and press Save.
e. “Set Price equal to % Margin” – Select this option to calculate the price off of a margin percentage, which is to be entered into the Price field. This is the same as option (d) above, except the number you enter in to the Price field becomes the target margin written as the percent you want it to be. For example, if the cost of one of your selected items is $2 and you enter “50” in the Price box for 50%, the new price for that item will become $4.
-
In the Price field, set the value of the price change or amount. This will either be a dollar amount or a percentage written as a whole number (e.g., enter “25” for 25%), depending on the option selected in the Price Change dropdown field.
Note: that negative amounts can be entered to decrease prices.
-
Optionally, the system can round prices when the price change is applied. This is done by checking one of the ‘Round’ checkboxes. It may be important to note that these take effect AFTER the applied price change amount. These options are as follows:
a. ‘Round 5 or 0’ – This option will round values from .01 to .04 up to the next fifth cent, and values from .06 to .09 will be rounded up to the next tenth cent. For example, a value of 1.12 would be rounded to 1.15 and a value of 1.16 would round up to 1.20.
b. ‘Round 5 or 9’ - This option will round values from .01 to .04 up to the next fifth cent, and values from .06 to .08 will be rounded up to the next ninth cent. For example, a value of 1.12 would round up to 1.15, and a value of 1.16 would round up to 1.19. Notice: Values of .00, .10, .20, etc., are rounded down to the previous ninth cent. In this case, 1.10 would be rounded to 1.09, and 1.20 would round down to 1.19.
c. ‘Round 9’ - This option will round values up OR down to the nearest ninth cent. For example, a value of 1.10 would be rounded to 1.09, a value of 1.12 would be rounded to 1.09, and a value of 1.16 would be rounded up to 1.19.
NOTE: This feature will round DOWN amounts ending in 4, so 1.14 will round to 1.09
-
After all the price change options have been set (and all the items you want changed are selected), click the “Apply Prices to Selected” button to apply the price changes. After clicking this button, the “New Price” column will show the new price for each selected item.
-
To make the price change permanent, you will need to click the “Save” toolbar icon.
Note: Price changes can also be manually entered on this screen by typing prices into the “New Price” column and clicking the “Save” toolbar icon. The Price Start Date that is displayed in the “Price Change” section will be the start date for manually entered prices as well as calculated prices. Manually entered items only update when you click “Save,” and calculated formulas update when you press the “Apply Prices to Selected” button. The formula-updated prices do need to be saved as well, though.
Mass Updating Vendor Costs
The StoreLIVE! system also allows for the mass updating of vendor costs (maybe referred to as catalog costs). This is useful when you wish to apply a cost increase or decrease to a vendor’s group of items.
Cost Change Screen
The “Cost Change” screen offers you tools you can use to quickly update cost information. In addition to updating costs and selling prices, you can analyze how the changes made will affect your profits.
-
From the “Item Maintenance” screen, enter search criteria and click the “Search” button. Important Note: Since costs are associated with vendors, the search must include a specific vendor before the Cost Change button will become selectable.
-
Click on the Cost Change button. (see below)

-
The “Cost Change” screen will appear, and it will list the items that had been queried in the “Item Locator” screen. This may default to the “Price Change” tab for that vendor.
-
Select the “Cost Change” tab, pictured below. Then select the items that need cost changes, either by clicking the Select All link, or by manually checking the checkboxes in the ‘Selected’ column at the far right of each item you wish to change.
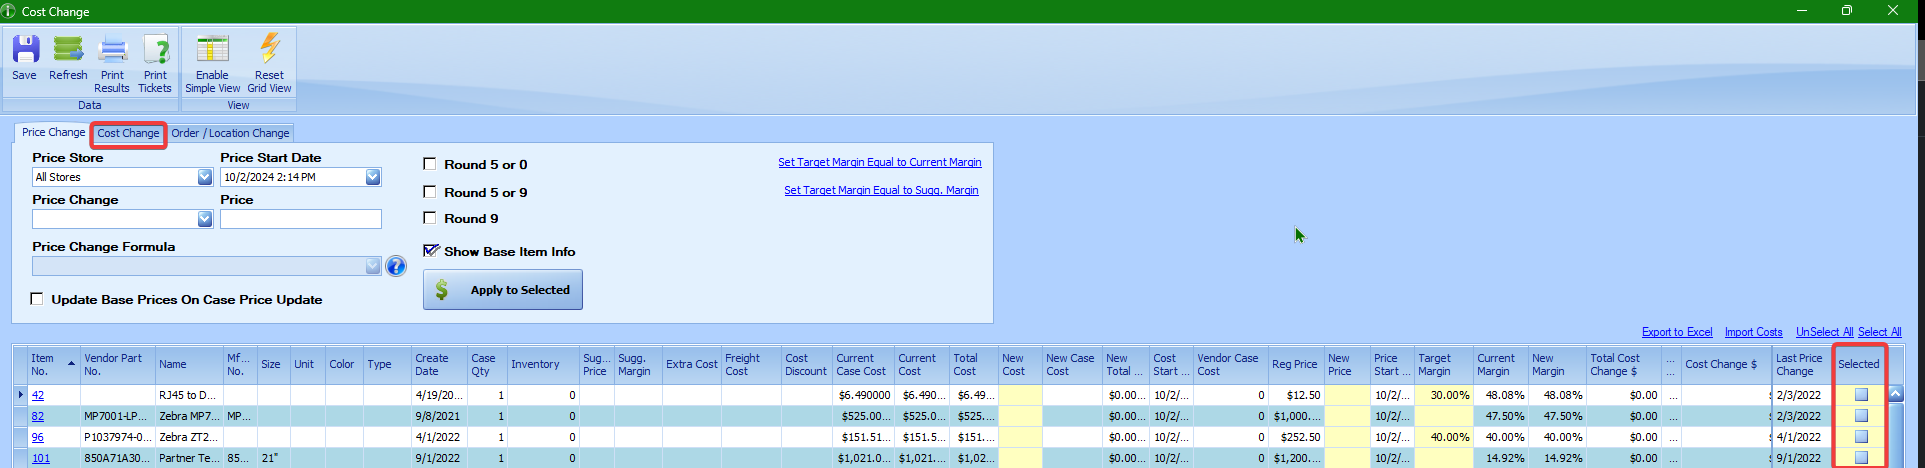
-
Cost changes can be manually entered into the “New Cost” field and saved, or the “Cost Change” section can be used to apply cost changes to the selected items the same way you would change prices (see Mass Price Changes, p. 2-40), then clicking “Apply to Selected.” (see below)
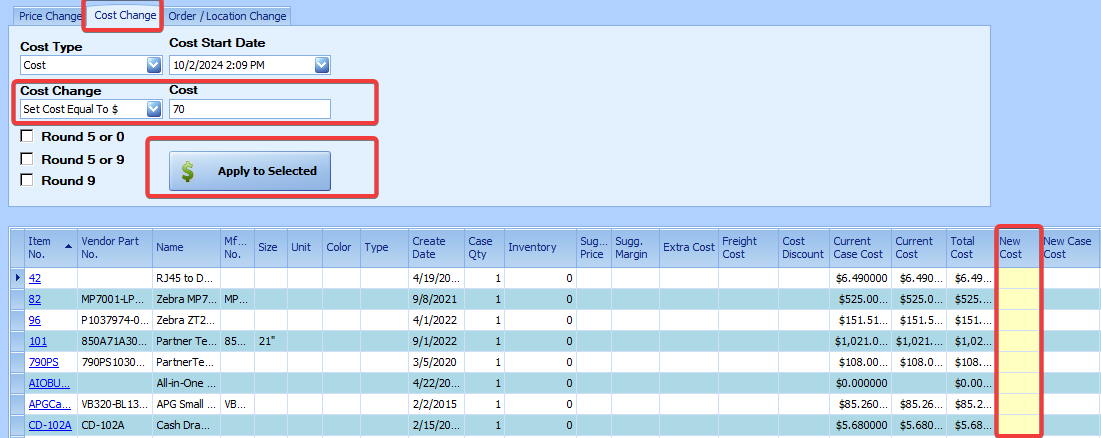
-
In the Cost Change dropdown, choose from the following options:
a. “Set Cost Equal To $” – Select this to set the cost to a specific amount, like $2.99.
b. “Increase Cost By $” – Select this to increase the cost by a specific dollar amount. For example, use this selection to increase the item costs by 25¢.
c. “Increase Cost By %” – Select this to increase the cost by a percentage. For example, use this selection to increase the selected items costs by 5 percent.
d. “Set Cost To % Of Item Cost” – Select this to make the cost a percentage of the current cost. Example: Enter “80” in the Cost field to change a $2.00 cost to be $1.60.
-
In the Cost field, set the value of the cost change. This will either be a dollar amount or a percentage, depending on the option selected in the Cost Change dropdown. If a percentage, the value should be entered as a whole number (10 should be entered for 10%). Note that negative amounts can be entered to decrease costs.

-
Optionally, the system can round cost amounts when the cost change is applied. This is done by checking one of the ‘Round’ check boxes. Same as for prices, the options are:
a. ‘Round 5 or 0’ – This option will round the cost from .01 to .04 up to the next fifth cent, and values from .06 to .09 will be rounded up to the next tenth cent. For example, a value of 1.12 would be rounded to 1.15 and a value of 1.16 would round up to 1.20.
b. ‘Round 5 or 9’ - This option will round values from .01 to .04 up to the next fifth cent, and values from .06 to .08 will be rounded up to the next ninth cent. For example, a value of 1.12 would round up to 1.15, and a value of 1.16 would round up to 1.19. Note: Values of .00, .10, .20, etc., are rounded down to the previous ninth cent. In this case, 1.10 would be rounded to 1.09, and 1.20 would round down to 1.19.
c. ‘Round 9’ - This option will round values up OR down to the nearest ninth cent. For example, a value of 1.10 would be rounded to 1.09, a value of 1.12 would be rounded to 1.09, and a value of 1.16 would be rounded to 1.19.
NOTE: This feature will round DOWN amounts ending in 4, so 1.14 will round to 1.09
-
After all the cost change options have been set, click the “Apply to Selected” button to apply the cost changes. After clicking this button, the “New Cost” column will show the new cost for each selected item, and the “Total Cost Change $” column will show the cost difference.
-
To make the cost change permanent, click the “Save” toolbar icon.
Price Change by Vendor
You have several options available to help you change prices in the Price Change tab under the Cost Change button.
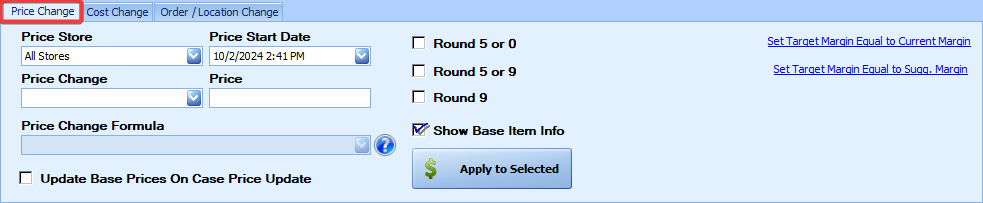
Price Store: A dropdown list to select the store to which the price change applies
Price Start Date: Select the starting date for this price change.
Price Change: A dropdown list of the types of Price Changes available
a. Set Price Equal To $: Enter the dollar amount in the Price box.
b. Increase Price By $: Enter the dollar amount in the Price box to increase the current price by this amount.
c. Increase Price By %: Enter into the Price box the percent to increase the price by. This should be entered as a full number (5 entered to increase by 5%).
d. Set Price equal to % Margin: Use this option if you want to make a certain margin on your selling price. Enter the margin percentage (again as a whole number) into the Price box. The “Price” box will change to say “Margin %.”
e. Set Price equal to % Markup: Enter a markup amount in the Price (“Markup %”) box. This is similar to the Price Increase, except it is based on the items’ costs.
f. Update Price Based On Formula: Update the price based on a formula selected in the Price Change Formula box. See below for more info on available formulas.
g. Set Target Margin Equal To: Enter the margin percentage amount into the Price (now “Target Margin %) field. The “Apply to Selected” button will apply that percentage as the new target margin. This option will not change prices.
h. Increase Target Margin By %: This will increase the current target margin of the selected items by the percentage entered in the Price (“Margin %”) field.
NOTE: This option does not work for items with no current target margin.
Price: Enter the percent or dollar amount to increase the price by this amount. The name of this box may change! Also, negative amounts can normally be entered, BUT NOT FOR MARGINS!
Price Change Formula: A dropdown list of various formula options you have to change prices. Use these formulas to have your price changes take into account additional cost beyond the vendor’s selling price. These are the options available under letter (f) above. There are three options relating to margin and three relating to markup.
a. Margin: Selling Price = ((Item Cost - Cost Discount) + Freight Cost + Extra Cost) / (1- Margin %): Margin percent is applied AFTER the freight and extra costs have been added to the cost price.
b. Margin: Selling Price = (((Item Cost - Cost Discount) + Freight Cost) / (1- Margin %)) + Extra Cost: The margin percent is applied after the freight cost is added, but before the extra cost is added to the price.
c. Margin: Selling Price = ((Item Cost - Cost Discount) / (1- Margin %)) + Freight Cost + Extra Cost: Margin percent is applied first, and then both freight and extra costs are added, to get the selling price.
d. Markup: Selling Price = ((Item Cost - Cost Discount) + Freight Cost + Extra Cost) * (Markup %): Markup percent is applied AFTER the freight and extra costs have been added to the cost price.
e. Markup: Selling Price = (((Item Cost - Cost Discount) + Freight Cost) * Markup %) + Extra Cost: The markup percent is applied after the freight cost is added, but before the extra cost is added to the price.
f. Markup: Selling Price = ((Item Cost - Cost Discount) * (Markup %)) + Freight Cost + Extra Cost: Markup percent is applied BEFORE the freight and extra costs are added.
Show Base Item Info: If an item in the list is a case item, checking this box will display the item information for the base item. This is checked by default.
Update Base Prices On Case Price Update: Check this box to automatically apply any price changes you have made regarding a case item to its associated base item as well. The price will be adjusted to take into consideration the number of units in the case.
Note: This does not work with the first two options on the Price Change dropdown. Using Set Price Equal To $ and Increase Price By $ on a case item will not affect the base price.
Customizing the Cost Change Screen Grid
You can customize the Cost Change screen to suit your needs. This may work for other tables as well.
To hide certain columns from your view, right-click the column header and select “Hide This Column.”
To make a column visible that has been removed: right-click a column header and select “Column Chooser.” A “Customization” table will appear, from which you can choose the column you wish to add.
You can change the order in which the columns appear from left to right by clicking and dragging a column header to the position you desire.
Click Save to save your settings. These settings will be saved when you exit the screen. Select the Reset Grid View button on the top taskbar to return the column settings to the default view.
Mass Update Item Scale Information
Item scale information can be mass updated using the Item Locator Scale Information screen. Fields such as the Scale PLU, Label Format, Shelf Life, tare weights, and others can be updated with this screen.
To Mass Update Scale Information:
-
From the StoreLIVE! Main Menu, click the Item Maintenance button.
-
On the Item Locator screen, query the group of items you wish to update.
-
After the query results are displayed, click the Scale Information icon on the toolbar. (see below)
-
The Change Scale Information screen will load and display the items.
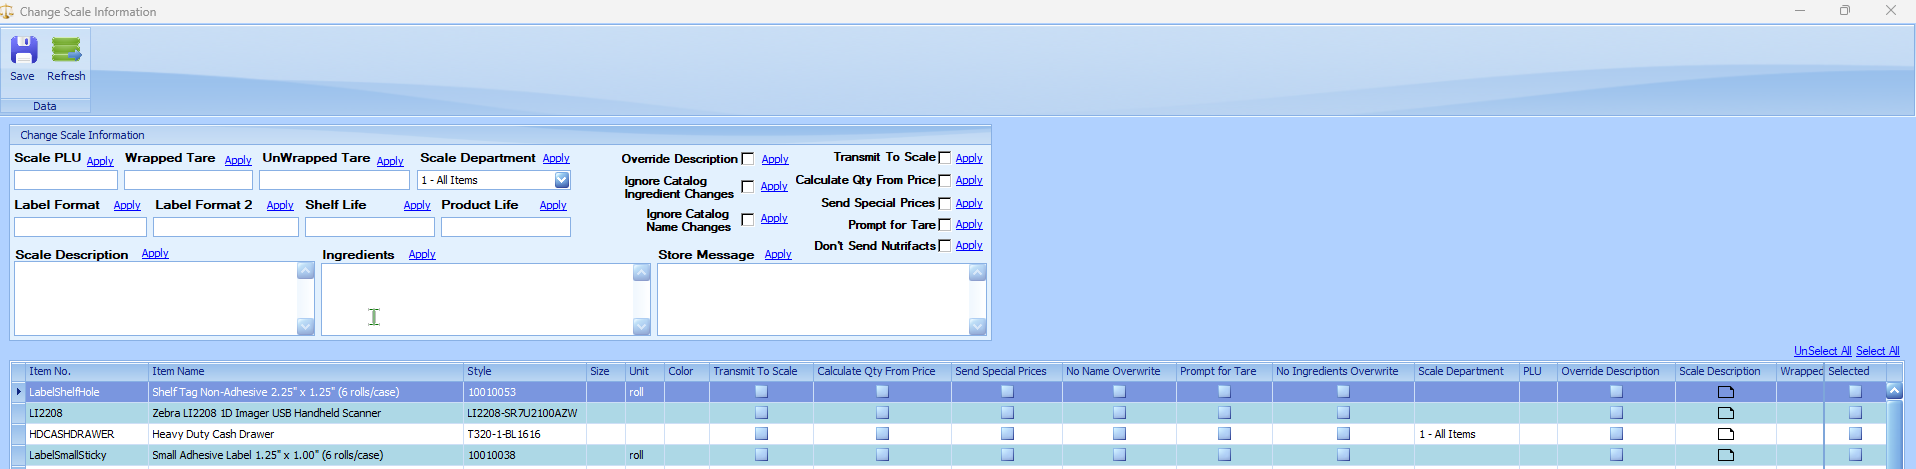
-
Select the items that should be updated, either by clicking the “Select All” link, or by individually checking the check box in the “Selected” column.
-
Enter information into a header field (such as Wrapped Tare), and click the Apply button next to it. Repeat this step for each field you wish to update. (When Apply is clicked, the data will be updated in that field for all selected items.)
-
When finished with the changes, click the Save icon on the toolbar to save the changes.