
The Import tools allow you to import item data to allow easier updating of item information and vendor catalogs, as well as helping to create purchase orders or receive items more quickly.
Warning! Imports cannot easily be undone. It is recommended that you carefully verify the data and options selected, and take a database backup before doing an import
Steps to Importing Data
One of the ways imports can be used is to create new items in the StoreLIVE! database. Regardless of which import tool is used, the same general steps are going to be used to import data. The system will automatically check if the items exist in the database already; however, for this example the Item Locator will be used.
-
The Data Import window should now appear. Regardless of the data being imported, the same Data Import tool is used.
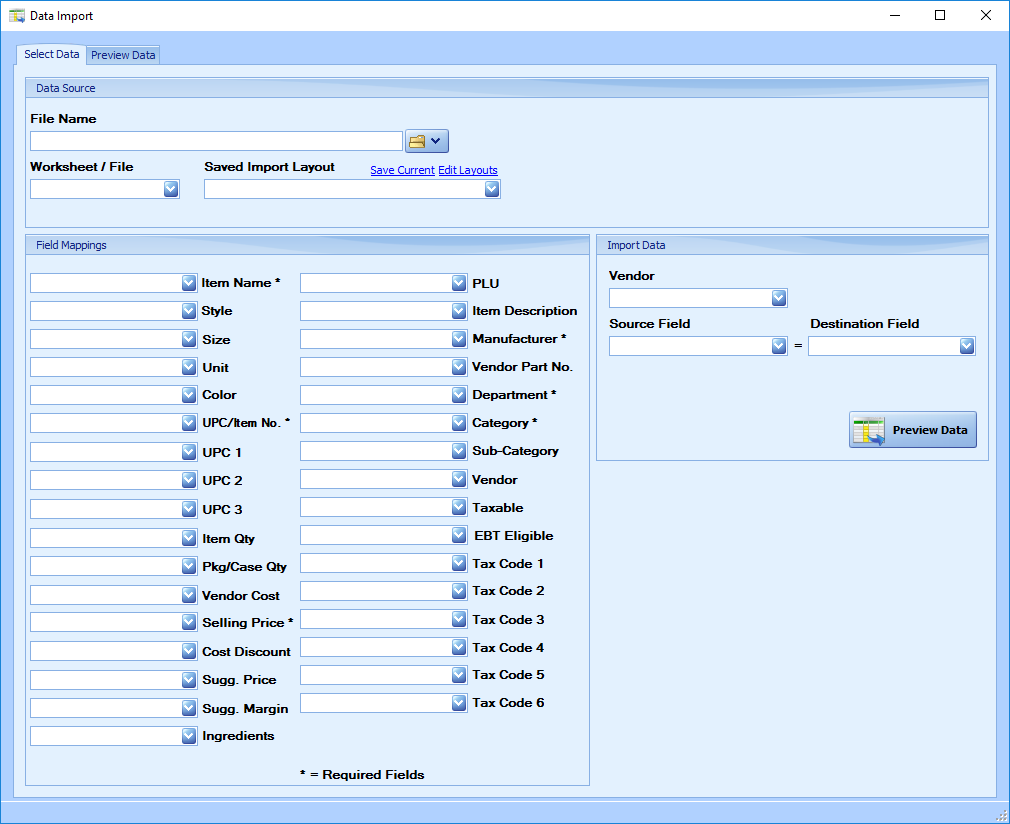
Click the Folder Icon to the right of the ‘File Name’ field. Select the file type being imported then browse to and select the file which has the desired item information you wish to add.
-
Verify the correct Sheet is listed under the Worksheet/File field. The Worksheet/File field will automatically select the first Sheet in the excel file. Only change this if there are multiple sheets saved within the Excel file and another needs to be selected.
-
The Field Mapping section is used to specify which field within the excel file will correlate to the fields of for the item within StoreLIVE!. Blank fields will be ignored and can be entered manually after the desired data is imported.
-
The Import Data section is used to determine which vendor these items will correlate to.
a. Select the Vendor in the vendor dropdown list.
b. Select the Source Field from within the excel file and then the Destination Field within StoreLIVE! that will correlate to the source field. This determines what is considered a unique entry.
-
Once all fields are entered, the current layout can be saved by clicking the ‘Save Current’ link in the Data Source section. This only saves the Field Mappings, not the Import Data so that it can be used for multiple vendors with little editing.
-
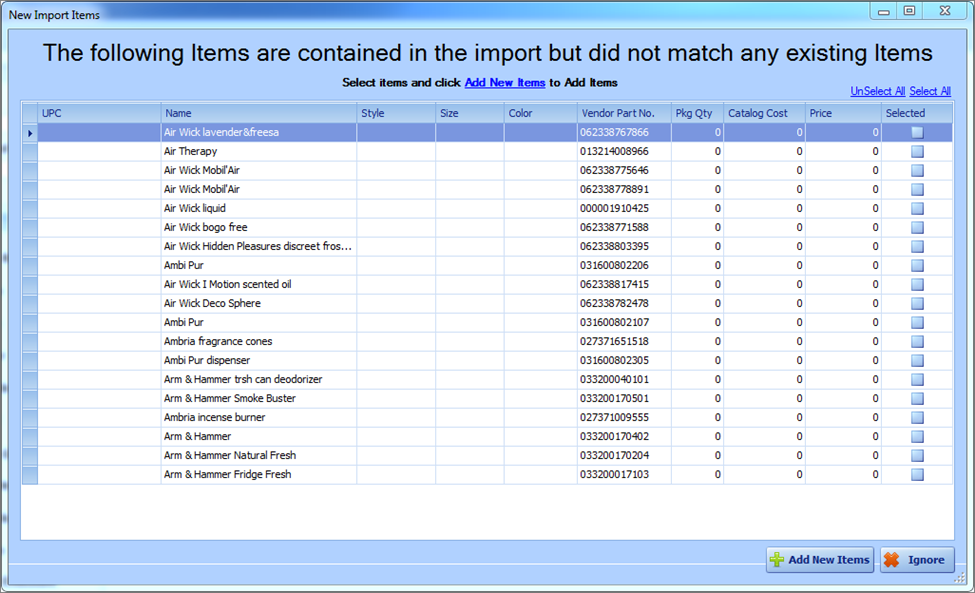
Click Preview Data once all fields are filled in to view what the data will look like. If you are attempting to import new items the following window will appear.
-
The New Import Items window will only show items that did not currently match anything in the StoreLIVE! database. Select which items are to be added using the checkboxes under the ‘Selected’ column.
-
Click Add New Items to generate those items within StoreLIVE!
10. The Create New Items window will now appear with the options selected for the first item in the list. These item fields can be edited or filled in, if blank. For additional help with creating an item, refer to the Item Maintenance section.
11. Click Add Item once the item is setup. A popup will appear if you have selected to add more than one item.
If Yes is selected, all the fields entered for the first item will be transferred over to the next item to be created. As before these fields can still be edited as needed.
a. If Yes is selected the default options are carried over to every other selected item.
b. If No is selected repeat steps 11 and 12 until every item has been setup.
12. Once the items have all been setup, the import items window will close and the Preview tab on the Data Import window will be present.

13. This is the final confirmation window; change any item fields that need to be edited.
14. Select the items to be entered and click ‘Commit Data.’
Importing New Items
One way the Importing tool can be used is to import new item data. This tool is meant to be used to create items that are not currently contained in the StoreLIVE! database.
-
Click Item Maintenance in the StoreLIVE! Main Menu.
-
Click the Import New Items button in the top menu bar.

-
Refer to the Steps to Importing Data for step by step instructions on how to use the Data Import tool.
Importing updated Catalog Costs
New costs can be imported into a vendor catalog. This tool
-
Click the Vendors/Manufacturers button in the StoreLIVE! Main Menu.
-
Search for and open the desired vendor’s information.
-
Click View Vendor Catalog in the menu bar of the Vendors/Mfg.. window.
-
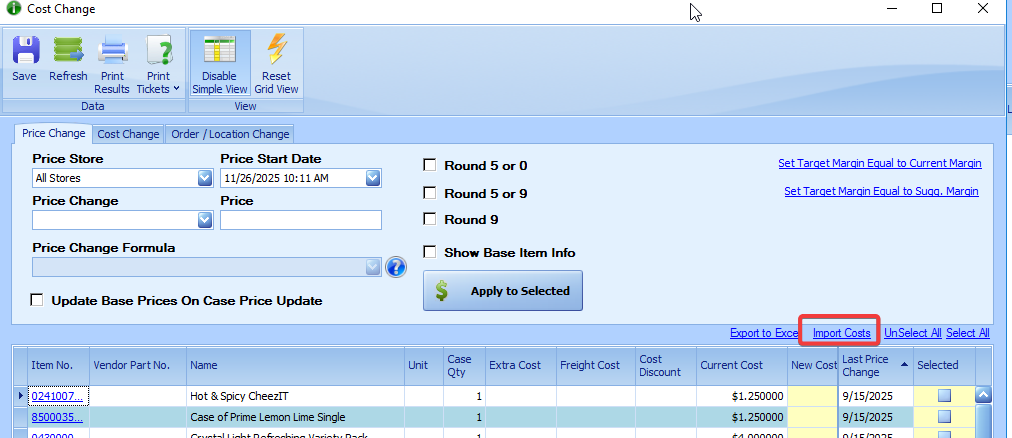
Click the Price/Cost Change button in the menu bar of the Vendor Catalog window.
-
Search for the items within the catalog that the costs are to be updated for, and select them using the checkboxes in the “Selected” column.
-
As opposed to importing costs manually, click the Import Costs link to import the costs from an Excel document automatically.
-
Refer to the Steps to Importing Data for step by step instructions on how to use the Data Import tool that appears.
Importing into Purchase Orders
Data can also be imported into a purchase order (PO) to either affect the costs displayed, or to input items directly into the PO.
-
Click the Purchase Orders icon in the StoreLIVE! Main Menu.
-
Create a new purchase order, or open an existing one. More help with using POs can be found in the Ordering section.
Importing Items
-
Once the Purchase Order is open, click the Import Items button in the top menu bar.

-
Refer to the Steps to Importing Data for step by step instructions on how to use the Data Import tool that appears.
Importing Items is the tool that should be used to import a list of items directly into the PO, such as maybe a list of items ordered in another venue that hasn’t been accounted for through StoreLIVE!
Import Item Costs
-
Once the Purchase Order is open, click the Import Item Costs button in the top menu bar.

-
Refer to the Steps to Importing Data for step by step instructions on how to use the Data Import tool that appears.
Importing Item Costs, unlike Importing Items, is meant to import an updated list of item costs for items that have already been added to the Purchase Order.
Importing into Receiving
Data can also be imported into a Receiving document. This is used primarily to import a list of items often
-
Click the Receiving Items icon in the StoreLIVE! Main Menu.
-
Open an existing Receiving document or create a new one. Additional help in doing this can be found in the Receiving section.
-
Click the Import Items link found within the ‘Receiving Items’ section of the Inventory Receiving window.

Refer to the Steps to Importing Data for step by step instructions on how to use the Data Import tool that appears.