
Promotions
Promotions can be used to manage pricing on a group of items that will have a special selling price for a fixed period of time. Promotions can also be used to schedule regular price updates.
Creating or Modifying Promotions
To create a new or modify an existing promotion:
-
Click the Promotions icon the Store LIVE! Manager Main Menu
-
After Promotion Search screen loads, click the “New Promotion” button to create a new promotion, or enter search criteria and click the “Search” button to find an existing promotion. If editing an existing promotion, double click the promotion entry that you wish to edit after it appears on the search results.

Setting up a Promotion
-
Follow the previous steps to create a new promotion.
-
On the Promotions screen, enter a promotion name, such as “20% Off Sale”.
-
In the Price Start Date Field, enter the date/time for the prices to go into effect.
-
In the Price End Date Field, enter the date/time the promotion will be ended and the item prices should revert back to their regular selling prices.
-
In the Promotion Type dropdown, choose a “Promotion Type” See below for explanation.
-
Click the “Save” icon to save the promotion.
|
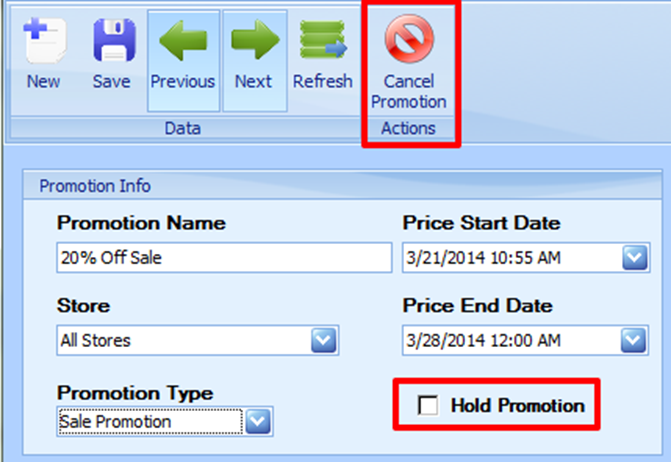
Note: If “Hold Promotions” is checked the promotion will not go into effect even after the “Price Start Date” passes. For more info see Clarification on Hold Promotion and Cancel Promotion |
Select the Promotion Types
-
Sale Promotion – Used when entering standard Sale or “Special” prices for one or more items
-
Regular Price Batch – Used when entering Regular Selling Price changes
-
Mix/Match Promotion – Used when setting up price schemes such as Buy One Get One Free, Buy 2 get Item 50% off, etc.
-
Split Pricing Batch – Used for setting up tiered or split pricing for items, such as 3 for a $1.00, 7 for $10.00, etc.
-
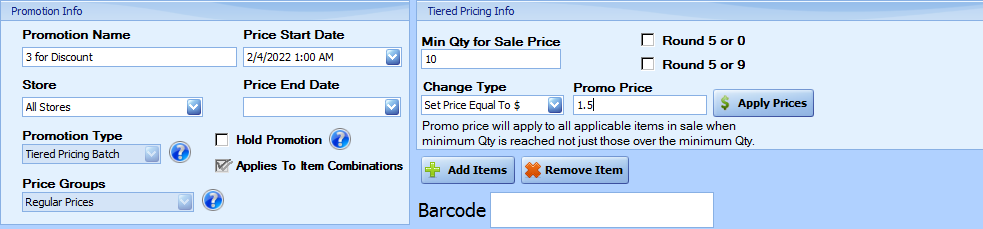
Tiered Pricing Batch – Used to set a discounted price after a certain quantity or $ value of items is purchased. For example, Regular Price $1.99 ea., 10 or more $1.50 ea.
-
Equal or Lesser Percent Batch – Used for “Buy one get one of equal or lesser value for 50% off” type scenarios
There is more info on how to setup each one of these promotion types later in this chapter.
Adding Items to the Promotion
After creating the promotion, the next step is to add the items to the promotion that will have the special selling prices. To do this:
-
Click the “Add Items” button.
-
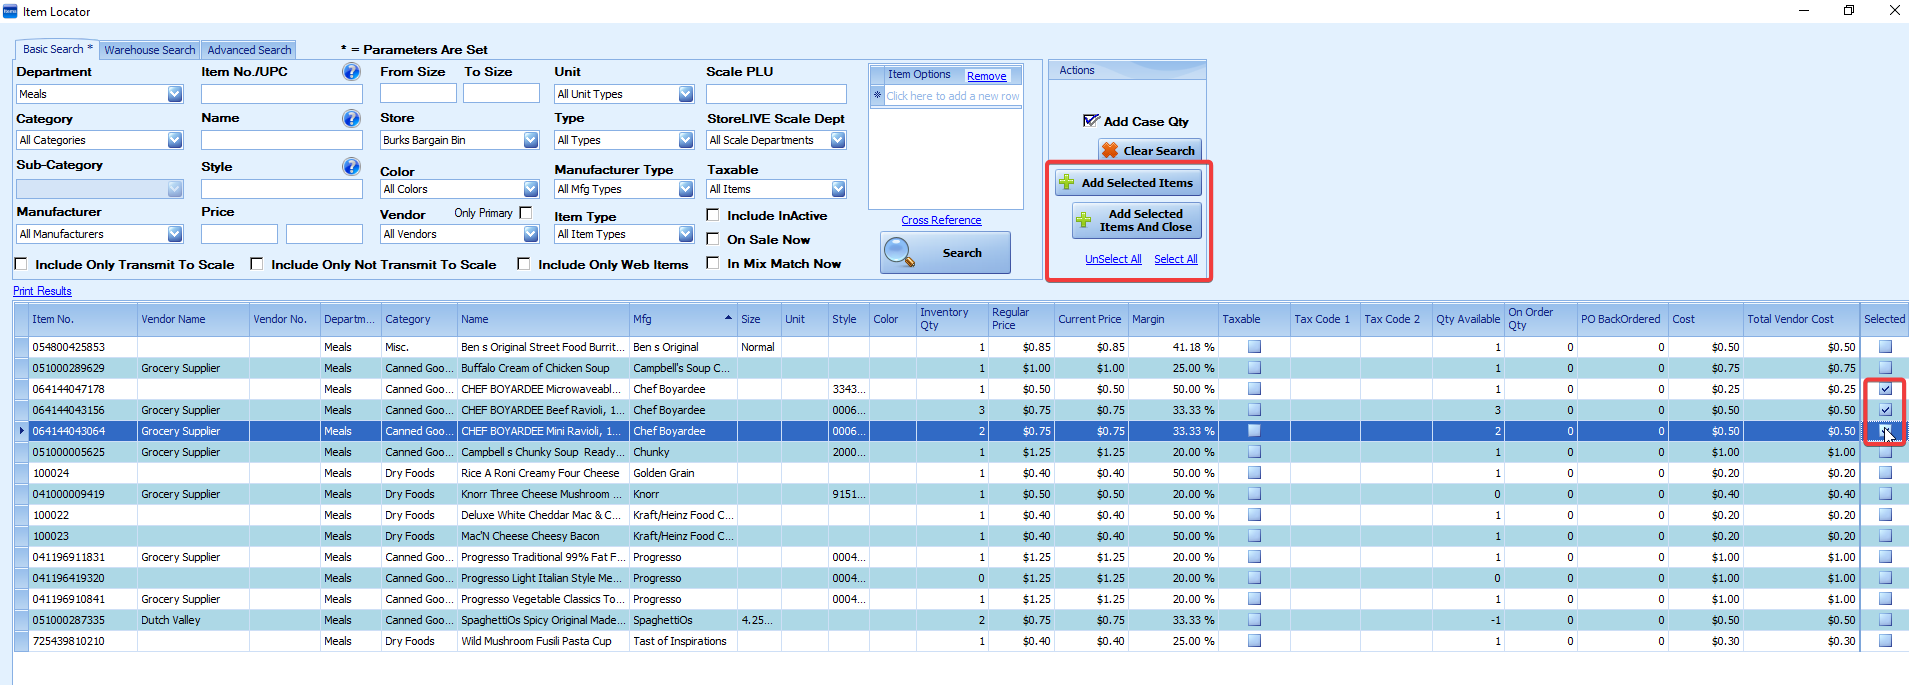
Using the Item Locator that appears, enter search criteria and click “Search” to display the item(s) that should be added to the promotion.
-
When items are displayed in the Item Locator search results, check “Selected” box next to each item that should be added to the promotion. You can also click the “Select All” link to select all items.
-
After selecting the items, click the “Add Selected Items” button. This will add the items to the promotion.
-
If you are prompted to “Apply Promotion Price to these Items”, choose No unless this is a Mix/Match type promotion.
-
This process can be repeated multiple times to add more items to the promotion.
Applying the Promotion Price
After items are added to the promotion, the final step is to setup the promotion prices. This can be done on an item by item basis, or it can be done by applying a percent or fixed dollar decrease to each item. This will vary by the promotion type selected. See the section on the specific type of promotion type for more information.
On Hold Promotion and Cancel Promotion Features
Cancel Promotion – This is used to “delete or remove” a promotion. Some reasons to use this would be if the promotion was entered in error, the promotion was canceled, etc.
Hold Promotion – This will keep the promotion from becoming active even if the “Price Start Date” passes. This can be used to hold a promotion if you are unsure when the promotion should go into effect. However the “Price Start Date” will need to be set to an earlier date.
Setting up a Sale Promotion
-
Follow the previous steps to create a new promotion.
-
On the Promotions screen, enter a promotion name, such as “20% Off Sale”.
-
In the Price Start Date Field, enter the date/time the 20% off prices should go into effect.
-
In the Price End Date Field, enter the date/time the promotion will be ended and the item prices should revert back to their regular selling prices.
-
In the Promotion Type dropdown, choose “Sale Promotion”.
-
Click the “Save” icon to save the promotion.
To apply a percent off of the regular selling price:
-
In the “Set Prices” section, select the “Discount Price By %” option from the Price Change dropdown.
-
In the Promotion Price field, enter the discount amount. (for example, to apply a 20% discount to an item, enter 20)
-
For more info on “Round 5 or 0” or “Round 5or 9” see the end of this section.
-
Click the “Apply Prices” button. This will calculate the discounted price and enter this in the “Promotion Price” field for each item.
-
Click Save to save the changes.
-
On the Point of Sale system, during the promotional period, the items on the promotion will ring up at the Promotion Price instead of the Regular Price.
Other Price Change Operations:
The Price Changes dropdown include additional options such as “Discount Price By $”. The usage of the “By $” types are the same as the percent off operation described above, except that it will change the price by the fixed $ amount instead of a %.
Setting up a Regular Price Batch
-
Follow the steps to create a new promotion and add items.
-
On the Promotions screen, enter a promotion name, such as “Update Regular Prices”.
-
In the Price Start Date Field, enter the date/time the new prices should go into effect.
-
Leave the Price End Date Field blank.
-
In the Promotion Type dropdown, choose “Regular Price Batch”.
-
Click the “Save” icon to save the promotion.
To apply new regular selling prices:
-
In the “Set Prices” section, select an option from the Price Change dropdown.
-
In the Promotion Price field, enter the discount or increase amount. (for example, to apply a 20% discount to an item, enter 20)
-
For more info on “Round 5 or 0” or “Round 5or 9” see the end of this section.
-
Click the “Apply Prices” button. This will calculate the new regular selling price and enter this in the “New Regular Price” field for each item.
-
Click Save to save the changes.
-
On the Point of Sale system, the new prices will take effect on the “Price Start Date.”
Setting up a Split Pricing Batch
-
Follow the previous steps to create a new promotion.
-
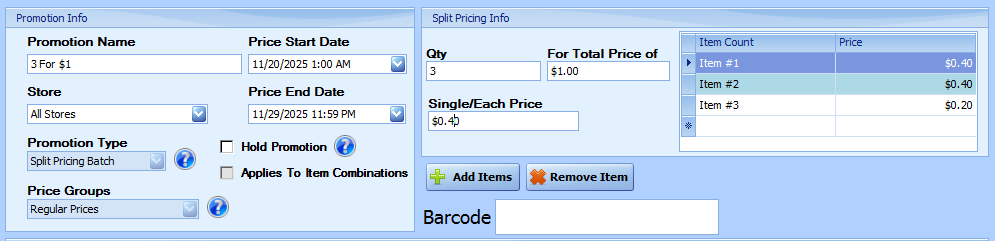
On the Promotions screen, enter a promotion name, such as “3 for $1.00”.
-
In the Price Start Date Field, enter the date/time “3 for $1.00” prices should go into effect.
-
In the Price End Date Field, enter the date/time the promotion will be ended and the item prices should revert back to their regular selling prices.
-
In the Promotion Type dropdown, choose “Split Pricing Batch”. (Promotion type can not be changed after saving
-
Check “Applies to Item Combinations” if the discount should be applied when any combination of the items on the promotion are sold. If this is unchecked items on the promotion will be counted individually before the discount is applied. For example, if the example above had 2 items on the promotion and 5 of each were added to a sale, the discount would not be applied unless “Applies to Item Combinations” was checked. (This cannot be changed after saving)
-
Click save.
-
In the Qty field under the “Split Pricing Info” Section, enter the number of pieces needed to be purchased to receive the special pricing
-
In the Price field enter the total special price (in the “3 for $1.00 example it would be $1.00)
-
In the Non-Promotional Price field enter the price that will be used if the item is not bought in the quantity to qualify for special pricing
-
The prices will be reflected on the far right under “Split Price Info” section
-
Click the “Save” button to save the promotion.
|
Note: If the Non-Promotion Price field is greater than Price divided by Qty the last item will ring up as a negative price. |
Tiered Pricing Batch
-
Follow the previous steps to create a new promotion.
-
On the Promotions screen, enter a promotion name
-
In the Price Start Date Field, enter the date/time the prices should go into effect.
-
In the Price End Date Field, enter the date/time the promotion will be ended and the item prices should revert back to their regular selling prices.
-
In the Promotion Type dropdown, choose “Tiered Pricing Batch”. (Promotion type can not be changed after saving)
-
Check “Applies to Item Combinations” if the discount should be applied when any combination of the items on the promotion are sold. If this is unchecked items on the promotion will be counted individually before the discount is applied. For example, if the example above had 2 items on the promotion and 5 of each were added to a sale, the discount would not be applied unless “Applies to Item Combinations” was checked. (This can not be changed after saving)
-
Click save.
-
Add the Items to the Promotion as described earlier in this chapter.
To apply a discounted price after a specified quantity is purchased:
-
In the “Tiered Pricing Info” section, set the Min Qty for Sale Price field to the Quantity that must be purchased in order for the discounted price to be applied. For example, in a case where the regular price is $2.00 ea., but 10 or more are $1.50 ea., set the Amount field to 10.
-
Select a discount type from the “Change Type” dropdown, and enter the discount % or Amount in the Change Amount field. For example, using the $2.00 ea./ 10 or more for $1.50 ea. scenario, set the Change Type field to “Set Price Equal to $”, and the Change Amount to 1.50.
-
For more info on “Round 5 or 0” or “Round 5or 9” see the end of this section.
-
Click Save to save the changes.
|
Note: A Tiered Pricing Batch will apply the discount to all the items on the sale that are in the promotion. Use the Equal or Lesser Value Batch to apply the discount to only the lowest priced item. |
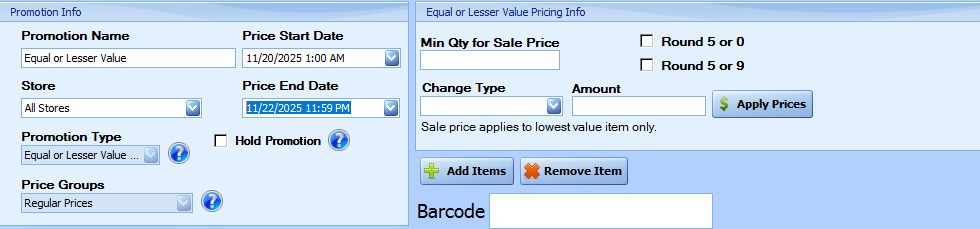
Equal or Lesser Value Batch
This is similar to Tiered Pricing Batch except that the discount only applies to one item of equal or lesser value.
-
Follow the previous steps to create a new promotion.
-
On the Promotions screen, enter a promotion name
-
In the Price Start Date Field, enter the date/time the prices should go into effect.
-
In the Price End Date Field, enter the date/time the promotion will be ended and the item prices should revert back to their regular selling prices.
-
In the Promotion Type dropdown, choose “Equal or Lesser Value”. (Promotion type can not be changed after saving)
-
Click Save.
-
Add the Items to the Promotion as described earlier in this chapter.
To apply a discounted price after a specified quantity is purchased:
-
In the “Equal or Lesser Value Pricing Info” section, set the Min Qty for Sale Price field to the Quantity that must be purchased in order for the discounted price to be applied. For example, in a case where the regular price is $1.99 ea., but if 2 are purchase one will be $1.50, set the Amount field to 2.
-
Select a discount type from the “Change Type” dropdown, and enter the discount % or Amount in the Change Amount field. For example, using the $1.99 ea. but “purchase 2 and get one at $1.50” scenario, set the Change Type field to “Set Price Equal to $”, and the Change Amount to 1.50.
-
For more info on “Round 5 or 0” or “Round 5or 9” see the end of this section.
-
Click Save to save the changes.
|
Note: With and Equal or Lesser Value Batch the POS will discount the lowest priced item that is included in the promotion. |
Mix Match Promotion
-
Follow the previous steps to create a new promotion.
-
On the Promotions screen, enter a promotion name
-
In the Price Start Date Field, enter the date/time the prices should go into effect.
-
In the Price End Date Field, enter the date/time the promotion will be ended and the item prices should revert back to their regular selling prices.
-
In the Promotion Type dropdown, choose “Mix Match Promotion”. (Promotion type can not be changed after saving)
-
Check “Applies to Item Combinations” if the discount should be applied when any combination of the items on the promotion are sold. If this is unchecked items on the promotion will be counted individually before the discount is applied. For example, if the example above had 2 items on the promotion and 5 of each were added to a sale, the discount would not be applied unless “Applies to Item Combinations” was checked. (This can not be changed after saving)
-
Click save.
-
Add the Items to the Promotion as described earlier in this chapter.
Types of Mix/Match Promotions
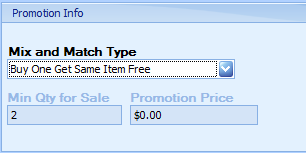
Buy One Get Same Item Free – This type of promotion allows for one of the more common types of sales, buy one item, and get a 2nd ‘same’ item free, such as buying a loaf of bread and getting a 2nd loaf for free.
Buy X Get Same Item Free – This type of promotion is similar to the previous one, except that in this promotion the number of items required to get one free can be set. Such as Buy 4 loaves of bread, get 1 free.
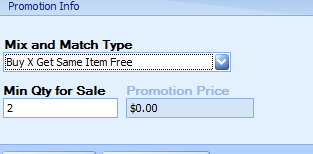
Do not include the item that is to be received free in the Promotion Qty Field
Buy X Get Same Item X Price – This promotion allows an item to be sold for a discounted cost, if it is purchased as part of a ‘set’ of multiple items, such as having a sale on packs of gum 3/$1. If 3 packs of gum are bought the total cost will equal $1.00, if less than 3 are bought they would ring up at regular price.

The item after the promotion Qty is filled will ring up at the price set in the promotion price field. In this example the Promotion Qty is set to 2, so the 3rd item would ring up at the promotion price. For instance, if the gum packs cost $0.35 each, the first two will ring up at $0.35, and the 3rd will ring up at $0.30 for a total cost of $1.00 (as shown in the above example).
Additional Setup Options
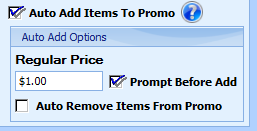
Auto Add Items To Promo – If checked, this option will allow items to be automatically added to the promotion if they match the specified price. This option also enables the additional options listed under “Auto Add Options.”
Regular Price – This field is used to set the price for which items will be added automatically to the promotion. For instance, if it is a 3 for $1 sale, typically the pricing that would qualify for the promotion would be $0.35 ea. With this field set to $0.35 any new items added at $0.35 will automatically get added to this promotion.
Prompt Before Add – This option dictates whether or not newly added items are automatically added to the promotion, or if a prompt appears to confirm the addition first.
Auto Remove Items From Promo – Similar to auto adding items, this option will automatically remove items that are already listed in the promotion if their pricing is changed back off of the specified price.
Setting up a Mix/Match Promotion using Item Maintenance
This method of promotion is not actively maintained and may not function as expected. Please validate its behavior prior to use.
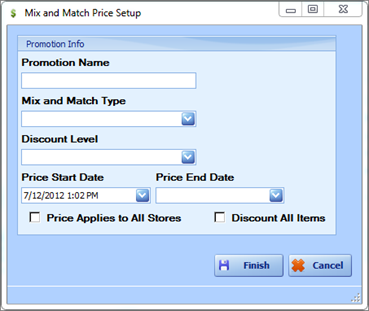
In addition to setting up a Mix/Match Promotion in the Promotions tab, a Mix/Match Promotion can be setup by finding a specific item in the Item Maintenance window for that item, and clicking the “Create Mix and Match Promotion” link under the pricing tab. The Mix and Match Price Setup that appears has many of the same options as setting up a Mix/Match Promotion through the Promotions button (found here); there are, however, some options that are not supported on the Promotions screen.
-
Discount All Items – Applies the discount to every item. Without this option the discount will only apply to any item purchased after the discount criteria is met. For example, this is the difference between a case of 12 all being discounted or just the 12th item being discounted.
-
Discount Level – Discount to be applied as part of the promotion, if any. The discounts in this menu are setup In the Settings menu under “Setup Discount Levels.”
-
Mix and Match Type – The type of Mix and Match promotion.

i. Buy One Get Same Item Free – Buy One Item and get a 2nd of the same item free
ii. Buy One of X Items Get Item Free – Buy One Item in the Item Group and get a 2nd item in the same group free. Add the appropriate items to the list
iii. Buy X Get Same Item Free – Buy X items of a specific item to get one free. For example Buy 3 Get One Free. Set the appropriate Promotion Qty.
iv. Buy X Get Same Item X Price – Buy X of one item and get the next for a discounted price. For instance buy 2 sodas at $1.50 each, get one for $1.00. Set the appropriate amount of items in the Promotion Qty that must be purchased before the promotional price is activated. Then enter the Promotional Price.
v. Buy X of X Items Get Item at X Price – Buy X items from a list of qualifying items to get one at a discounted price. For instance buying 3 sodas from a list of qualify sodas at $1.50 each, and then get one qualifying soda at $1.00. Very similar to the previous type except a list of items can be selected. Set the Promotion Price to the price of the discounted item. On the left set the Required Qty to the quantity or amount needed to be purchased before the discount applies. Set the Criteria Code to Qty. or Amount. Then add the items to the list on the right.

vi. Buy X of X Items Get Item Free – Buy X items from a list of qualifying items to get one item from the list free. Such as buying 2 qualifying t-shirts to get a 3rd t-shirt free. On the left set the Required Qty to the quantity or amount needed to be purchased before the discount applies. Set the Criteria Code to Qty. or Amount. Then add the items to the list on the right.
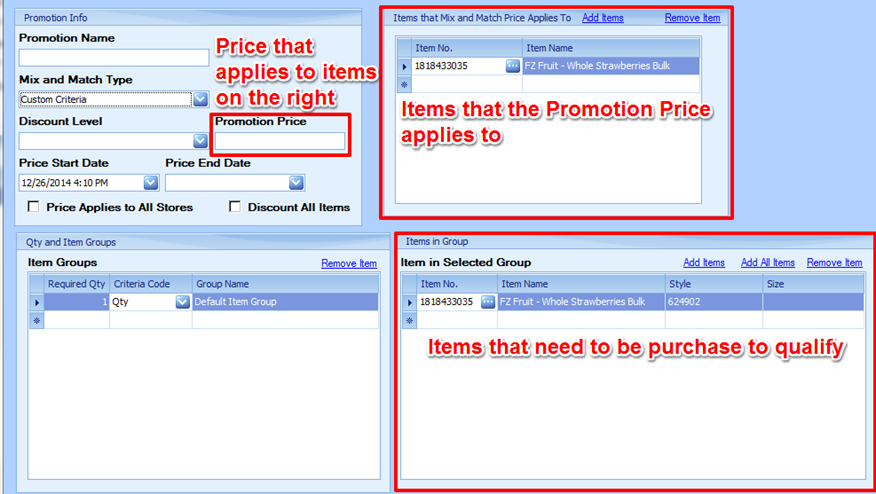
vii. Custom Criteria – this option is used to setup a more customized Mix/Match promotion. This option is only available using this method of setting up a Mix/Match Promotion, and is what will be used to set up a Price-Break promotion.
If the custom criteria option is selected there will be a new box in the upper-right corner that was not previously present. This box is used to list the items that the promotion will affect. Because of more complicated scenarios involving the Custom Criteria option, the items that are given at a reduced price are not always the same items that qualify the purchase for the promotion. For instance, a promotion could be set up where if 2 pairs of pants are bought they get 1 shirt free. The free shirt would go in this section.
See below for a step-by-step guide.
Setting up a Quantity – Price Break Promotion
A Quantity – Price Break promotion is a promotion where certain # of items must be bought, and once that criterion is fulfilled the items being purchased can be purchased at a reduced cost. One example of this would be providing a discount on a case of sodas. Each soda is an individual purchase price, but if you are buying a whole case each item in that case is rung up at the discount price instead.
-
To get started, click the Item Maintenance button in the StoreLIVE! Main menu.
-
Use the Item Locator window to search for an item you wish to create a promotion for and double click the item to open Item Maintenance. For help using this window please visit the Item Maintenance chapter.
-
Click the Price tab in the lower half of the screen in the Item Maintenance window, and click the “Create Mix and Match Price” link to the right-hand side.

-
Enter a Promotion Name for the promotion such as “Quantity Price Discount.”
-
Select Custom Criteria in the Mix and Match Type dropdown menu.
-
Enter the Start Dates and End Dates that the promotion should be active for in the Price Start Date and Price End Date fields.
-
In the Promotion Price field enter the promotional price the items should be sold at once the quantity criteria are met.
-
For this type of promotion, check the “Discount All Items” checkbox. Optionally also check the “Price Applies to All Stores” checkbox if this promotion should affect every store.
-
Enter the item that a price break should be given on in the “Items that Mix and Match Price Applies To” table in the upper right, as well as in the “Items in Group” table beneath it. The reason for this is that for this particular promotion, the item that qualifies the purchase for the special pricing are the same items that the discount will apply to.
10. Finally in the Item Groups category change the Required Qty to the # of items that have to be purchased to activate the discount. The item purchased after this one is the one that will activate and apply the discount. A qty of 11 tells the system that 11 items must be purchased prior to the discount becoming active. The 12th item will activate the discount.
Setting up a Discount after a Quantity or $ level is reached
The 2nd common type of custom promotion that can be implanted is a discount if either certain # of items is purchased or if an overall $ amount of spending is reached. In this example, a % discount on a purchase of $100.00 or more will be created.
-
To get started, click the Item Maintenance button in the StoreLIVE! Main menu.
-
Use the Item Locator window to search for an item you wish to create a promotion for and double click the item to open Item Maintenance. For help using this window please visit the Item Maintenance chapter.
-
Click the Price tab in the lower half of the screen in the Item Maintenance window, and click the “Create Mix and Match Price” link to the right-hand side.
-
Enter a Promotion Name for the promotion such as “10% off of $100 or more.”
-
Select Custom Criteria in the Mix and Match Type dropdown menu.
-
Enter the Start Dates and End Dates that the promotion should be active for in the Price Start Date and Price End Date fields.
-
Under the discount level dropdown select the discount that you wish to apply once the $ amount criteria is met.
-
Optionally also check the “Price Applies to All Stores” checkbox if this promotion should affect every store.
-
Enter the item(s) that should qualify towards the total $ amount spent in the “Items that Mix and Match Price Applies To” table in the upper right, as well as in the “Items in Group” table beneath it. The reason for this is that for this promotion the item(s) that qualifies the purchase for the special pricing is the same item that the discount will apply to.
10. Finally in the Item Groups category create a line that has the Criteria Code set to ‘Dollar Amount’ and enter 100 for the Required Qty. Also create a line with the Criteria Code set to Qty and set the Required Qty. to the number needed before the discount is activated. Note: When the Dollar amount criteria code is selected, the ‘Discount All Item’ checkbox may not be selected. This would cause the total amount to fall beneath the $ threshold, deactivating the discount.